The ThinLinc Administrator’s Guide
Version 4.14.0
Introduction
About the Documentation
This document is separated into five parts. This, the first part, is an introduction to the subject with general information about the product. The second part is about how to install different components in ThinLinc and integrate those with other systems, such as user account databases and file servers. Part three discusses the administration of ThinLinc after it is installed. The last part contains appendices with extra information.
Note
Before you start using ThinLinc, please read the release notes supplied in both Server and Client Bundles and online at https://www.cendio.com/thinlinc/docs/relnotes
Finding More Information
If you need more information about ThinLinc, contact your supplier and/or visit the ThinLinc homepage, http://www.cendio.com/. At the ThinLinc homepage you will find information about courses, upgrades, etc.
If you need more information about Linux, we recommend looking at the Linux Documentation Project homepage as well as the homepage for your Linux distribution.
ThinLinc Architecture
The goal of this chapter is to give a technical overview of how the system works for someone who will install or maintain a ThinLinc installation.
ThinLinc is a product for managing server based computing. The system is largely based on open source software, which has led to an expansion of the product to encompass solutions for authentication, availability systems, emulation and conversion between different computer systems. ThinLinc can be used as a gateway between different types of clients and a large number of base systems.
The system architecture allows an existing infrastructure to be maintained while a new architecture is gradually introduced to the organization. The system can be launched alongside the existing systems for a gradual migration to a new platform, and at the same time it acts as a link or gateway between the existing systems.
The architecture is designed to be flexible in order to handle larger organizations with autonomous office applications or functions, whilst maintaining management and security. The system can be supplemented with an automated system for installation, configuration and administration of the client hardware, such as through the use of PXE. It’s also possible to create different user groups. In this way departments with special needs are easily administered in the case of adaptations or user-driven application development.
Fig. 1 gives an overview of the ThinLinc architecture.
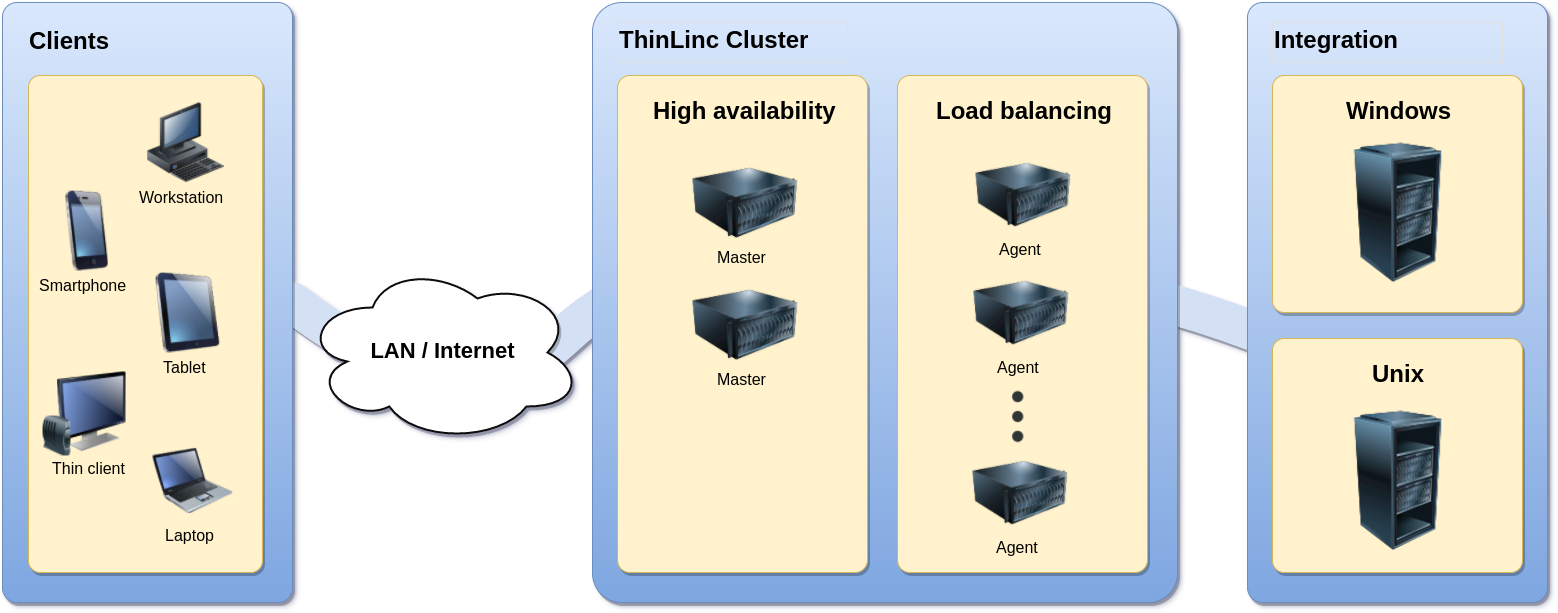
Fig. 1 The system architecture of ThinLinc
Several different devices can be used to connect to a ThinLinc system. ThinLinc client applications are available for Linux, macOS, Windows and selected thin terminals. ThinLinc Web Access is also available, enabling web browsers to act as ThinLinc clients.
The clients connect to a ThinLinc system located on the Local Area Network (LAN) or on a Wide Area Network (WAN) such as the Internet. Depending on the network type and the bandwidth available, several bandwidth-saving algorithms can be used to provide good performance even over narrow-banded links. Encryption is used to secure all information sent between the client and the server.
When a user connects to a ThinLinc server, a session is created. This session is the user’s starting point for running applications either on the ThinLinc server(s) or on other servers reachable from the ThinLinc server. ThinLinc has a Single Sign-On (SSO) mechanism that enables passwordless but secure logins to (for example) Windows Remote Desktop Servers and other Unix Servers running special applications.
The ThinLinc servers runs on Linux platform. There is support for High Availability and advanced two-level load balancing.
Session Overview
When a user logs in from a native ThinLinc client, the following will happen:
The client establishes a SSH tunnel to the server entered in the server field of the client interface. If this fails, then the login process will be interrupted and an error message will be displayed.
The client tries to authenticate with the VSM server, through the SSH tunnel. The VSM server (VNC Session Manager) is the main process of ThinLinc, responsible for allocating and keeping track of user sessions.
If the authentication succeeds, the server will check if there already exists a session for the user. If there is a session, then information about it will be returned. If there is no session a new one will be started on an agent server and information about it will be returned. If more than one agent server exists, load balancing will be used to select which server to start a session on.
The client now disconnects the SSH tunnel to the VSM server and checks the information it received to see which agent server it should connect against.
The client now establishes a new SSH tunnel to the VSM agent server it received information about from the VSM server. Port forwarding for VNC is always established, as well as other ports depending on which local devices have been enabled. All tunnels are multiplexed over the same SSH connection.
The client now starts the VNC viewer, which will connect to the remote VNC server via the SSH tunnel.
Installation
This chapter describes how to install the ThinLinc server software. To upgrade an existing installation, see Upgrading an Old Installation.
Read through any platform-specific notes for your distribution. These can be found at https://www.cendio.com/thinlinc/docs/platforms.
Install the ThinLinc Master machine, following the instructions in Installing the ThinLinc Remote Desktop Server.
Optionally, install an additional ThinLinc Master for a High Availability setup. More information regarding HA can be found in High Availability (HA).
Optionally, install the ThinLinc Agent machines, following the same instructions as for the ThinLinc Master. Instructions for setting up a cluster can be found in Configuring ThinLinc Servers in a Cluster.
Server Requirements
ThinLinc System and Software Requirements
Minimum requirements:
An x86_64 (or compatible) CPU
GLIBC 2.12, or newer
Python 3.4, or newer
RPM or dpkg support
Libraries and commands from LSB 4.1, specifically those listed in the Core and Printing modules (except LSB specific interfaces). Additionally, “libX11” is also required.
ss from iproute2
An SSH (secure shell) server
Accurate time synchronization between all ThinLinc servers
Optional requirements:
PyGObject and GTK+ 3.20 or newer
python-ldap
CUPS (Common UNIX Printing System)
As long as your platform fulfills the requirements above, ThinLinc should work as expected.
Server Sizing
The amount of computer resources needed to run a ThinLinc cluster varies greatly with the number of users, the type of hardware used for the servers, the application mix run by the users and the type of users. Trying to estimate the number of servers needed for a specific cluster is not something that can be done using a predefined table of facts. Instead decisions should be made based on benchmarks and experience.
Below, we will try to give some ideas on what kind of resources are needed based on customer experience. With time and experience from your own cluster with your own application set, you will work out your own set of figures.
It is important to remember that the ThinLinc load balancing feature makes it easy to add another server when the need arises. Start out with a number of servers and add more as the load increases.
Types of Resources
There are several types of resources needed in a ThinLinc cluster.
Disk
About 100MiB of disk is needed for the software and data being part of ThinLinc. Each active session also requires a very small amount of data (normally less than 100KiB) for storage of session data and the session log. In addition to that, there must be disk available for the operating system, the applications users run and logs.
CPU
The amount of CPU is very hard to estimate as it depends completely on the set of applications run by the users, and also on how active the users are as well as which response times are accepted by the users. A server that without problem copes with 100 users running LibreOffice calc updating a spreadsheet now and then will cope with a considerably lower amount of concurrent users if they are accessing internet sites with streaming video.
For a full desktop (KDE or Gnome) with typical office and internet applications (LibreOffice, Firefox, some graphics program and users visiting multimedia-intensive web pages, the amount of CPU needed is somewhere between 150 and 300MHz per active user.
The CPU figures above are based on experience from customers running Intel Xeon 7140M (Netburst) CPUs. For other types of CPU, the figures should be adjusted accordingly.
Memory
The amount of memory, just as the amount of CPU, is also very dependent on type application set and how active the users are.
For a full desktop (KDE or Gnome), expect the need for 100-200MiB of memory per user, not including the memory required for individual applications.
Preparing the Network for ThinLinc Installation
Naturally, the network at the site where ThinLinc is to be installed needs to be prepared for the installation. This section aims to help in understanding the requirements of the network for a successful ThinLinc installation.
We will explain the most common setups, including a typical Novell site and a typical Microsoft site. Also, we will explain how a site with NAT can use a NAT/Split-DNS setup to access ThinLinc in an efficient way both from the inside network as well as from the Internet.
A Simple ThinLinc Setup

Fig. 2 A simple ThinLinc setup
In Fig. 2, a very simple ThinLinc setup is shown. In this setup, clients are configured to connect to thinlinc.example.com, DNS is configured with information about what IP addresses correspond to the hostnames thinlinc.example.com, tlagent1.example.com and tlagent2.example.com and no firewalls are in the path between the clients and the servers.
The number of VSM agents will range from 1 (on the same host as the VSM server) to a larger number, based on the number of users that are using the system. In this example, there are one host running both VSM server (the software controlling the whole ThinLinc cluster) and VSM agent, and two dedicated VSM agent hosts running only sessions.
Clients will communicate with the servers solely via SSH (by default port 22).
ThinLinc in a Novell Network

Fig. 3 ThinLinc in a Novell network
In Fig. 3, ThinLinc is installed in a Novell environment, and integration with Novell eDirectory and/or Novell Netware fileservers are in use.
The ThinLinc servers will need to communicate with the eDirectory servers on either port 389, if using unencrypted LDAP, or on port 636, if using encrypted LDAP (ldaps).
The ThinLinc servers will also need to communicate with the Novell Netware file servers. In the case where NCP is used to access the files, the ThinLinc servers needs to communicate with the Netware servers on TCP or UDP port 524. In the case where NFS is used to access files, UDP port 111, TCP and UDP port 2049 and a range of dynamically allocated UDP ports are used to communicate with the file servers. If there is a firewall between the ThinLinc servers and the Netware file servers, it needs to have support for understanding portmap requests, opening NFS UDP ports on demand, or there can be no restrictions for the traffic between the ThinLinc servers and the Netware file servers.
ThinLinc in a Windows Network

Fig. 4 ThinLinc in a Windows network
In Fig. 4, ThinLinc is installed in a Windows environment, and integration with Windows Domain Services and/or Windows Fileservers are in use.
The ThinLinc servers need to communicate with the Windows Domain Controller on TCP port 139.
The ThinLinc servers will need to communicate with the Windows file servers using TCP port 139 and/or TCP port 445.
ThinLinc in a NAT/Split-DNS Environment

Fig. 5 ThinLinc in a NAT/Split-DNS environment
At many sites, the internal network is behind a firewall doing Network Address Translation (NAT). This means that the IP addresses on the internal network are allocated from so-called RFC 1918 space, i.e., they are within the range 10.0.0.0 - 10.255.255.255, 172.16.0.0 - 172.31.255.255 or 192.168.0.0 - 192.168.255.255.
As long as ThinLinc servers are only meant to be accessed from the internal network, this is no problem, and the situation will be like the one described in A Simple ThinLinc Setup. However, if the ThinLinc servers are meant to be accessed from the Internet as well, special arrangements need to be made.
Note
An alternative to using a split DNS configuration is to use a client
side translation configured by the HOST_ALIASES
parameter, but in most cases, a proper DNS setup is recommended. See
Configuration Parameters Used by the ThinLinc Client for more information.
Relays
First, relays must be configured in the firewall. One IP address reachable from the outside network per ThinLinc server needs to be available, and each should be equipped with a relay forwarding traffic from TCP port 22 on the outside to TCP port 22 on one specific ThinLinc server. In our example, as shown in Fig. 5, there is one relay listening to TCP port 22 on the externally reachable IP address x.12.253.1 forwarding traffic to the ThinLinc server on the internal network with IP address 10.0.0.12, one relay listening on TCP port 22 on the externally reachable IP address x.12.253.2 forwarding traffic to the ThinLinc server on the internal network with IP address 10.0.0.13, and so on.
DNS
After configuring the relays, DNS must be configured so DNS queries for the hostnames of the ThinLinc servers get different answers depending on the origin of the query. DNS queries originating from the internal network should be answered with the real IP addresses of the servers, and DNS queries originating from the outside network should be answered with the IP addresses on the firewall, where the relays are listening.
In our example, if a host on the internal network is asking for the IP address of the hostname thinlinc.example.com it should get the IP address 10.0.0.12 as answer. If a outside host is asking for the IP address of the same hostname it should instead get the IP address x.12.253.1 as answer.
When configured this way, a client connecting from the internal network will communicate directly with the ThinLinc servers, without the need to pass the firewall, while clients connecting from the outside will pass through the firewall and the relays to communicate with the ThinLinc servers. This will ensure optimal performance for clients from the internal network, at the same time lowering the load on the firewall.
Configuring the VSM Agents
Finally, after configuring relays and DNS, the VSM agents must be configured to respond with the correct hostname when asked by the VSM server what hostname the clients should connect to. The default behaviour is to respond with the IP address of the host, but that will not work in this case since clients connecting from the external network won’t have any route to for example 10.0.0.13. Instead, the VSM agents should be configured to respond with the hostnames that can be found in both the internal and the external DNS.
This is done by setting the parameter
/vsmagent/agent_hostname on each of the VSM agents in the
ThinLinc cluster. In our example, set
/vsmagent/agent_hostname to tlagent1.example.com on the
machine with IP address 10.0.0.13.
Using ThinLinc Web Access
If users are supposed to be able to connect using a web browser, using ThinLinc Web Access, they must be able to connect to port 300 on both the VSM server and on all VSM agents.
In the NAT/Split-DNS setup, relays must obviously be configured in the firewall for each ThinLinc server and the port 300.
Other Services Required by ThinLinc Servers
In order for ThinLinc to function properly together with the rest of the network, they will need to synchronize time with some internal or external time source. Linux machines use the Network Time Protocol (NTP), so if there is one or several NTP servers on the internal network, the ThinLinc servers will need to communicate with them. Otherwise, the ThinLinc servers should be configured to use some external time source, and should be allowed to communicate with it.
Installing the ThinLinc Remote Desktop Server
Starting the Installation Program
The installation program is located in the root directory of the Server Bundle. Extract the bundle and start the installation program as follows:
$ sh ./install-server
If you prefer, you can also install the ThinLinc packages by hand. These
packages are located in subdirectory packages of the Server
Bundle.
After installing the software packages, ThinLinc must be configured. This is done by ThinLinc Setup, which is started by running /opt/thinlinc/sbin/tl-setup. If install-server is used, it will ask about starting ThinLinc Setup automatically at the end of the package installation. ThinLinc Setup must be run on all ThinLinc servers that make up the ThinLinc cluster. The role of the server in the cluster can be specified at the start of ThinLinc Setup, it’s a choice between agent or master. Instructions for configuring newly installed master and agent machines to create a cluster can be found in Configuring ThinLinc Servers in a Cluster.
Automating ThinLinc Setup
You can automate ThinLinc Setup by providing it with an answer file. Begin by generating an answer template by running the following command.
$ /opt/thinlinc/sbin/tl-setup -g OUTPUT-FILE
A list of questions which ThinLinc Setup would ask is written to
OUTPUT-FILE . Edit this file with suitable answers for your
system. The file uses the same Hiveconf syntax also used for the
ThinLinc configuration files, described in Hiveconf. You can now
use the -a option for ThinLinc Setup to make it read answers
from the given file.
$ /opt/thinlinc/sbin/tl-setup -a INPUT-FILE
Upgrading an Old Installation
This chapter will detail the process of upgrading ThinLinc servers and clusters. There are several important items that has to be considered regarding ThinLinc upgrades:
It is required that all servers (including HA nodes) in a cluster are running the same ThinLinc version.
Users will not be able to reconnect to running sessions when the master service is stopped or when the agent service is stopped on the agent server running the session.
Users will not be able to create new sessions when the master service is stopped or when no agent servers are available.
Running sessions will be unaffected by a upgrade. This means that users can continue working. This also means that running sessions will not be getting the benefits from the new version.
Upgrading a Cluster
The recommended workflow for upgrading a ThinLinc cluster is as follows:
Review configuration changes in the release notes for the new release. More information regarding configuration migration can be found in Configuration Migration.
Check licenses and install new ones if needed. For details see New Licenses.
Schedule the upgrade and if necessary prepare the users on that reconnections or creation will be unavailable during the upgrade process. The command tl-notify can be used to send messages to users in running sessions. Documentation for this command can be found in Commands on the ThinLinc Server.
Stop the agent services on all agent servers. The command tl-ssh-all can be used to run commands on all agent servers in the cluster. Documentation for this command can be found in Commands on the ThinLinc Server. This step will prevent reconnections and the creation of new sessions.
Remove all agent servers from the cluster by clearing the configuration parameter
/vsmserver/subclusters/<name>/agentson the master. Details on this parameter can be found in Parameters in /vsmserver/subclusters/. Restart the master service to take the change into effect. If HA is used, do this on both master servers.Upgrade the master server. Details for installing an upgrade can be found in Upgrading the Packages and Configuration Migration. If HA is used, stop the master service on both master servers and then upgrade both servers.
Upgrade each agent server and manually add them back into the upgraded cluster. Upgrading agents works the same way as upgrading a master server. Add each upgraded agent to the configuration parameter
/vsmserver/subclusters/<name>/agentson the master. Restart the master service afterwards. If HA is used, do this on both master servers. Once at least one agent is added users will again be able to create new sessions.
Once all agent servers are upgraded and added back into the cluster all users will be able to reconnect to existing sessions and the upgrade is complete.
New Licenses
Before performing an upgrade the first step is to find out if new license files are required to run the new version. ThinLinc license files delivered with version x.y.z will still work for versions with the same x and y but higher z, but not for increased x or y. For example, license files for ThinLinc 3.1.0 will still work for ThinLinc 3.1.1, but not for ThinLinc 3.2.0 or ThinLinc 4.0.0.
As the new licenses will work with the old (current) version, it’s a good idea to install them as the first step in the upgrade process.
Upgrading the Packages
The same installation program that you used to install ThinLinc is also used to upgrade it. It is located in the root directory of the Server Bundle. Extract the bundle and start the installation program as follows:
$ sh ./install-server
and answer the questions. If you prefer, you can also upgrade the
ThinLinc packages by hand. These packages are located in subdirectory
packages on the Server Bundle.
If install-server was used, it will ask if ThinLinc Setup should be started at the end of the package upgrade. If ThinLinc Setup wasn’t started automatically, it should be started manually after the package upgrade by running /opt/thinlinc/sbin/tl-setup.
Configuration Migration
Once the packages has been upgraded, a decision will sometimes be required regarding how to migrate the configuration. When a conflict between the saved configuration and the configuration in the new release arises, a choice has to be made.
ThinLinc Setup will present choices regarding migration of Hiveconf
files. Conflicting files that aren’t Hiveconf files are not affected by
ThinLinc Setup. In these cases the package upgrade will have kept your
configuration in place and saved the new default values from the new
ThinLinc version as .rpmnew or .dpkg-dist versions of
the conflicting files. Potential migration of non-Hiveconf files has to
be done manually.
The three options that are presented in ThinLinc Setup are as follows:
Use the new Hiveconf files and migrate the parameters and values from the old files.
With this option, all configuration changes done in the earlier version are preserved. The configuration will be based on the new files. Values of parameters that have been moved or renamed in the new release will be migrated to the new parameters. Parameters that have been removed will be deleted. Comments will not be migrated. The file structure and file names may also be different. All parameters and values from the listed Hiveconf files are copied over. This means that unchanged parameters in these files will use the default values from the earlier release.
Note that a certain parameter will be defined if it is defined either in the new or old Hiveconf files. This means that if you have removed some parameters, for example one of the example profiles, those parameters will again exist after the migration. For profiles, however, this will not affect the user session, since profiles are only visible if they are also listed in the “order” parameter.
Parameters will be removed from the new Hiveconf files if they are defined elsewhere. For example, if
/vsmagent/agent_hostnamehas been moved fromvsmagent.hconftolocal.hconf, this change will be preserved.Use all old Hiveconf files.
With this option, all the old files are used. Custom comments and the file structure are preserved, but no new parameters or comments from the new release are introduced. Please note that configuration files which are identical in the old and new release are not listed or processed. This means that new default values in such files are introduced even with this option.
Ignore old Hiveconf files and use the new files.
With this option, the listed configuration files are ignored and the new files are used instead. Please note that configuration files which are identical in the old and new release are not listed or processed. This means that configuration changes to such files are preserved even with this option.
SELinux enabled distributions
ThinLinc is designed to run with reference SELinux policy and users in the unconfined context. It is possible to use ThinLinc with other policies and more restricted contexts, but will most likely require modifications to your policy to accommodate ThinLinc.
The local system policy will optionally be modified by ThinLinc Setup during installation. The SELinux module and other policy changes performed can be examined in /opt/thinlinc/share/selinux. Execute the command /opt/thinlinc/share/selinux/install to reapply ThinLinc’s policy changes.
Note
The ThinLinc policy module is distributed in source form and therefore requires the reference policy build environment. On Red Hat based systems this is always installed, but other systems might require extra packages.
VirtualGL
Overview
VirtualGL is used to provide server-side hardware 3D acceleration to applications displayed on a remote client. VirtualGL can be used with ThinLinc to provide accelerated graphics for OpenGL applications running in Linux environment.
Although ThinLinc is designed to work in combination with VirtualGL, VirtualGL is not developed or maintained directly by Cendio AB, and as such is not shipped as a part of the ThinLinc product.
Installation and configuration
Full documentation regarding the installation and configuration of VirtualGL can be found online at https://virtualgl.org/Documentation/Documentation.
Note
The following section numbers references the VirtualGL 2.3.3 documentation. Documentation for past or future VirtualGL releases may have different section numbers.
For the general case, it should be sufficient to consult the following sections:
5.1 - Installing VirtualGL on Linux
6.1 - Granting Access to the 3D X Server
And see also:
9.1 - Using VirtualGL with an X Proxy on the Same Server
For more advanced configuration, such as using a remote application server with VGL Transport, see the following sections:
6.3 - SSH Server Configuration
8 - Using VirtualGL with the VGL Transport
License Handling
Overview
To run a session against a ThinLinc cluster, the server must be equipped with license files. The license files specify the number of concurrent users the cluster is allowed to run.
If no license files are installed on the cluster, a maximum of ten concurrent users are allowed.
Each cluster can have one or several license files. Each file contains licenses for a specific number of concurrent users. When the VSM Server starts up, it reads all license files and creates a sum of the number of concurrent users allowed based on the licenses from all files.
License files have one soft and one hard limit. When the soft limit is reached, new sessions can still be started, but a license violation will be logged and sent to the administrator (see Log Files and E-mail Messages). If however the hard limit has been reached, new sessions cannot be started. The purpose of this system is to allow growing organisations some time to adapt the number of licenses to a growing number of concurrent sessions, avoiding loss of production.
License Counting
One license is required for each pair of (username, client hardware). This means that if a user runs several sessions from the same client, only one license is used. If the same user runs multiple concurrent sessions from different client hardware, multiple licenses are required by the user.
Location and format of License Files
License files are delivered either in the form of text files (filename
extension .license) or ZIP files (filename extension
.zip). Transfer each file to your ThinLinc master server and
place it in /opt/thinlinc/etc/licenses. Make sure that the
transfer of the files uses binary mode, or the license file might not be
verifiable. We recommend transferring via scp or sftp.
After adding new license files, either restart VSM Server by running /bin/systemctl restart vsmserver or wait until the VSM Server automatically reads in the new licenses, something that happens once every 12 hours.
Note
When running VSM Server in a High Availability setup (see High Availability (HA)),
license files should be copied to /opt/thinlinc/etc/licenses
on both nodes.
Log Files and E-mail Messages
ThinLinc logs user license violations to the file
/var/log/thinlinc-user-licenses. Other license-related messages
are logged to /var/log/vsmserver.log.
If license violations occurs, ThinLinc sends email to the person defined
as system administrator in the parameter
/vsmserver/admin_email in vsmserver.hconf. E-mail
messages warning about license violations are sent every 12 hours if any
license violations have occured.
Checking the Number of Valid Licenses
You can use the program /opt/thinlinc/sbin/tl-show-licenses to verify the number of valid user licenses. There is also a graph available in the administrative interface. See The Status Module for more information.
Printer Features
ThinLinc has several printer-related features that aims to provide the user with maximum flexibility while making the administrator’s work easier. A ThinLinc system normally uses CUPS (Common Unix Printing System) to provide normal printing services. By integrating with CUPS, ThinLinc also provides the following features:
Local Printer support allows users to print documents on a printer that is connected to their terminal from applications running on the ThinLinc server.
See Local printer support for documentation on this feature.
Nearest Printer is a feature that simplifies the printing process for the user by automatically printing to a printer that is located at the terminal the user is currently using. Users only need to know that they should always print to the nearest printer - the system will figure out the rest based on a database of terminals, printers and locations, eliminating the need to learn the names of printers at different locations. This decreases the need for support.
See Nearest printer support for documentation on this feature.
Printer Access Control uses the same database of terminals, locations and printers as the Nearest Printer feature to dynamically limit which printers a user may print to based on the terminal the user is currently using. This feature also limits the list of printers seen by each user to the printers the user are allowed to use, simplifying choice of printer for the user by only showing the printers that are relevant at the current location.
See Printer Access Control for documentation on this feature.
Printer Configuration Overview
This section provides an overview of how printing is configured in a ThinLinc cluster.

Fig. 6 Printer Configuration Overview
CUPS Browsing
It is important that the CUPS Browsing feature is turned off on all machines in the cluster, or problems with duplicate thinlocal printers will occur.
CUPS configuration on the Machine Running VSM Server
Configure all printers that need to be available in the CUPS configuration on the machine running VSM Server. Either use distribution-specific tools, or the built-in administration interface in CUPS which can usually be reached by using a web browser, connecting to port 631 on the machine, i.e. http://tl.example.com:631/.
The nearest and thinlocal queues, used by the nearest printer and the local printer features respectively, are added by ThinLinc Setup.
Printers, with one exception (see below) only needs to be configured on the machine running VSM Server. Agent nodes will use the CUPS daemon (cupsd) on the VSM Server machine for printing.
CUPS configuration on the Machine running VSM Agent
The machines in the cluster that run VSM Agent, i.e., the machines that host user sessions, needs a running CUPS daemon (cupsd), but this cupsd only needs one printer defined - the thinlocal queue. The reason for this is that the local printer backend needs to run on the same machine as the session of the user printing to local printer to be able to access the endpoint of the SSH tunnel used to transport the printer job to the client.
The thinlocal queue is added by ThinLinc Setup when installing the agent.
Note
The CUPS daemon on each agent must listen to requests on the network interface, and allow printer jobs from the machine running VSM Server to be submitted to the thinlocal queue.
When a user submits a job to the local printer, i.e. to the thinlocal queue, the printer job will be submitted to the CUPS daemon running on the VSM Server host. It will then be respooled to the cupsd on the agent server hosting the session. This is to make central configuration of all other printers possible.
Local printer support
Theory of operation
With ThinLinc, it is possible to print to a printer attached to the client computer. Two primary modes of operation available: device independent and device dependent. Both modes can be used at the same time. See below for details about the two modes.
The thinlocal printer is cluster-aware. If a user submits a print job on a node in a ThinLinc cluster which does not host the users session, the print job will automatically be respooled to the correct node. This is used in the recommended setup (see Printer Configuration Overview).
If a user has more than one session, print jobs submitted to the local printer will be redirected to the client that made the last connection.
The local printer features is implemented as a backend to CUPS (Common Unix Printing System).
Note
When using local printers, we recommend that you activate the
parameter /vsmserver/unbind_ports_at_login.
Device independent mode
The device independent mode is designed to provide universal access to any local printer without having to install drivers on the ThinLinc server. This is achieved by converting the print job to the Adobe Portable Document Format (PDF) on the remote desktop server, and then sending it through an encrypted tunnel to the client. The client subsequently prints the job on the local printer using a built-in PDF renderer.
Because the driver on the ThinLinc server is device independent, it has no way to know what capabilities (duplex ability, trays, paper size, etc.) the printer connected to the client has. At the same time, applications that want to print needs to know about these capabilities to print correctly.
As a compromise, the universal printer is configured with a PPD (Postscript Printer Definition) that covers a broad range of printer capabilities - it’s a Generic Postscript Printer driver. This makes it possible for CUPS to convert input formats to the correct format before sending them to the local printer. It also means that default values can be set for some of the configuration parameters, for example paper size, using the CUPS configuration interface.
Device dependent mode
The device dependent mode is to be used when it is necessary to access all options on the printer, or when the communication with the printer cannot be expressed in terms of normal pages (e.g. a label printer). In this mode the printer driver is installed on the ThinLinc server and the data is sent unmodified to the local printer.
Note
ThinLinc has no way of verifying that the connected printer is the correct one, so it is up to the user to make sure that a device dependent queue is not used with a different printer.
Installation and Configuration
Use ThinLinc Setup to install the PDF conversion filter, the backend and queue in CUPS on all machines running VSM Agent. This adds a new queue named thinlocal to CUPS and makes it available to your users. This queue is the one to use for device independent mode described above.
After installation, the local printer is ready for use. Make sure your ThinLinc client is configured to allow redirection of printers, then print to the thinlocal queue, and the job will be rerouted to the default printer of the client you’re currently using.
Device dependent queues are installed as if installing the printer
locally on the ThinLinc server. The only difference is that the URI
shall be specified as thinlocal:/. Example:
$ sudo lpadmin -p thinlocal-label -v 'thinlocal:/' \
   -P /media/cd/label-printer.ppd
Parallel port emulation
ThinLinc also includes a very basic form of parallel port emulation that gives legacy application access to the local printer. It is built on top of the thinlocal queue, which means it only works if certain requirements are satisified:
The application must only write to the port. Reading is not supported, neither is monitoring or altering the port status pins.
After a print job is completed, the application must close the port. As the emulation is unaware of the printer protocol, closing the port is the only way it can determine where one job ends and another begins.
To access the emulated parallel port, configure the application to use
the port $TLSESSIONDATA/dev/lp0.
Nearest printer support
With the ThinLinc nearest printer feature, printer jobs are sent to a printer selected based on the physical address of the users terminal. This is typically used to implement printer queues based on physical proximity.
The nearest printer is implemented as an extra printer queue, on top of the real printers. Printer jobs sent to the nearest queue will be sent to the nearest printer backend. The backend is a program which is called by CUPS together with all needed information. The backend will look at the user name requesting the printout and ask the ThinLinc VSM server for more information about this user. The information includes which terminal the user is currently using. The backend then queries the information stored in Hiveconf for a list of printers that are considered near the terminal used by the printing user. When a printer is known the backend will place the job in that printer queue.
The nearest queue is added to the VSM master server by ThinLinc Setup. The recommended setup is to configure one nearest printer queue in the CUPS daemon on the VSM Server host, and then let all agents use this CUPS daemon. See Printer Configuration Overview for an overview of printer setup in a ThinLinc cluster.
Administration of the Nearest Printer Feature in ThinLinc
The nearest printer system needs information about groups of terminals, known as locations, which typically represents some physical layout. The information connects terminals to locations and also links printers to the locations. Available printers are automatically fetched from the underlying printing system and are available for assigment to locations and/or terminals.
Information about terminals, locations and their associated printers can be administrated using the ThinLinc Web Administration, see The Locations Module.
Each location should be entered with a name, and may have an optional description. A location can for example represent a classroom, a department, a house, and so on. Each location can be associated with one or more printers, including the special nearest and thinlocal printers. Typically it will include all printers available near that physical location the location represents. If the location is so big that different printers are close to different parts of the location, then you should probably divide the location into smaller parts, each represented by a separate location.
A location can be set to handle clients which are not defined using a terminal definition (“unknown terminals”).
Each terminal in the ThinLinc Web Administration represents one physical
terminal in the installation and is defined by its terminal network
interface hardware (MAC) address. The hardware address can be entered in
many formats, but will be converted to all uppercase hexadecimal form
separated by colon, i.e. 01:23:45:67:89:AB.
A terminal must be associated with a location.
Nearest Printer Selection Algorithm
If a terminal has a printer directly assigned to it in the terminals module in tlwebadm, that printer will be the nearest printer for that terminal. For terminals without a printer directly assigned (the normal situation), the first printer in the list of printers for the terminal’s location is selected when the user submits a printer job to the nearest queue.
If the client is not a known terminal, i.e. its hardware address was not found, it will use the printer for the location marked as handling unknown terminals. If not, there will be no printer available.
If a user is using multiple sessions, print jobs submitted via nearest printer will be redirected to the printer that is found starting from the client that made the last connection.
Printer Drivers
When printing via the nearest printer, the CUPS client can’t get hold of all information about the real printer where the job will actually be printed, because it doesn’t know that the printer job will be rerouted by the nearest driver. Therefore, the printing application has no way to know about the number of trays, the paper sizes available etc.). This is a problem for some applications, and it also adds to the number of applications that will be misconfigured, for example selecting the wrong paper size.
As a compromise, the nearest printer is configured with a PPD (Postscript Printer Definition) that covers a broad range of printer capabilities - it’s a Generic Postscript Printer driver. This makes it possible to configure default values for some of the settings, for example paper size, using the CUPS configuration interface.
If all the printers in your organisation are of the same type, it may be a good idea to replace the Generic Postscript PPD installed for the nearest queue with a PPD for the specific printer in use. That will let CUPS-aware applications select between the specific set of features available for the specific printer model.
Printer Access Control
In a ThinLinc cluster, all printers that any user of the cluster needs to be able to print to must be defined centrally, or the user will not be able to print from applications that run in a ThinLinc session. For large installations, this leads to a very long list of available printers.
A long list of printers leads to usability problems - having to select printer from a long list can be troublesome. Also, it opens for problems with printer jobs being printed at remote locations by mistake (or on purpose, by users finding it amusing to send “messages” to other locations).
The solution to this problem is the Printer Access Control feature of ThinLinc. By integrating with CUPS (the Common Unix Printing System), the list of printers a user is presented with and allowed to print to is limited to the printers that should be available to a specific terminal, based on information in a database of printers, terminals and locations.
Note
The Printer Access Control feature will affect all users on the ThinLinc cluster. The only user excepted from limitations of the printer list is the superuser (root) - all other users will only see and be able to use printers based on the location of their terminals, when the Printer Access Control feature is enabled.
Theory of Operation
Each time a user requests a new session or reconnects to an existing session, the hardware (MAC) address of the terminal is sent along with the request from the ThinLinc client. Using the same database as the nearest printer feature used to find which printer is closest to the user, the printer access control feature calculates which printers the user is allowed to use, and then configures the access control of the printing system (CUPS).
This way, the user is presented with a list of printers that only contains the printers relevant for the location where the terminal the user is currently using is located. In a situation where a user has multiple sessions running from multiple clients, all printers associated with the different terminals will be made available.
Requirements
CUPS v1.2 or higher.
Activating the Printer Access Control Feature
First, make sure you have configured the printers in your ThinLinc
cluster as documented in Printer Configuration Overview. For the
Printer Access Control Feature, a central CUPS daemon on the VSM Server
host is required, and all agent hosts must have a correctly configured
/etc/cups/client.conf.
To activate the printer access feature, create two symlinks on the host running VSM Server, as follows:
$ sudo ln -s /opt/thinlinc/sbin/tl-limit-printers \
   /opt/thinlinc/etc/sessionstartup.d
$ sudo ln -s /opt/thinlinc/sbin/tl-limit-printers \
   /opt/thinlinc/etc/sessionreconnect.d
The first symlink makes sure tl-limit-printers is run when sessions are started. The second makes sure it is run at reconnects to existing sessions. More details about the session startup can be found in Customizing the User’s Session.
Note
With the above configuration (symlinking tl-limit-printers
into sessionstartup.d and sessionreconnect.d), the
client will not get an answer back from the server until
tl-limit-printers has finished its execution. This is the
desired behaviour if it is strictly neccessary that printer access
rights are correct when the user connects to the session. In
environments where it is acceptable that the final list of printers
shown to the user may not be finished when the user connects to the
session, place the execution of tl-limit-printers in the
background, as detailed in
Scripts run at session startup/reconnect, as that will decrease
the time the user has to wait for the session to appear on his client.
After creating the symlinks, try connecting to your ThinLinc cluster with a ThinLinc Client and bring up an application that lists the available printers. The list of printers should now be limited according to configuration.
Note
The printer list limitation doesn’t work for applications that use the deprecated “cupsGetPrinters” library call. This means that older applications might show the whole list of printers. The access control are still enforced, which means that even if a disallowed printer is shown in the list of printers, users can’t submit jobs to it.
Most applications in a modern Linux distribution doesn’t have this problem.
Configuration
Configuration of the printer access control feature is mostly a matter of using tlwebadm (see The Locations Module for details) to add the hardware address of all terminals as well as information about where they are located and which printers are to be available for each location.
Unknown Terminals / Terminals Without Hardware Address
When a client reports a hardware address that is not present in the database of terminals, or when no hardware address is reported, the default behaviour is to disallow access to all printers, rendering an empty printer list for the user.
There is however a way to give even unknown terminals access to one or more printers - define a special location and check the Use for unknown terminals and terminals without hardware address checkbox. Then add the printers that should be available for the unknown terminals.
One common configuration is to add such a location and then add the thinlocal printer to this location. This way, unknown terminals, for example people working from their home computers, will be able to user their locally connected printer, but no other printer will be available.
High Availability (HA)
This chapter describes how to setup ThinLinc with High Availability (from now on referred to as “HA”) for the VSM server. Since the VSM server service handles load-balancing and the session database, it can be problematic if the machine fails. ThinLinc HA provides protection for this service against the single point of failure that the hardware running the VSM server normally is.
The basic principle behind this setup is to have two equal machines, both capable of running VSM server. If one of the machines goes down for some reason, the other machine will take over and serve VSM server requests with no or short interruption of service.
Note
The HA functionality provided by ThinLinc provides synchronization of the ThinLinc session database across two VSM servers. The software used by these machines to implement failover is not part of ThinLinc, and must be installed and configured according to your requirements. The industry standard for doing so on Linux is provided by Pacemaker and Corosync, see https://clusterlabs.org for more information.
High Availability Overview
Background - Reasons For a HA Setup
In a standard ThinLinc setup, there is a single point of failure - the machine running the VSM server. If the VSM server is down, no new ThinLinc connections can be made, and reconnections to existing sessions can’t be established. Existing connections to VSM agent machines still running will however continue to work. A ThinLinc cluster of medium size with one machine running as VSM server and three VSM agent machines is illustrated in Fig. 7.

Fig. 7 A non-HA ThinLinc cluster setup
Here the incoming connections are handled by the VSM server which distributes the connections to the three VSM agent machines. If the VSM server goes down, no new connections can occur. The VSM server is a single point of failure in your ThinLinc setup.
Solution - Elimination of Single Point of Failure
In order to eliminate the single point of failure, we configure the VSM server in a HA configuration where two machines share the responsibility for keeping the service running. Note that ThinLinc’s HA functionality only handles the parts of your HA setup that keeps the ThinLinc session database syncronized between the two machines. Supplementary software is required, read more about this in Theory of Operation.
When ThinLinc as well as your systems are configured this way, the two machines are in constant contact with each other, each checking if the other one is up and running. If one of the machines goes down for some reason, for example hardware failure, the other machine detects the failure and automatically takes over the service with only a short interruption for the users. No action is needed from the system administrator.
Theory of Operation

Fig. 8 A ThinLinc HA cluster setup
In a HA setup, as illustrated in Fig. 8 two equal machines are used to keep the VSM server running. One of the machines is primary, the other one is secondary. The primary machine is normally handling VSM server requests, but if it fails, the secondary machine kicks in. When the primary machine comes online again, it takes over again. That is, in normal operation, it’s always the primary machine that’s working, the secondary is just standby, receiving information from the primary about new and deleted sessions, maintaining its own copy of the session database.
Both machines have an unique hostname and an unique IP address, but there is also a third IP address that is active only on the node currently responsible for the VSM server service. This is usually referred to as a resource IP address, which the clients are connecting to. ThinLinc does not move this resource IP address between servers, supplementary software is required for this purpose.
Configuration of ThinLinc for HA Operations
In this section, we describe how ThinLinc is configured for High Availability.
Installation of a New HA Cluster
In this section, we will describe how to setup a new HA cluster. In the examples we will use a primary node with the hostname tlha-primary and IP address 10.0.0.2, a secondary node with the hostname tlha-secondary and IP address 10.0.0.3, and a resource IP address of 10.0.0.4 with the DNS name tlha.
Begin by installing ThinLinc as described in Installation on both nodes.
Both nodes in the HA cluster must have the same SSH host key. Copy
/etc/ssh/ssh_host_*from the primary host to the secondary host, and restart ssh on the secondary host.Install and configure the system-level high-availability software, for example the software provided by the ClusterLabs project, which can be found at https://clusterlabs.org. This and other high-availability software may also be provided as part of your distribution, so check for the solution which best fits your requirements before proceeding.
Configure the system’s high-availability software to watch the status of the other machine via the network, and to enable the resource IP address 10.0.0.4 on the active node. The machine with the hostname tlha-primary should normally be active.
Configure each VSM agent to allow privileged operations both from tlha-primary and tlha-secondary:
$ sudo tl-config '/vsmagent/allowed_clients=tlha-primary tlha-secondary'
Also, set the
/vsmagent/master_hostnameto the DNS name of the HA interface:$ sudo tl-config /vsmagent/master_hostname=tlha
Restart all VSM agents after changing the configuration values.
If the tl-config command is not found, logout and login again in order to let the login scripts add
/opt/thinlinc/binand/opt/thinlinc/sbinto the PATH.Verify operations of VSM Server on both nodes. Make sure you can start the VSM server properly on both hosts, and connect to the respective hosts when VSM server is running (i.e., it should be possible to connect, using tlclient, to both tlha-primary and to tlha-secondary).
Both nodes should be configured with the same subcluster configuration.
Warning
It is very important that 127.0.0.1 is not in the list of agent servers of any subcluster. If the machines running VSM server are also VSM agents, their unique hostnames or IP addresses must be added to
/vsmserver/subclusters/<name>/agentsinstead of 127.0.0.1. The reason for this is that 127.0.0.1 will be a different server based on which VSM server is currently active.After verifying that normal ThinLinc connections work as intended when using both the primary and the secondary VSM server’s hostname, it is time to enable HA in the VSM servers. This is done by setting
/vsmserver/HA/enabledto1, and by specifying the nodes in the cluster in/vsmserver/HA/nodes. For example:$ sudo tl-config /vsmserver/HA/enabled=1 $ sudo tl-config '/vsmserver/HA/nodes=tlha-primary.example.com tlha-secondary.example.com'
Configuration should be identical on both nodes. Restart the VSM server on both nodes after configuration.
If vsmserver can’t safely determine which of the two nodes in
/vsmserver/HA/nodesis the remote node, and which is the local node, it will start without HA enabled, and log a message. If this happens, validate your hostname and DNS setup. One of the entries of/vsmserver/HA/nodesmust match the local machine. Either the resolved IP of one of the entries in/vsmserver/HA/nodesmust match the local IP, or one entry must exactly match the local hostname as returned by uname -n.Once HA has been configured, tests should be performed in order to confirm that the failover works as expected. This can normally be done by simply removing the network cable from the primary node, and ensuring that the secondary node then takes over. Check also that any active ThinLinc sessions have been synchronized from the primary to the secondary node, and that logging in to such a session on the secondary node succeeds once the primary node has been disabled.
Your ThinLinc HA cluster is now configured! When sessions are created, changed or deleted on the currently active node, the information about them will be transferred to the other node using a inter-VSM server protocol. If the other node has to take over service, its copy of the session data will be up to date, and it can start serving new requests instantly. When the primary node comes up again, the secondary node will resynchronise with the master.
Reconfiguring an existing ThinLinc Installation into HA mode
If you have an existing ThinLinc installation and want to eliminate the single point of failure (the VSM server), the procedure is very much like the procedure for installing a new HA cluster.
Recovering from hardware failures
If situations occur where the secondary node has been forced to take over service because the primary node failed for some reason, it’s important to know how to recover.
Recovering from Minor Failures
If the primary went down because of a minor failure (overheating
trouble, faulty processor, faulty memory etc.) and the contents of the
files in /var/lib/vsm are untouched, recovery is very simple and
fully automatic. Simply start the server and let the two VSM servers
resynchronize with eachother.
Recovering from Catastrophic Failure
If a catastrophic failure has occured, and no data on the disks of the primary can be recovered, ThinLinc needs to be reinstalled and HA must be reinitialized.
Install ThinLinc as described in Configuration of ThinLinc for HA Operations, but before starting
the VSM server after enabling HA in the configuration file, copy the
file /var/lib/vsm/sessions from the secondary to the primary.
That will preload the database of active sessions with more current
values on the primary.
The ThinLinc Client
This chapter describes the ThinLinc Client and how to use and configure it. Please see Client Platforms for installation instructions and details specific to each platform where the client is available.
Client usage
Starting the ThinLinc client is normally easy, but the method can differ somewhat between the available operating systems. See Client Platforms for instructions on how to start the client on different platforms.
The started ThinLinc client
When the ThinLinc client is started it will show the login window. This window contains a ThinLinc logo, text fields where needed information can be entered, buttons for control and at the very bottom a status field that gives information about the login procedure.
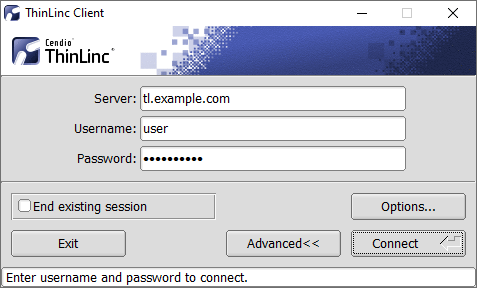
Fig. 9 The ThinLinc client login window
Logging in to a ThinLinc server
To login into a ThinLinc server the client needs to do a successful user authentication. This means that it needs to tell the ThinLinc server a user name and a corresponding authentication information (a password or an encryption key). The ThinLinc server controls that the information is valid and accepts or denies the login attempt.
The things the client needs to know to successfully login the user against a ThinLinc server is a server address, a user name and the corresponding authentication information. When the client is normally started it will display two text fields labeled Server and Name, and one text field labeled Password, Key or Certificate. This can differ some depending on command line arguments, but this is the normal behavior.
Accepted values for the server field is the hostname or the IP address of the server. The name field should be filled in with the ThinLinc username. The authentication information needed depends on the type of authentication used:
For password authentication, a plain text password should be entered. The password won’t be shown as clear text when entered.
For public key authentication, the path to an encryption key must be entered or browsed to using the … button.
For smart card authentication, a certificate must be chosen using the drop down menu next to the certificate name field.
The server name, username, key path and certificate name are saved when the user tries to start the session, so they don’t have to be entered again each time a new session is wanted.
When the user has entered server address, username and authentication information, it becomes possible to login. This is done by pressing the Connect button or the Enter key on the keyboard. The client will then try to establish a connection with the ThinLinc server. If any of the fields has a bad value that prevents the client from successfully logging in, for example if the username or password is incorrect, there will be response message shown as a message box with the suiting information.
Note
By default, usernames are case-sensitive when logging in via the
ThinLinc client. This behaviour may be changed using an option in the
client configuration file - see LOWERCASE_LOGIN_NAME in
Configuration Parameters Used by the ThinLinc Client for details.
If the login attempt is successful a ThinLinc session will start, an old one will be reused or a session selection box might be presented, all depending on the client’s settings and how many sessions the user has running. See Advanced tab for more information on how the choice is made.
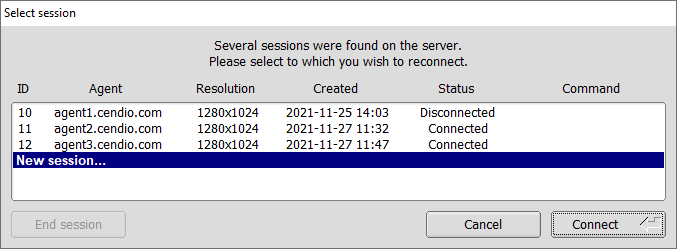
Fig. 10 The ThinLinc client session selection window
The session selection window presents the user with a list of relevant sessions and several buttons to act on those sessions:
- Connect
Connect to the selected session, or create a new session if the current selection is Create new session….
- End session
Forcefully terminate the selected session and restart the connection procedure.
- Cancel
Abort the connection and return to the main window.
The server will then prepare a graphical session on a ThinLinc server. The client then connects to this session and displays it. Normally the user now sees a dialog with different session options. The user can there select for example to run a Linux session or a Windows session. Depending on the choice the server at the other end will start that kind of session.
Language Settings
The ThinLinc client gets all its strings from a database. This way it can be easily translated, by just providing a new database for a new language.
On Linux based systems, the client picks up which language to use by reading the standard POSIX locale environment variables. A somewhat simplified description of these follow here:
- LC_ALL
If this environment variable is set, it takes precedence over all other locale variables. It will affect all locale settings, including message strings, sorting order, money representation, decimal numbers, etc.
- LC_MESSAGES
If LC_ALL is not set but this one is, it will make the messages of the client adhere to the language in question, in effect making the client use that language. There are several other variables of this kind, but they do not affect the ThinLinc client.
- LANG
If LC_ALL is not set then the value of this variable will be used for all locale categories that are not explicitly set, e.g. LC_MESSAGES.
There is also a variable called LANGUAGE on some systems, but it is non-standard, and we do not recommend the use of it.
If none of these variables are set, the locale defaults to C, which
in practice means American English. The value of the variables should be
of the form language_country, where language and country
are 2 letter codes. Currently, the languages delivered with the client
are Brazilian Portuguese (pt_BR), English (en_US), Dutch
(nl_NL), French (fr_FR), German (de_DE), Italian
(it_IT), Russian (ru_RU), Spanish (es_ES), Swedish
(sv_SE), and Turkish (tr_TR).
On Windows, the same environment variables can be set in a script that
also starts the ThinLinc client. An example script called
altlang.cmd is installed with the ThinLinc client for Windows.
If nothing is set, the Windows client will use the language setting that
was given with the control panel.
The ThinLinc session life cycle
When the user has started a ThinLinc session the client login interface disappears from the desktop. The client program continues to run in the background as long as the ThinLinc session is running. The client enters a service mode where it handles services needed to fulfill the requested features. For example the client handles the export of local printers, serial ports, and so on. When the ThinLinc session quits the client service engine quits as well.
There are several ways a session can end. The most common one is that the user chooses to logout from the session. That causes the session to finish on the server side. The ThinLinc server finds out that the session has finished and disconnects the client. Another possibility is to intentionally disconnect the client, without finishing the session on the server. This can be done by using the session menu. See The session menu below for information about how to do this. When the client disconnects before the session running on the server is told to end, then the session will continue to run on the server. The next time the user logs in the server will reconnect the user to the very same session. This way it’s possible to, for example, disconnect a session at work, go home, reconnect to that session and continue to work.
If the user knows that there already is a session running on the server, but still wants to start a new fresh session, then it’s possible to check the End existing session check box that exists in the client login interface (advanced mode only). The client will then tell the server that it wants to end the existing session (if it exists) and get a new one.
Network issues or problems with ThinLinc services can sometimes prevent the servers from checking the status of a session. Such a session will be considered unreachable and the client will not be able to reconnect to it. The user can chose to abandon the session or wait for the problem to be resolved. However abandoning the session causes the ThinLinc server to stop tracking it and can leave applications running without any way of reaching them.
Running the ThinLinc client from the command line
To run the ThinLinc client from the command line you run the program tlclient, optionally followed by options and a server name. The correct program syntax is as follows.
tlclient [options] [server][:port]
The optional server field can be used to specify a ThinLinc server that should be predefined in the server field when client is started. The optional port parameter causes the client to try to connect another TCP/IP port number than the normal SSH port when establishing it’s secure connection to the ThinLinc server. More information about custom SSH settings is available at Security tab.
The ThinLinc client is highly controllable from the command line by the use of command line arguments. Many parts of the client can be controlled this way. The more simple things to control is the server or user name. It is possible to force settings and lock tabs and fields in the config interface to prevent them from being changed.
All arguments written on the command line overrides the settings saved from previous sessions. The options window will show the current settings, including the settings from the command line. The client settings is only stored to file when the user press the OK button in the options window. This means that options from the command line normally don’t affect the saved settings. But if the user opens the options window and accepts the settings by pressing the OK button then the settings, including the one from the command line, will be saved.
For a complete list of arguments supported by your client you can run
the client with the argument -?.
Description of available command line arguments
Here follows a description for all available command line arguments.
- -?, --help
Display a help summary.
- --version
Display client version information and exit.
- -a, --advanced
Start client in advanced mode. Advanced mode means that the client will show the Server field, Options… button and the End existing session checkbox. The advanced mode is the normal mode used when you start the ThinLinc client. A simpler mode, where those interface components are hidden, is used automatically when you enter a server name as a command line argument. By adding this argument you override that and always use the advanced mode.
- -C <FILE>, --configfile <FILE>
Specifies an additional configuration file. Parameter values in this configuration file overrides the values specified by the system wide and user configuration file. Settings changed from the GUI will be stored in this configuration file, instead of the user’s configuration file.
- -d <LEVEL>, --debug <LEVEL>
The ThinLinc client logs information about the current session to the file
~/.thinlinc/tlclient.logon Linux systems and%TMP%\tlclient.logon Windows systems. The amount of information to log can be configured with this option followed by a number from 1 to 5. A low number gives less logging than a higher number. The default is a log level of 3. For more information about log file placement, see Logfile placement below.
- -u <USER>, --user <USER>
This option sets the user name that should be filled in into the Name field. This can be used to override the name that is automatically saved from last session. If you for example, in a school classroom, want it to always start with an empty Name field, then you can use this parameter with the empty string
"".
- -p <PASSWORD>, --password <PASSWORD>
This option sets the password that should be filled in into the Password field. When this option is used and a user name exists (either saved from previous session or entered with the
-uparameter) the client will automatically try to login, directly after start. If the login try fails it will return focus to the client interface, making it possible to adjust the values. Note that the command line of tlclient, and therefore the password, will be visible to other processes running on the client operating system. If this is a problem in your environment, consider using the-Poption documented below.
- -P <PROGRAM>, --askpass <PROGRAM>
This option makes it possible to specify an askpass program that should be used to achieve the password. This program should in some way ask the user for a password and then return that password together with an exit code. This triggers the auto login (see argument
-pabove).
- -e <ENCODING>[,ENCODING...], --encodings <ENCODING>[,ENCODING...]
This option makes it possible to select which VNC encoding you want to use (see Optimization tab for more information about VNC encodings). Valid encodings for this option are:
Tight,ZRLE,HextileandRaw.
- -l <ITEM>[,ITEM...], --lock <ITEM>[,ITEM...]
This option makes it possible to lock different parts of the client interface. This can be used to prevent things from being changed. Locked parts will still be shown, but will be “grayed out”, which means that they can’t be made active for change. The items that should be locked should follow this option as a comma separated list. The following items are possible to lock.
server: Server entry fielduser: Username entry fielddisplay: Display tablocaldevices: Local Devices taboptimization: Optimization tabsecurity: Security tabadvanced: Advanced tab
- -h <ITEM>[,ITEM...], --hide <ITEM>[,ITEM...]
This option makes it possible to hide different parts of the client interface. This can be used to remove parts of the interface that can confuse novice users, or to prevent them from reaching parts of the interface. The following items are possible to hide.
options: options button
- -f <SETTING>[,SETTING...], --force <SETTING>[,SETTING...]
This option makes it possible to force a setting to a value. This can be used to preset a client with values and to force them to reset to those values each time, even if the users make changes. When an option is forced it is turned on. The following items are possible to force.
terminate: terminate sessionfullscreen: full screen on all monitorssound: sound modesshcomp: ssh compression
- -M, --minimize
This option causes all other applications to be minimized when the ThinLinc client starts.
- -s <PROGRAM>, --startprogram <PROGRAM>
Specifies the program to start in the session. Overrides the
START_PROGRAM_ENABLEDandSTART_PROGRAM_COMMANDconfiguration parameters.
- --loop
This option causes the client to run forever. The exit button is removed, and when a session has ended, a new client process is automatically started.
Note
The only way to stop the client from restarting is to terminate the tlclient process.
Local device export
ThinLinc supports export of different local devices. This means that a device that exists on your client computer or terminal can be reached from the ThinLinc session that runs on the server. The type of devices that can be exported varies depending on which operating system the ThinLinc client runs on. The export is, very generalized, done by establishing secure tunnels for the data transmission and services that connect both ends. Here follows more information about each type of possible export; for detailed information about how to enable each type of export in the client, see Local Devices tab below.
Sound device
This feature makes it possible to hear sound from applications that runs on the ThinLinc server. Sound will be sent from the ThinLinc server to your local client through a secure connection. A small local sound daemon will be automatically started by the ThinLinc client. A secure tunnel for sound will be established during the ThinLinc session setup.
All programs that support PulseAudio should automatically be aware of this tunnel and send their sound to the client. See also Using Sound Device Redirection for information about supporting other applications.
The sound data that is sent from the server session to the local client is uncompressed audio data. This means that it can be relatively large and may use relatively much network bandwidth. This feature should not be used if you plan to use ThinLinc over low bandwidth connections such as modems or ISDN connections.
Serial ports (Windows and Linux only)
This feature makes it possible to export two local serial ports to the ThinLinc session. When serial port redirection is enabled, a small redirection daemon will be automatically started by the ThinLinc client during session startup. A secure tunnel for serial port data will be established.
Warning
When activating serial port redirection, all users on the terminal server can access the serial port of the client machine.
Drives
This feature makes it possible to, in a secure way, export one or many local drives from the client machine to the server session. This can be local hard disk volumes, local CD-ROM drives, and so on. The local drive will be made available on the ThinLinc server session.
Each exported device can have individual permission settings. All export settings are made in the ThinLinc client options interface.
Printer
This feature makes it possible to export a local printer to make it available from the ThinLinc session. When enabled, the client will setup a secure tunnel for printer jobs. The client will also activate a small built-in print server that listens for printer jobs on this tunnel.
When you print to the special printer queue thinlocal in your ThinLinc session, then the job will be sent through this tunnel and then printed on the client machine. On Linux platforms, the print job will always be sent to the default printer. On Windows and macOS, it is possible to select whether the print job should be sent to the default printer or if the printer selection dialog should be used every print. Note that device dependent print jobs will always go to the default printer.
For more information about printer redirection in ThinLinc, see Local printer support.
Smart Card Readers
This feature makes it possible to export all local smart cards and smart card readers to make them available from the ThinLinc session. All smart card readers available to the system will be exported to the session so there is nothing to configure except an activation switch.
The ThinLinc client relies on the PC/SC interface present on the system to communicate with the smart card readers. If you have a reader that uses another system, then that reader will not be exported.
Client configuration
To configure the ThinLinc client you press the button labeled Options… in the client window. That brings up the client options window. This window contains several pages of settings, ordered in tab sets. The following sections will describe each of these pages and all individual settings.
When a user press the OK button all the current settings in the options window is saved. For more information about the config file format, see Client configuration storage.
Display tab
The Display tab contains options regarding how the session should be displayed by the client.
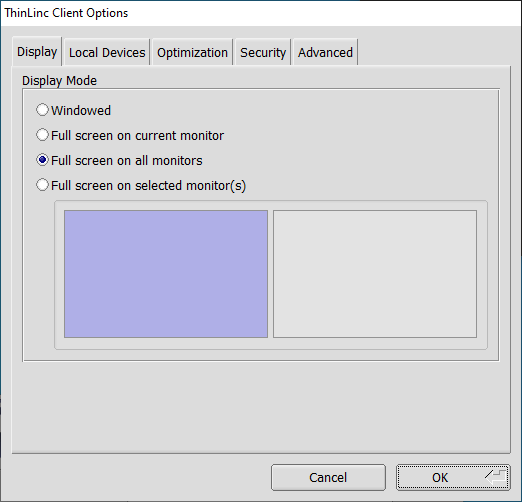
Fig. 11 Client settings display tab
Description of display tab settings
Here follows detailed description of the settings available in the display tab.
- Windowed
This option makes the ThinLinc session appear as a normal window on the desktop that can be moved and resized.
- Full screen on current monitor
This option makes the ThinLinc session cover the entire screen area of the monitor that the client is current on. If you run in full-screen mode and want to reach the native session that is hidden by the ThinLinc session then you can switch out from full-screen mode. To do this you press the key assigned to bring up the session pop-up menu. Normally this menu is bound to the F8 key, but can be manually changed. See the Popup menu key setting on the Options tab above for more information on this. In the session menu you should select Full screen to toggle full-screen mode.
- Full screen on all monitors
This option makes the ThinLinc session cover the entire screen area of all the monitors that are connected to the local client. Leaving full-screen mode to access the native session is done that same way as for full screen on the current monitor.
- Full screen on selected monitor(s)
This option makes the ThinLinc session cover the entire screen area of the monitors that have been selected in the monitor selection box below this option. Leaving full-screen mode to access the native session is done that same way as for the other full-screen modes.
More monitors may be included than have been selected in the selection box in order to create a rectangular session size. These extra monitors will be indicated with a checkered pattern.
Local Devices tab
The Local Devices tab contains options for which local devices should be exported to the server and in what manner.
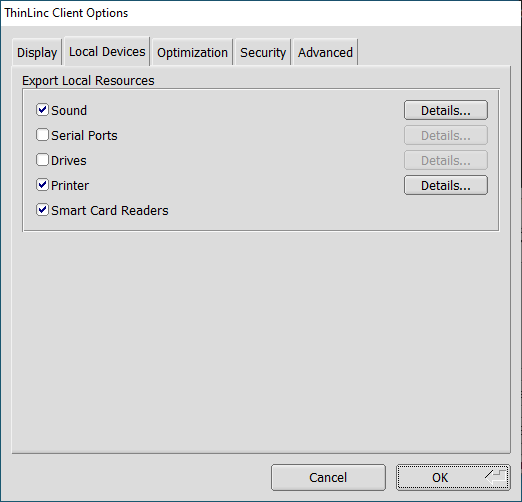
Fig. 12 Client settings Local Devices tab
Description of local devices tab settings
Here follows detailed description of the settings available in the local devices tab.
- Export - Sound Device
When enabled, sound will be sent from the ThinLinc server to your local client. A small local sound daemon will be started by the client, which connects to a secure tunnel to the server. See Using Sound Device Redirection for more information about this topic.
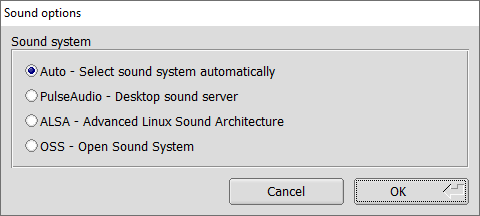
Fig. 13 Sound system selection interface
On Linux there is a Details… button next to the Sound check box that will allow you to choose between PulseAudio, ALSA and OSS for the local sound system. You can also let the ThinLinc client select the correct system automatically.
- Export - Serial Ports
It is possible to forward two serial ports from the client to make it available to programs you run on the server. To select which of your local serial devices to export you can press the Details… button next to the Serial Port check box. This will bring up a dialog where you can select which two serial ports should be exported.
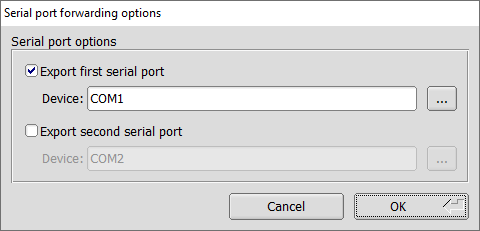
Fig. 14 Serial port selection interface
The Device should be a path to a Linux serial device (such as
/dev/ttyS0) or a Windows COM port name (such asCOM1). Enter the device to export in the text field or press the … button to browse to the wanted device.- Export - Drives
This check box turns on export of local devices from your terminal top the ThinLinc server. This makes your local drives available from your ThinLinc session. To select which drives to export you press the Details… button next to Drives check box. That presents a dialog where you can build a list of drives to export and set export permissions.
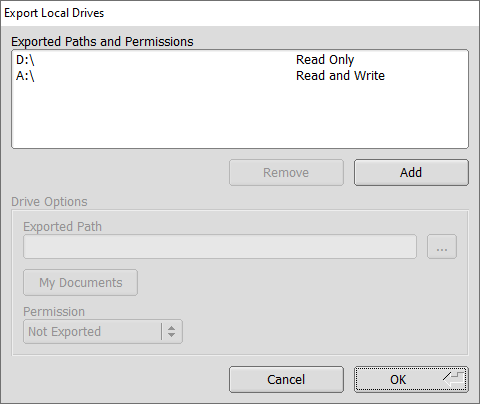
Fig. 15 Local drive export selection interface
The Export Local Drives window consists of two parts. At the top there is a list containing exported paths, with two control buttons below. The lower half contains settings fields for the currently selected path. When you select a path listed in the upper list you will see its corresponding settings in the Drive Options field below. You can then change the selected path by changing the values on the options field.
To add a new path to the list you press the Add button. That creates a new empty land in the path list. The new path will be automatically selected. you can then modify the settings in the lower half. Set the path and export permission for the new export. To set the export path you can either write it manually in the path text field or press the … button to bring up a file navigation window.
To remove a path you simply select a path and press the Remove button.
The Windows client features a mechanism that makes it easy to export the
My Documentsfolder. This feature is activated by pressing the My Documents button. Regardless of the local folder name, this folder will be mounted asMyDocumentson the server.The export permissions can be one of the following three options, Not Exported, Read Only and Read and Write. The Not Exported option can be used to temporarily turn off an export without having to delete it. The Read Only option means that you from the ThinLinc session will be able to read from the export, but not write. The Read and Write option means that you from the ThinLinc session will be able to both read and write.
- Export - Printer
By checking this check box the client will export your local printer to make it available from the ThinLinc session. For more information about this feature, see Printer and Local printer support.
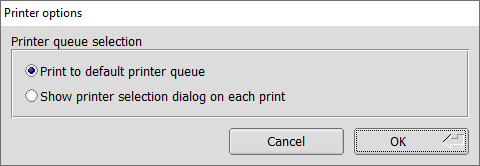
Fig. 16 Printer options dialogue
On Windows and macOS there is a Details… button next to the Printer check box that will allow you to select if the print job should be sent to the default printer or if the printer selection dialog should be used on every print.
- Export - Smart Card Readers
This check box makes all local smart card readers and smart cards available to applications on the ThinLinc server. It is not necessary to check this box to authenticate using smart cards, but it is needed if you also wish to authenticate using smart cards to a Windows Remote Desktop Server.
Optimization tab
The Optimization tab contains various settings that affects the protocols used to transfer the graphic information. This includes algorithm used for the graphic encoding. The best choices may differ from case to case. Factors that affects the algorithm choices can for example be network bandwidth, network latency, and client computer performance.
The default setting is to use the Auto select mode, to automatically select the best suited algorithms.

Fig. 17 Client settings Optimization tab
Description of optimization tab settings
Here follows detailed description of the settings available in the optimization tab.
- Auto select
This option makes the ThinLinc system try to automatically select the best suited encoding algorithm. The network performance is measured during the life of the connection and the encoding options are adjusted based on the results. This means that the encoding options can be changed automatically during the connection, if the network performance changes. Activating this option will “gray out” the Preferred encoding and Color level options, to show that they aren’t manually controlled.
- Preferred encoding
This block of settings affects the VNC protocol encoding. There are several different ways to compress and encode the graphic data that is sent from the server to your client. In this box you select one of four possible encodings. The methods differ much: Some try to use smart algorithms to select and compress the areas to send, which means slightly higher CPU usage, but most likely less bandwidth usage and faster sessions where the bandwidth is limited. Other methods use less CPU capacity but more network bandwidth. The best choice can vary much depending on place and situation. A safe choice is to let the system automatically select the best encoding by checking the Auto select checkbox above.
- Encoding: Tight
This choice selects the Tight encoding method. With this encoding the zlib compression library is used to compress the pixel data. It pre-processes the data to maximize compression ratios, and to minimize CPU usage on compression. Also, JPEG compression may be used to encode color-rich screen areas. The zlib compression level and the JPEG compression ratio can be manually changed. See Custom compression level and Allow JPEG compression below. Tight encoding is usually the best choice for low-bandwidth network environments (e.g. slow modem connections).
- Encoding: ZRLE
This choice selects the ZRLE encoding method.
- Encoding: Hextile
This choice selects the Hextile encoding method. With Hextile the screen is divided into rectangles, split up in to tiles of 16×16 pixels and sent in a predetermined order. Hextile encoding is often the best choice for using in high-speed network environments (e.g. Ethernet local-area networks).
- Encoding: Raw
This choice selects the Raw encoding method. This is the simplest of the encoding methods. It simply sends all the graphic data of the screen, raw and uncompressed. Since this method use the least processing power among the possible methods this is normally the best choice if the server and client runs on the same machine.
- Custom compression level
By selecting this option you choose to override the standard compression level used when compressing data with the Tight encoding. You can manually select the wanted compression level by entering a number between 0 and 9. Level 0 means no compression. Level 1 uses a minimum of CPU performance and achieves weak compression ratios, while level 9 offers best compression but is slow in terms of CPU consumption on the server side. Use high levels with very slow network connections, and low levels when working over high-speed network connections. This applies to the Tight encoding only!
- Allow JPEG compression
By selecting this option you choose to override the standard JPEG compression quality of color-rich parts of the screen. JPEG is a “lossy” compression method for images that helps the Tight encoding to significantly reduce the size of the image data. The drawback is that the resulting image, depending of selected compression ratio, can be blurred and grainy. You can manually select the wanted image quality by entering a number between 0 and 9. Quality level 0 gives bad image quality but very impressive compression ratios, while level 9 offers very good image quality at lower compression ratios. Note that the Tight encoder uses JPEG to encode only those screen areas that look suitable for lossy compression, so quality level 0 does not always mean unacceptable image quality.
- Color level
This block of choices selects the number of colors to be used for the graphic data sent from the server to the client. The setting has four levels, Full, Medium, Low and Very low. The default and normal is to use the Full setting. Selecting a lower number of colors will highly affect the resulting image to the worse, but may also speed up the transfer significantly when using slow network connections.
In this context, Full means the number of colors supported by the clients graphics hardware.
- SSH compression
This choice selects whether or not to use SSH compression for all the data sent between ThinLinc server and client. This is normally not used since an extra compression step, above a compressing graphic encoding normally doesn’t help making it smaller, only use more CPU performance. There can still be occasions where this is worth trying though. It is possible that this can help speeding up printing or other exports over slow connections.
Security tab
The Security tab controls how the client authenticates against the ThinLinc server. The main interface of the client will be different depending on the choices made here.
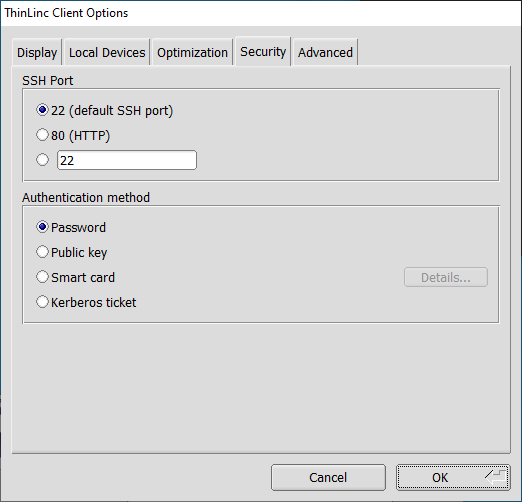
Fig. 18 Client settings Security tab
Description of security tab settings
Here follows detailed description of the settings available in the security tab.
- SSH Port
This option selects the TCP/IP port to use when the client tries to establish an SSH connection with the ThinLinc server. The normal SSH port is 22, which also is the default selection for this option. There can be reasons to use another port on some occasions. If you for example need to use ThinLinc over the Internet, from a location where port 22 is blocked by a firewall. Then you can select a port that is let open. Port 80 which is used for HTTP, the protocol used for transport when surfing the WWW is one port that often is open. To be able to use a port other than 22 you need to make sure that the SSH daemon (sshd), which runs on the ThinLinc server, listens to the port you want to use. The SSH daemon can be told to listen to any wanted ports. In the client interface you can select between the default port 22, port 80 and an arbitrary port number which you can enter by yourself.
Note
If the SSH host key on the server changes, e.g. due to an upgrade of the OS or SSH server software, the client will note this fact. It will then, at the next login, open a dialog and let the user confirm that the new host key is valid. If the user clicks OK, then the host key on the client for this particular server is updated on disk.
The administrator can disallow this by manually setting the parameter
ALLOW_HOSTKEY_UPDATEto0. See Configuration Parameters Used by the ThinLinc Client for more information.- Password
This option makes the client try to authenticate using a regular password.
- Public key
This option makes the client try to authenticate using public key encryption. The user will be asked to provide a private encryption key instead of a text password.
- Smart card
This option makes the client try to authenticate using public key encryption, but with the private key securely stored on a smart card. The user will be asked to select a certificate on the smart card and to provide the passphrase for it.
Note
Smart card authentication requires that the smart card is readable by your PKCS#11 library. The library included by default supports PKCS#15 compliant smart cards and relies on the PC/SC interface. This is always present on Windows systems and is usually installed by default on Linux systems.
The Details… button lets you change the options for smart card usage and managing the certificate filters which are used to match accepted certificates for authentication.
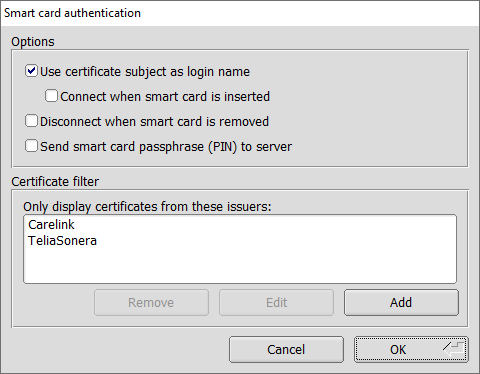
Fig. 19 Smart card authentication settings
- Use certificate subject as login name
Enable this options if you want to enable automatic login, this will also hide the input box for login name from user.
- Connect when smart card is inserted
This options will try to automatic connect and is dependent on certificate filters, automatic connect will only occur if only one certificate is available after the filtration.
Read more about automatic connection below where certificate filters is discussed.
See Automatic Connection for information on how to configure the server for automatic smart card connection.
- Disconnect when smart card is removed
Enabling this options makes the client automatically disconnect when the smart card used to authenticate is removed.
- Send smart card passphrase (PIN) to server
This option makes the client transmit the smart card passphrase, as entered by the user, over to the ThinLinc server. It is required to enable smart card single sign-on.
Warning
Enabling this option reduces the security of the smart card as the passphrase would otherwise never leave the client system. The option should be left disabled if smart card single sign-on is not used.
- Smart card - certificate filter
A certificate filter is used to present only allowed certificates for authentication, certificates that does not match any filter will be hidden from the user.
When no certificate filters are configured, all available certificates on the smart card will be available for authentication and therefore the autoconnect feature will not work.
If the resulting filtered list of certificate evaluates only one certificate for authentication and the autoconnect feature is enabled, it will be used for authentication.
When the login dialog is displayed and the key shortcut Control+Shift+F8 is pressed, the certificate filtering functionality is bypassed and gives you access to all certificates available on the smart card for authentication.
To add a new filter just press the add button as shown in dialog Fig. 19 or select an available filter item in the lsit and press edit to change the settings for specific filter. Either way, the certificate filter settings dialog Fig. 20 will be shown where you can modify the settings of the specific filter.
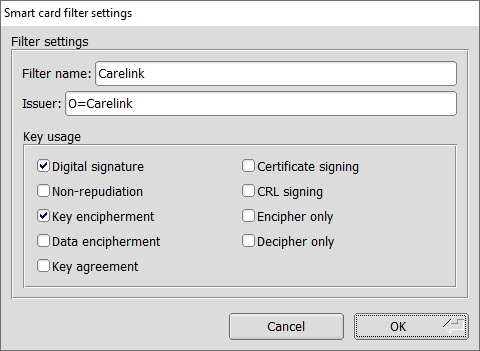
Fig. 20 Certificate filter settings
- Name
Enter name of the filter that will be seen in the list of filters.
- Issuer
The certificate issuer field consists of a comma separated list of attribute-value pairs that all must be present in the certificate issuer field. Commonly the “common name” of the issuer is used, e.g.
cn=My CA. It is also possible to allow any issuer that are part of the same organisation, e.g.o=My Company Ltd.. Any registered object identifier descriptor can be used as an attribute name (see IANA for a full list).- Key usage
The certificate must have all the key usage bits selected in this window. Having more bits than those selected does not exclude a certificate.
- Kerberos ticket
This option makes the client try to authenticate using an existing kerberos ticket.
Note
This requires that a valid kerberos ticket is available on the client, and that the SSH daemon on the ThinLinc server is configured to accept this ticket during authentication. For information about how to configure kerberos authentication on your particular platform(s), please see the relevant vendor documentation.
Advanced tab
The Advanced tab contains advanced options for the ThinLinc session. This includes settings for which program to execute in the session, shadowing another users session, reassignment of session pop-up key and how reconnections are handled.
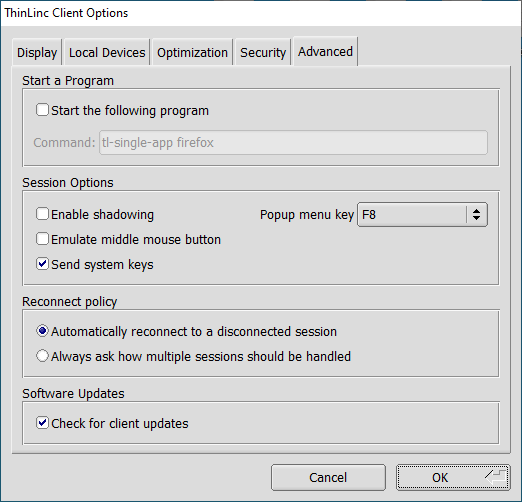
Fig. 21 Client settings Advanced tab
Description of advanced tab settings
Here follows detailed description of the settings available in the advanced tab.
- Start a Program
If enabled, the client requests that the server should start the session with the command supplied by the client. Otherwise, the session command is determined by the server configuration.
- Enable shadowing
When enabled, an extra text field will be present in the client main window. This field is used to enter the user name of the user whose session you want to shadow. For more information, see Shadowing.
- Send system keys
When this setting is enabled and the client is in full-screen mode, key combinations such Alt+Tab will be sent to the remote system instead of being handled locally. To regain access to the local system without ending the session, the menu key must be used.
- Emulate middle mouse button
When enabled, middle mouse button can be emulated by pressing left and right mouse button simultaneously.
- Popup menu key
During a ThinLinc session you can press a specific key to bring up the session control pop-up window. This window can for example be used to toggle to and from full-screen mode and to disconnect the session. The default key for this is F8, but other keys can be configured here. The feature can also be disabled by selecting None.
- Reconnect policy
When the client connects to a ThinLinc server, there might already be multiple sessions running on it. Some of these sessions might be connected to another client, and some might be disconnected. The client can be configured to automatically handle some of these cases, or always ask the user what to do. This option only affects connections to servers where multiple sessions per user are allowed.
Note
Sessions that have been started with a command different from the one currently used will be ignored.
- Automatically reconnect to a disconnected session
If there is no disconnected session and additional sessions are allowed, create a new session. The master will attempt to keep this new session on the same agent as the other sessions for this user.
If there is a single disconnected session, or if server allows only one session, reconnect to existing session.
Otherwise, ask how to proceed.
- Always ask how multiple sessions should be handled
If there is no running session, create a new session.
If server allows only one session, reconnect to existing session.
Otherwise, ask how to proceed. If there are any running sessions for this user and the server allows an additional session, the master will place the new session on the same agent as the previous sessions of that user.
- Software Updates
If enabled, the client will periodically query the
UPDATE_URLvalue specified intlclient.conffor updates. If a newer version is available, the user will be asked if they want to install it.
Client Touch Gestures
The ThinLinc client has support for a number of touch gestures when used on a touch capable monitor. These gestures allow the user to simulate certain mouse operations that would otherwise not be possible.
Note
Touch gestures are not available on macOS as it currently lacks native support for touch capable monitors.
 |
Click Tap a single finger to simulate a click of the left mouse button. |
 |
Drag Press a single finger and drag it across the screen to simulate pressing the left mouse button and moving the cursor. |
 |
Right click Press and hold a single finger to simulate a press of the right mouse button. |
 |
Right click, alternative Tap two fingers to simulate a press of the right mouse button. |
 |
Middle click (not available on Windows) Tap three fingers to simulate a press of the middle mouse button (mouse wheel). |
 |
Pan / Scroll Press two fingers and drag them across the screen to simulate rotating the vertical or horizontal mouse wheel. |
 |
Zoom Press two fingers and move them closer or further away from each other to simulate pressing the Control key and rotating the mouse wheel. Many applications interpret this combination as a request to zoom the open document in or out. |
The XDM mode (Linux only)
When installing dedicated clients, for example old PCs or thin terminal boxes, it’s common to install the client to run in XDM mode. XDM is an acronym for X Display Manager and is the name of a small graphical program used for graphical logins in many Linux systems. By using the ThinLinc client in XDM mode you can make sure that the client appears automatically when the client hardware is started and that it reappears directly after a user logs out.
To run the client in XDM mode you need to start it with the -x
option. When running in XDM mode the following changes will be made to
the client interface.
The Exit button is removed.
Always use full screen on all monitors.
Logfile placement
The ThinLinc client logs its activities in human readable log files. For
the common use case of running one client at a time, the log file is
always called tlclient.log. Once the first client has been
closed and a second client is started, the log file of the first client
is renamed tlclient.old.log and the second client creates its
log file, again called tlclient.log. At most two log files are
kept at a time for this use case - one for the current client and one
for the most recently closed client. If the file
tlclient.old.log exists before starting a client, that file will
be permanently deleted once the client is started.
Another, more rare use case is running two or more clients
simultaneously. The first log file is again called tlclient.log
and the log files of any additional clients are called
tlclient2.log, tlclient3.log, and so on, up to a maximum
of nine active log files. Once the maximum number of active log files is
reached, any additional clients started will not have any log files
associated with them.
If a client with an associated log file is closed, that log file is
considered inactive. If a new client is started when less than nine log
files are active, the client will once again have a log file associated
with it. Note, however, that a client can reuse an inactive log name.
In this context, reuse means that if e.g. the client associated with
log file tlclient3.log is closed and a new client is opened, it
is possible for the log file of the new client to again be named
tlclient3.log.
Every time a new client is opened, all .old.log files will be
permanently deleted and all inactive log files will be renamed from
.log to .old.log. That means that when running multiple
clients simultaneously, there can be several .log files as well
as several .old.log files.
The locations of the log files differ between Linux and Windows systems and are explained below.
Linux log file
On Linux systems the logfile is located in the home directory for the
user that runs the ThinLinc client. The path is
~/.thinlinc/tlclient.log.
Windows log file
On Windows systems the logfile is located in the directory referenced from the %TMP% variable. The value of this variable can be achieved by running any of the following commands in a Windows command window.
C:\> echo %TMP%
or
C:\> set
Observe that some directories in the Windows %TMP% path may be flagged as hidden by the Windows system. This means that you need to change directory options to display hidden files and directories to navigate to the log file.
macOS log file
On macOS systems the logfile is located in the home directory for the
user that runs the ThinLinc client. The path is
~/.thinlinc/tlclient.log.
Client configuration storage
The ThinLinc client does not use Hiveconf for its configuration. Instead, the Linux and macOS clients uses a plain text format with key/value pairs and the Windows client stores the values in the Windows registry.
Note
The configuration parameters should seldom be edited by hand. For a system wide configuration, create a parameter set using the client and copy it to the system wide file.
Configuration Parameters Used by the ThinLinc Client
Both the Windows and the Linux version of the ThinLinc client use the same names for their configuration parameters, although the storage technique used is different (text files vs. registry keys). In this section we will list the parameters and explain their possible values.
- ALLOW_HOSTKEY_UPDATE
Set to
1if SSH host key updates should be allowed. This parameter cannot be changed from the GUI. The result of settingALLOW_HOSTKEY_UPDATEto0is that the client cannot connect to the server if the host key is wrong. This enhances security if there is a risk for a man in the middle attack.
- AUTHENTICATION_METHOD
This parameter can be set to
password,publickey,scpublickeyorkerberosto select the authentication mode used by the client.
- AUTOLOGIN
If this parameter is set to
1, the client will automatically login at start, using the server name, user name and password specified in the configuration storage.
- CERTIFICATE
Specifies the smart card certificate to use when authenticating.
- CERTIFICATE_NAMING
Controls how the client presents a certificate to the user. The parameter consists of a comma separated list of naming tokens that represent bits of information from each card or certificate. Possible tokens:
card_labelThe label specified on the smart card.
pin_labelThe label associated with the PIN protecting this certificate.
subject_*A field from the subject in the certificate. Can for example be the common name by specifying
subject_cnorsubject_commonName. Any registered object identifier descriptor can be used (see IANA for a full list).issuer_*A field from the issuer in the certificate, in the same manner as for
subject_*.
The client will use as many of the tokens as necessary to give each certificate a unique name. That means that certificates on two different cards can be presented with a different number of tokens depending on how much the information between the certificates overlap. An index number will be added to the name if the names are still not unique when all tokens are used.
- CUSTOM_COMPRESSION
Set to
1if a custom compression method is selected.
- CUSTOM_COMPRESSION_LEVEL
The selected compression level. An integer between 1 and 9.
- DISPLAY_MODE
The display mode. Can be set to values
SIMPLEandADVANCED, or be left empty. In the latter case, the default behaviour is to use simple mode if a server name is given as a parameter and advanced mode otherwise.
- EMULATE_MIDDLE_BUTTON
Set to
1if the client should emulate middle mouse button when pressing left and right mouse buttons simultaneously.
- FULL_SCREEN_MODE
Set to
1if the client should run in full-screen mode.
- FULL_SCREEN_MONITOR_MODE
This parameter selects which monitors the client should be used when in full-screen mode and can be set to one of the following:
currentUse the monitor the client window is currently displayed on.
allUse all available monitors.
selectedUse the monitors specified in
FULL_SCREEN_SELECTED_MONITORS.
- FULL_SCREEN_SELECTED_MONITORS
This parameter specifies a comma separated list of monitor numbers that should be used in full-screen mode when
FULL_SCREEN_MONITOR_MODEis set toselected. Monitors are numbered from left to right, based on their top left corner, starting from one. If two monitors are perfectly aligned vertically then the top-most monitor is considered first.
- HOST_ALIASES
This parameter specifies a list of hostname and port translations. This translation list is consulted whenever the client is about to initiate a network connection. This includes the SSH connection to the ThinLinc agent machine. The syntax for this parameter is:
[fromhost][:fromport]=[tohost][:toport] ...
If
fromhostis omitted, the translation will apply to all hosts. The same principle is used for ports. Iftohostortoportis omitted, the original host or port will be used. Multiple translations are separated with whitespace. The translation stops as soon as one match is found.
- JPEG_COMPRESSION
Set to
1if JPEG compression is wanted.
- JPEG_COMPRESSION_LEVEL
The wanted compression level.
- KILL_EXISTING_SESSIONS
Set to
1if existing sessions should be ended.Note
It makes little sense to change this value. The client never saves this setting.
- LOGIN_NAME
The username.
- LOWERCASE_LOGIN_NAME
Set to
1if the client should convert the entered username to lowercase before logging into the server. This affects both the login user name and the name of the user to shadow (if applicable).
- NEW_PASSWORD_REGEXP
This parameter specifies a regular expression. If an interactive SSH prompt matches this expression, the response is taken as a new password. The new password will be used for the SSH connection to the agent machine. It will also be sent to the server to enable Single Sign-On.
- NFS_EXPORTS
A list of local drive paths and permissions. The syntax for this parameter is:
[path1],[permissions1],[path2],[permissions2] ...
As seen above, each path should be followed by the desired permissions
disabled(not exported),ro(read only) orrw(read and write). See Advanced tab for their meaning. This list specifies local drives to be exported.
- NFS_ROOT_WARNING
Set to
1to enable a warning if running as root and exporting local drives.
- NFS_SERVER_ENABLED
Set to
1if local drives should be exported.
- OPTIONS_POPUP_KEY
Key code for key to activate option pop-up menu.
- PASSWORD
This parameter allows you to specify a password in the configuration file. It must be specified using a hexadecimal ASCII notation, which means that every character is specified by its hexadecimal value.
Warning
The password value is not encrypted. It should be treated as a clear text password. Avoid storing configuration files with a
PASSWORDparameter on disk or transmit such files over networks without encryption.
- PKCS11_MODULE
Specifies the PKCS#11 module that will be used to communicate with the smart card. The path can be relative the base prefix of the ThinLinc client or an absolute path.
- PRINTER_ENABLED
Set to
1if local printers should be enabled.
- PRINTER_SELECTION
Set to
1if the local printer selection dialog should be displayed on every print on Windows and macOS clients. Otherwise printing jobs will be sent to the default local printer.
- PRIVATE_KEY
This parameter specifies the path to the private key to be used to authenticate the user.
- RECONNECT_POLICY
This parameter can be set to
single-disconnectedoraskto control the client’s reconnect policy. See Advanced tab for their meaning.
- REMOVE_CONFIGURATION
If
1, the user configuration file (or the file specified by-C) will be removed after the client has started. Settings changed in the GUI will not be stored to disk. If the client fails to remove the file, it will try to truncate it instead.
- SEND_SYSKEYS
Set to
1if the client should send system keys (like Alt+Tab) to the remote system when in full-screen mode.
- SERIAL1_DAEMON_DEVICE
The path to the first local serial port device to be exported.
- SERIAL1_PORT_ENABLED
Set to
1if the first local serial port should be exported.
- SERIAL2_DAEMON_DEVICE
The path to the second local serial port device to be exported.
- SERIAL2_PORT_ENABLED
Set to
1if the second local serial port should be exported.
- SERIAL_PORTS_ENABLED
Set to
1if local serial ports should be exported.
- SERVER_NAME
The hostname or IP of the ThinLinc server. When using ThinLinc in a cluster setup this should be the hostname or IP of the Master server machine.
- SHADOWING_ENABLED
Set to
1if shadowing should be enabled.
- SHADOW_NAME
The username of the user who’s session should be shadowed.
- SMARTCARD_AUTOCONNECT
Set to
1if the client should automatically attempt a connection when a smart card with a suitable certificate is found, this will only work ifSMARTCARD_SUBJECT_AS_NAMEalso is set to1.
- SMARTCARD_DISCONNECT
Set to
1if the client should disconnect automatically when the smart card used for authentication is removed.
- SMARTCARD_EXPORT_ENABLED
Set to
1if local smartcard readers should be exported.
- SMARTCARD_FILTER_n
This is a item list of certificate filters replace
nwith a sequence number that defined the order of the filter in the list.The filter string consists of three fields where each field is sperated using a
|(pipe), the defined three fields are: name, attributes and key usage which are documented below. Here follows an example of a filter string showing its format:SMARTCARD_FILTER_1=Telia|o=TeliaSonera|5
name
The name of the filter which will be displayed in the list of filters defined in the user interface.
attributes
This field holds a comma separated list of certificate attributes that is used when matching against available certificates, for example
O=TeliaSonera.key usage
This field is a bitmask value used to match against a certificate’s key usage flags. It indicates the intended usage of the certificate, such as identification, signing etc.
Use this to match certificates that is intended to be used for logon. For example, identification certificates will be matched using a value of 5:
digital signature + key encipherment = 5
The values are described in the following table:
1
digital signature
2
non-repudiation
4
key encipherment
8
data enciperment
16
key agreement
32
certificate signing
64
CRL signing
128
enchiper only
256
decipher only
- SMARTCARD_PASSPHRASE_SSO
Set to
1if the client should transmit the smart card passphrase to the ThinLinc server to enable smart card single sign-on. See Security tab for security implications.
- SMARTCARD_SUBJECT_AS_NAME
Set to
1if the certificate subject should be used as logon name, this will hide the name field from login window.
- SOUND_ENABLED
Set to
1if sound redirection should be enabled.
- SOUND_SYSTEM
Which local sound system to use. Only used on platforms that have multiple sound systems to choose from. Possible values:
AUTOAutomatically choose the most appropriate sound system of those available.
PULSEUse the local PulseAudio server as determined by X11 properties or environment variables.
ALSAUse the default ALSA device.
OSSUse the default OSS device.
- SSH_ARBITRARY
Custom port number for ThinLinc connection.
- SSH_COMPRESSION
Set to
1to use the compression built into SSH.
- SSH_PORT_SELECTION
Port selection for ThinLinc connection. Possible values:
0for port 22 (standard ssh port).1for port 80.2for custom port set in theSSH_ARBITRARYparameter.
- START_PROGRAM_COMMAND
Specifies the command to use when starting the session, if
START_PROGRAM_ENABLEDis active.
- START_PROGRAM_ENABLED
Specifies if the client should request that the server starts the session with the command supplied by the client.
- UPDATE_ENABLED
Set to
1to enable periodic checks for new versions.
- UPDATE_INTERVAL
This parameter specifies the time interval, in seconds, between client update checks.
- UPDATE_LASTCHECK
This parameter specifies the time that the last update check was performed.
- UPDATE_MANDATORY
If set to
1, updating to new client versions is mandatory.
- UPDATE_URL
The HTTP URL to client update configuration file.
- VNC_AUTOSELECT
Set to
1to dymanically autoselect the compression algorithm during the session.
- VNC_COLOR_LEVEL
The color level used for the session.
- VNC_ENCODING_SELECTION
The encoding to use for VNC. Possible values:
0for Raw5for Hextile7for Tight16for ZRLE
- YESNO_PROMPT_REGEXP
This parameter specifies a regular expression. If an interactive SSH prompt matches this expression, a graphical yes/no dialog will be presented, instead of a dialog for text input. Additionally, if the prompt is known to the client, an alternate text will be used. The dialog buttons Yes and No will send
yesandnoto the server, respectively.
Configuration Parameter Storage
Configuration parameters are typically stored in text based
configuration files. The format is simple: Each parameter is written on
one line, followed by an equal sign (=) and the value of the
parameter, as in the following example:
SOUND_ENABLED = 0
SERVER_NAME = tl.example.com
By using the -C option, additional configuration files can be
specified. Any name is accepted, but the file extension
.tlclient is recommended. The Windows, Linux, and macOS packages
configures the system to automatically recognize such files as
configuration files for the ThinLinc Client. Additionally, the Internet
Media Type application/vnd.cendio.thinlinc.clientconf is
linked to such configuration files.
Linux Client Configuration Files
The Linux client first reads the file
/opt/thinlinc/etc/tlclient.conf, if it exists. It then reads the
file .thinlinc/tlclient.conf in the user’s home directory, and
the values there override the values from
/opt/thinlinc/etc/tlclient.conf. This way, a system
administrator can set global defaults for client operations, while each
user can still customize the client to wanted behavior.
macOS Client Configuration Files
The macOS client first reads the file
/Library/Application Support/ThinLinc Client/tlclient.conf if it
exists. It then reads the .thinlinc/tlclient.conf in the user’s
home directory, and the values there overrides the values from
/Library/Application Support/ThinLinc Client/tlclient.conf. This
way, a system administrator can set global defaults for client
operations, while each user can still customize the client to wanted
behavior.
Windows Client Configuration
On Windows, the ThinLinc client reads its configuration from the
registry. All ThinLinc client data is stored under
Software\Cendio\ThinLinc\tlclient in the HKLM and HKCU hives. The
parameter names are the same as for the Linux client.
The behaviour of global and user-specific settings are identical to that
of the Linux client, where settings in HKLM correspond to
/opt/thinlinc/etc/tlclient.conf and those in HKCU correspond to
.thinlinc/tlclient.conf.
Adding Custom Branding to the ThinLinc Client Login Window
It is possible to add a custom logo to the main ThinLinc client window, making it easily distinguishable from a generic client. The custom logo will be placed to the right of the input fields.
Adding the logo is easy. The new logo must be a PNG file with maximum
width and height of 50 pixels. On Windows, just add the file
branding.png in the same directory as the executable with the
custom logo. On Linux, the file name is
/opt/thinlinc/lib/tlclient/branding.png.
Client Customizer
Introduction
This software lets you create customized ThinLinc client installation programs. This means that when users install the customized version, they will automatically get the default settings you have configured.
One advantage with this is that you can provide, for example, a default server name. A custom client can also be used to enhance security: You can distribute SSH host keys with the client itself, so that users don’t need to be concerned with SSH host key fingerprint verification.
Note
The Client Customizer only works for the Windows client.
Installation
Before you can start, you have to install the build environment. This is done by running the command tl-x.y.z-client-customizer.exe located in the Client Bundle. This will also create a shortcut to the build directory in the Start menu.
Building a Customized Client
To create a customized client, do the following:
Edit
settings.reg. This file contains all the parameter names and default values that are used in tlclient. To customize the client, edit any of these values, and they will be installed in the registry when you install the customized client itself. You can also add your servers SSH host keys (see below).Custom branding can be added to the client by simply dropping a file called
branding.pngin the root directory of the Client Customizer. See Adding Custom Branding to the ThinLinc Client Login Window for more details.Run
build.batin the same directory. The filesetup.exewill now be created. This is the installation program for the customized client.
Adding SSH Host Keys
To add your servers SSH host key to settings.reg, do the
following:
Use tlclient to connect to your server, if you haven’t already done so. Confirm the servers host key, if necessary.
Run the registry editor, and select
HKEY_CURRENT_USER\Software\Cendio\ThinLinc\tlclient\KnownHostsExport this key to an external text file.
Open the text file from the previous step in an editor.
Copy the line corresponding to your ThinLinc server. Paste this line into
settings.reg, sectionHKEY_LOCAL_MACHINE\Software\Cendio\ThinLinc\tlclient\KnownHostsSave
settings.reg, and proceed to create the customized client as described above.
Launching the Client from a Web Page
This feature allows a web server, such as an intranet or a web portal, to initiate a ThinLinc Client connection with a given configuration on behalf of a user.
Requirements
Web Integration requires an Apache HTTP Server, configured for TLS, with the ability to run CGI scripts.
Note
Some Linux distributions distributes their Apache HTTP server with the mod_cgi module disabled. This module is required for Web Integration to work. On Ubuntu systems, it can be enabled by running the a2enmod cgi command and restarting the httpd service.
Note
If Web Integration is used over HTTP, an attacker with access to the network may be able to intercept user passwords. To protect from this happening, Web Integration automatically redirects to a HTTPS connection when HTTP is used.
Installation
The Web Integration feature is not enabled by default in a ThinLinc
installation. An installation script,
/opt/thinlinc/share/web_integration/install-web-integration, is
provided for ease of installation.
$ sudo /opt/thinlinc/share/web_integration/install-web-integration
Note
After installing the Apache HTTP configuration file, make sure to restart the httpd service to load the new configuration.
While the installation script works as-is on most supported platforms, two environment variables grants you more control over where the configuration file is installed. This can be useful if you have an httpd installation at a custom location.
- APACHE_CONF_DIR
If your Apache HTTP server has been installed to a non-standard location, set this environment variable to tell the installation script where the configuration directory is located.
If this parameter is unset, the installation script will attempt to find the configuration directory from a list of known locations.
$ sudo env APACHE_CONF_DIR=/usr/local/etc/httpd/conf.d \
    /opt/thinlinc/share/web_integration/install-web-integration
- APACHE_CONF_NAME
The default behavior of the installation script is to install the configuration file in the configuration directory with the name
thinlinc.conf. If you already have a file with that name in the configuration directory that you wish to keep, set this environment variable to an different name.$ sudo env APACHE_CONF_NAME=web-integration.conf \ /opt/thinlinc/share/web_integration/install-web-integration
Usage
The process works like this:
The CGI script is called with the desired parameters.
The CGI script generates a “launch file”, which is a normal client configuration file. When the browser recieves this file, it launches the locally installed ThinLinc client.
The launch file delivered to the client is generated from the template
/opt/thinlinc/etc/tlclient.conf.webtemplate. The CGI script
performs some substitutions on this file, before sending it to the
client. Currently, the following variables are substituted:
$server_name$The server name where the CGI script resides.
$login_name$The user name, specified by the
usernameCGI parameter.$password$The password in hexadecimal ASCII notation, specified by the
passwordorhexpasswordCGI parameters.$autologin$The value of the
autologinCGI parameter.
The CGI Script tlclient.cgi
The CGI script tlclient.cgi is used to start the native client,
when launched from a web page. It accepts many parameters which affects
its operation. These are described below:
server_nameThe desired server name.
usernameThe desired user name. No default.
passwordThe desired password, in plain text. No default.
hexpasswordThe desired password, in hexadecimal ASCII notation. This parameter overrides the
passwordparameter. No default.redirtoAfter launching the native client, the browser will redirect to the web page specified by this parameter. Default value: the empty string.
loginsubmitThis boolean parameter specifies if a login should be directly executed, instead of showing a login form. Default value:
0autologinThis boolean parameter specifies if the native client should automatically connect to the specified server at startup. Default value:
1start_program_enabledThis boolean parameter specifies if the native client should request that the server starts the session with the command supplied by the client, as indicated by the
start_program_commandparameter. Default value:0start_program_commandThis parameter specifies the command to use when starting the session. Default value:
"tl-single-app firefox".displayurlThis boolean parameter can be used for debugging and development purposes. It will display and URL with all submitted parameters, and do nothing else. Default value:
0shadowing_enabledThis boolean parameter specifies if the native client should activate shadowing. Default value:
0shadow_nameThis parameter specifies the user to shadow. Default value is the empty string.
To make it easier to test various parameters, the HTML file
cgitest.html is included, in the same location as
tlclient.cgi. It also demonstrates how to create icons on web
pages, which launches ThinLinc sessions.
Advanced Topics
Hardware Address Reporting
When the client connects to server, it reports it’s hardware address. On Linux, the active interface with the smallest MAC address is used. On Windows, the address of the first interface (as listed in the Control Panel) is used.
Client Update Notifications
The client includes a feature which can periodically check for new
versions. This functionality is affected by the configuration parameters
UPDATE_ENABLED, UPDATE_INTERVAL,
UPDATE_LASTCHECK, UPDATE_MANDATORY, and,
UPDATE_URL. These are described in
Configuration Parameters Used by the ThinLinc Client. During an update check, the client retrieves
the file specified by UPDATE_URL. An example follows:
WINDOWSINSTALLER = https://www.cendio.com/downloads/clients/tl-latest-client-windows.exe
LINUXINSTALLER = https://www.cendio.com/downloads/clients/thinlinc-client-latest.i686.rpm
DEFAULTINSTALLER = https://www.cendio.com/thinlinc/download
OKVERSIONS = 3.2.0 3.3.0
The OKVERSIONS parameter specifies a list of valid client versions.
If the running client version is different, the client will notify the
user. The WINDOWSINSTALLER, LINUXINSTALLER, and
DEFAULTINSTALLER parameters specifies the updated client packages
for Windows, Linux, and other platforms, respectively.
Client Platforms
There are several ways to run the ThinLinc client, and also some ways to access ThinLinc servers without running the client.
In this chapter we will document how to install, configure and run the ThinLinc client on all different platforms including dedicated thin terminals.
Windows
Requirements
The supported Windows versions are 7, 2008 R2, 8, 2012, 8.1, 2012 R2, 10 and 2016. Windows CE is currently not supported.
Installing the Windows Client
To install the client on a Windows machine, unpack the Client Bundle and
enter the client-windows directory. Then click on the file
tl-x.y.z-client-windows.exe and follow the instructions.
You will also find unpacked versions of the ThinLinc Windows client,
both 32bit and 64bit under tl-x.y.z-client-windows-x86 and
tl-x.y.z-client-windows-x64 directories. It makes it possible to
run the client directly from the bundle or other media, like a portable
application, without the requirement of installing the client.
For more information about how to configure the client, read Client configuration storage.
Running the Windows Client
During installation the ThinLinc client will be added to the Start menu. To start the client you select it from the Start menu.
macOS
Requirements
macOS (formerly OS X) version newer than 10.6 running on 64-bit Intel hardware
Note
macOS (formerly OS X) versions newer than 10.9 installs with a default setting that breaks the multi monitor functionality of the ThinLinc client. A workaround to this problem is to disable setting Displays have separate Spaces in settings for Mission Control found in System Preferences.
Installing the macOS Client
The client for macOS can be found in the directory client-macos
in the Client Bundle. To install the client, follow these steps:
Double-click on the file
tl-x.y.z_rel-client-macos.iso.Drag the ThinLinc Client application to an application folder of your choice.
Eject ThinLinc Client.
Running the macOS Client
To start the ThinLinc Client, double click on the client application. The client can also be added to and started from the Dock.
Command and Alt Keys on macOS
The Alt key (also know as the Option key) behaves very differently on macOS compared to its behaviour on other platforms. It closely resembles the PC AltGr key, found on international keyboards. ThinLinc therefore treats these keys in a special manner on macOS in order to provide a good integration between the client and the remote ThinLinc system.
Whenever either of the Alt keys are pressed, ThinLinc will behave as if AltGr was pressed. The left Command key is used as a replacement for Alt in order to use shortcuts like Alt+F. The right Command key retains its behaviour of acting like the Super/Windows key.
Linux PC
Requirements
A compatible CPU architecture:
An i686 (or compatible) CPU with MMX and SSE support
An x86_64 (or compatible) CPU
An ARMv7 (or compatible) CPU with Thumb-2 and VFP3D16
GLIBC 2.12, or newer
A working Fontconfig configuration, or basic fonts available in
/usr/share/fontsor/usr/X11R6/lib/X11/fonts.32 MiB RAM
Installing the Linux Client
The Linux client is distributed in three different kinds of packages. One that can be installed using the RPM package system, one in the DEB package format, and one in compressed tar archive form for any Linux distribution.
If you need more information than mentioned here, read Client configuration storage.
In the instructions below, we will assume that you have unpacked your
Client Bundle to ~/tl-x.y.z-clients.
RPM-based Installation on RPM-based distributions
The RPM-based client can be found in the directory
client-linux-rpm in the Client Bundle. It is suitable for
systems such as Red Hat, Fedora, SuSE, and Mandrake. Perform the
following steps to install it on a 32-bit system:
$ cd ~/tl-x.y.z-clients/client-linux-rpm
$ sudo rpm -Uvh thinlinc-client-x.y.z-rel.i686.rpm
or the following steps on a 64-bit system:
$ cd ~/tl-x.y.z-clients/client-linux-rpm
$ sudo rpm -Uvh thinlinc-client-x.y.z-rel.x86_64.rpm
or the following steps on a 32-bit ARM hard-float system:
$ cd ~/tl-x.y.z-clients/client-linux-rpm
$ sudo rpm -Uvh thinlinc-client-x.y.z-rel.armv7hl.rpm
DEB-based Installation on Debian and Ubuntu based distributions
The DEB-based client can be found in the directory
client-linux-deb in the Client Bundle. It is suitable for
systems such as Debian and Ubuntu. Perform the following step to install
it on a 32-bit system:
$ cd ~/tl-x.y.z-clients/client-linux-deb
$ sudo dpkg -i thinlinc-client_x.y.z-rel_i386.deb
or the following steps on a 64-bit system:
$ cd ~/tl-x.y.z-clients/client-linux-deb
$ sudo dpkg -i thinlinc-client_x.y.z-rel_amd64.deb
or the following steps on a 32-bit ARM hard-float system:
$ cd ~/tl-x.y.z-clients/client-linux-deb
$ sudo dpkg -i thinlinc-client_x.y.z-rel_armhf.deb
Installation on Other Linux Distributions
A client without any specific package format can be found in the
directory client-linux-dynamic in the Client Bundle. It is
possible to run this client from any directory, even from the unpacked
Client Bundle. We generally recommend installing it in
/opt/thinlinc. Perform the following steps to install the client
to /opt/thinlinc on a 32-bit system:
$ cd ~/tl-x.y.z-clients/client-linux-dynamic
$ sudo mkdir -p /opt/thinlinc
$ sudo cp -a tl-x.y.z-rel-client-linux-dynamic-i686/* /opt/thinlinc/
or the following steps on a 64-bit system:
$ cd ~/tl-x.y.z-clients/client-linux-dynamic
$ sudo mkdir -p /opt/thinlinc
$ sudo cp -a tl-x.y.z-rel-client-linux-dynamic-x86_64/* /opt/thinlinc/
or the following steps on a 32-bit ARM hard-float system:
$ cd ~/tl-x.y.z-clients/client-linux-dynamic
$ sudo mkdir -p /opt/thinlinc
$ sudo cp -a tl-x.y.z-rel-client-linux-dynamic-armhf/* /opt/thinlinc/
The client is also available as tar archives for easy transfer to other systems without having to copy the entire Client Bundle.
Running the Linux Client
On Linux systems the client will be installed as
/opt/thinlinc/bin/tlclient. The client package contains settings
that adds /opt/thinlinc/bin to the path of the users.
To run the client, click on the ThinLinc Client icon in your
desktop environment. Typically, the icon is found in the Internet
category. You can also run the client by executing
/opt/thinlinc/bin/tlclient.
Thin Terminals
ThinLinc has support for several thin terminals, i.e. hardware built with the task of providing a thin client as primary design goal.
HP ThinPro Terminals
HP ThinPro terminals are based on Ubuntu, and therefore one can use the DEB package provided in our ThinLinc Client bundle for this terminal.
Manual installation/upgrade of ThinLinc Client
Below we will describe the process of manually installing the ThinLinc Client on Ubuntu based HP ThinPro Linux terminals.
Use the tool Administrator/User mode switch to authenticate as administrator.
Start an X terminal from the advanced tab in the control panel.
Unlock the filesystem:
# fsunlockCopy the ThinLinc Client .deb package from ThinLinc Client bundle onto a USB memory stick, and connect it to the terminal. Go into the directory which represents your connected USB device with command:
# cd /tmp/tmpfs/media/my_usb_storage
As an alternative, it is also possible to download the client package from a web server using the wget command.
Install the ThinLinc Client package using Debian package manager command:
# dpkg -i thinlinc-client*.debLock down the filesystem before closing the X terminal window:
# fslockReboot.
Add a ThinLinc connection in the connection manager.
The HP Connection Wizard does not include an entry for ThinLinc. Press Skip, then add a ThinLinc Connection in the Connection Manager.
The default user and administrator share the same home directory, and it is therefore important to NOT start the ThinLinc Client as administrator the first time. This will make the ThinLinc Client configuration only accessible by administrator and not the default user.
On “zero” clients, the default server name is set when the ThinLinc connection type is selected. To change server name, temporarily switch to another connection type, then switch back to ThinLinc. Also, to configure the ThinLinc Client, enter an invalid username/password combination in the HP login dialog. Acknowledge the error. It is then possible to access the full ThinLinc Client interface.
IGEL Universal Desktop
A client package for IGEL Universal Desktop terminals is provided. It is
included in the directory client-igel in the Client Bundle. IGEL
Universal Desktop is a modern embedded operating system which works
well. Some editions includes a bundled ThinLinc client. We do not
recommend this client. Instead, install the client as described below.
Note
Installation of our client package is only possible on IGEL terminals with the Custom Partition feature. Please ask your IGEL representative for more information.
Installing/Upgrading the ThinLinc Client on IGEL terminals
Below we will describe how to install and configure the ThinLinc client on IGEL terminals, using the Custom partition. You can use either the Universal Management Suite software running on a separate workstation, or the setup software installed on the terminal. You will need access to a web server which allows you to publish the client files.
Edit the configuration of the terminal. Select .
Under the Partition option, make sure that Enable Partition is checked. Enter a size, such as
100M. The partition must be at least 25 MiB. The upper limit depends on the hardware used. Make sure that the mount point is/custom.Under the Download option, press the star to create a new data source. Enter the URL to the web server where the ThinLinc client package definition is located. Example:
http://www.example.com/client-igel/thinlinc-i686.infUnder Custom Application, press the star to create a new application entry. Use a Session Name such as
ThinLinc.Click on Settings. Enter the Icon name:
/custom/thinlinc/icon.png
To setup the client to use the terminals normal language, enter this Command:
/custom/thinlinc/bin/tlclient
To setup the client to use Swedish, use this Command:
env LC_ALL=sv_SE.UTF-8 /custom/thinlinc/bin/tlclient
Press OK to save the configuration.
Other Thin Terminals
The ThinLinc client can be made to run on almost any Linux-based Thin Terminal as well as on some Windows-based appliances. Contact Cendio if you need help on a consultancy basis.
Running ThinLinc on a Thinstation terminal
The Thinstation project is an opensource thin client Linux distribution that can be booted in many different ways, including entirely over the network on diskless machines and via a LiveCD.
A client package for ThinStation is shipped as part of the ThinLinc client distribution. In this section, we will document how to use and configure this package with Thinstation.
Note
To run the ThinLinc client in ThinStation, you need ThinStation version 2.2 or later. However, on ThinStation version 2.4 and later, the ThinLinc client will be downloaded automatically during the build process. Thus the download procedure is only needed for ThinStation 2.2. However, the configuration step is needed for both 2.2 and 2.4.
There are two alternative methods of getting a Thinstation image with the ThinLinc client included. The first one is to use one of the TS-O-Matic servers available. They allow you to build Thinstation images online, and should generally have the ThinLinc client available as an option. The TS-O-Matic servers are available from the Thinstation webpages. The second is to download the Thinstation distribution, add the ThinLinc client package and then configure and build a Thinstation image manually. This requires access to a Linux box.
Below, we will describe the second method
Installing and Building the Package
Begin by downloading and unpacking the Thinstation main distribution available from the Thinstation webpages.
Enter the Thinstation directory created while unpacking, and unpack the
ThinLinc Thinstation client package, found in the
client-thinstation directory in the Client Bundle, into this
directory:
$ tar zxvf tl-x.y.z-rel-client-thinstation.tar.gz
This will unpack files into the packages/thinlinc directory, as
well as the file README.thinlinc which contains some summarized
information on the package.
Edit the build.conf and add a line package thinlinc in the
Applications section.
Run the build script and wait for its completion.
If everything went well, there will now be Thinstation images available
in the boot-images directory. Use the appropriate boot image for
your preferred boot method.
Configuring the ThinLinc client when running on a Thinstation Terminal
When running on a network-booted Thinstation terminal, the client is
configured by adding statements to the configuration file that is
downloaded at boot by Thinstation. The default name of this file is
thinstation.conf.network, located in your tftproot. There can
also be other filenames that configures specific terminals based on
their IP or hardware (MAC) addresses.
Basic Configuration
For the ThinLinc client to appear at all, a Thinstation “session” must
be created. This is done by adding a few lines to the
thinstation.conf.network file. Here’s an example:
SESSION_0_TYPE=thinlinc
SESSION_0_THINLINC_SERVER=tl.example.com
SESSION_0_THINLINC_OPTIONS="-u johndoe"
SESSION_0_THINLINC_CONFIG_NFS_SERVER_ENABLED=0
The above example will make the ThinLinc appear on the display of the
client after boot. It will set the servername to tl.example.com, and
it will reset the username field. It will also disable export of local
drives. See below for information on enabling local drives on
Thinstation.
All standard client options can be added to the
SESSION_0_THINLINC_OPTIONS variable. For example, to lock down the
server field, add -l server.
Configuration using the Client Configuration File
Some of the features of the ThinLinc client can’t be configured via command line options. Instead, the configuration file must be altered. To allow features such as local drive and sound redirection to work when running on Thinstation, the ThinLinc client package for Thinstation has features for altering the configuration file on the client.
To alter the configuration file, add statements on the form
SESSION_0_THINLINC_CONFIG_<configuration file variable name>
= <value>
to thinstation.conf.network. An example follows:
SESSION_0_THINLINC_CONFIG_NFS_SERVER_ENABLED=1
SESSION_0_THINLINC_CONFIG_SOUND_ENABLED=1
The above example will set the NFS_SERVER_ENABLED to 1
and the SOUND_ENABLED to 1, and so on.
Enabling Sound and Local Drive Redirection
If the hardware running Thinstation has support for it and the correct
sound and disk device modules has been loaded, the ThinLinc client will
be able to support sound and local drive redirection. The following
configuration lines in thinstation.conf.network will enable
sound redirection and local drive redirection for USB storage devices:
SESSION_0_THINLINC_CONFIG_NFS_EXPORTS=/mnt/usbdevice,rw,/mnt/cdrom,ro
SESSION_0_THINLINC_CONFIG_NFS_SERVER_ENABLED=1
SESSION_0_THINLINC_CONFIG_SOUND_ENABLED=1
SESSION_0_THINLINC_CONFIG_NFS_ROOT_WARNING=0
Avoiding Question about Server Host Key
When running on a device with non-volatile storage, such as a hard disk, the ThinLinc client stores the public part of the ssh host key of the ThinLinc client the first time it connects to the server after asking the user to verify the fingerprint of the key. At subsequent connects, this copy is used to verify that the client is connecting to the correct server.
When running on a diskless Thinstation host, the key can be stored only in volatile memory (on a RAM disk), so the client will ask the user to verify the fingerprint once each time the client has been rebooted. Since its normal behaviour to reboot a Thinstation terminal once a day, this will lead to a confusing situation for users, not to mention that it will decrease security.
To solve this problem, the ThinLinc client package for Thinstation tries
to download a file name ssh_known_hosts from the tftproot. If it
exists it will be used as database of known hostkeys on the client.
To create this file, login with the client to the ThinLinc server, using
the same servername as the one that will be configured on the clients.
Then copy the file ~/.thinlinc/known_hosts to
<tftproot>/ssh_known_hosts.
ThinLinc Web Access
ThinLinc Web Access is a ThinLinc client that runs in modern browsers and allows access to a ThinLinc server or cluster without installing any extra software on a client device.
Requirements
ThinLinc Web Access requires a web browser that supports modern web technologies such as WebSockets and Canvas. It is verified to work correctly on the latest versions of the major web browsers:
Microsoft Edge
Firefox
Google Chrome
Safari
Server Configuration
ThinLinc Web Access is served by the service tlwebaccess. The
default TCP port number for this HTTP service is 300. It can be changed
to some other port such as 443, assuming this port is free. The
configured port must be allowed in any firewalls.
In a cluster setup, the tlwebaccess service must run on all
machines. The same service port should be used, and all machines must be
accessible from the clients.
The setting /webaccess/login_page will also need to be
configured in a cluster setup. The client first authenticates with the
master. Once the master server has chosen an agent server for the
session, the client will authenticate with that agent server. The
browser will thus present pages from two different servers. First a page
from the master, and then from the agent, unless the agent is on the
same server of course. This parameter is a means for the agent to know
the public hostname of the master server. Thus when it’s properly set,
the user can, when the session has ended, click a button to return from
the agent to the master to login again. The default value, which is
/, will not redirect to another server and is only usable if you are
unning a stand alone ThinLinc server, i.e. not a cluster. If you have
more than one server or are using Network Address Translation (NAT), you
must set this parameter to an address that all clients can connect to.
Example:
login_page = https://thinlinc-master.example.com:300/
Please see Parameters in /webaccess/ for details on all possible settings for ThinLinc Web Access.
Certificates
For best security and user experience, we strongly recommend that you
use valid TLS certificates. The certificates should match the server
host names. For correct behavior, you should set the parameter
/vsmagent/agent_hostname on each of the agents in the
ThinLinc cluster.
If you can’t obtain a valid TLS certificate but still want to test
ThinLinc Web Access you can use a self-signed certificate. Such a
certificate, created for localhost, is bundled with Web Access. Any
use of self-signed certificates is insecure and most browsers will
display warnings when they are used. Self signed certificates must be
manually approved.
Note
In Safari, the certificates must match the server hostname, while other browsers might be content with a warning. Firstly, this means that you cannot connect through an IP address. Secondly, you can not use the bundled self-signed certificate. You can create a new self-signed certificate using our shipped helper script make-dummy-cert. OpenSSL is required to be installed for this script. Use it like this:
$ sudo /opt/thinlinc/etc/tlwebaccess/make-dummy-cert `hostname --fqdn`
Manually approving the self-signed certificate requires some additional steps in Safari compared to other browsers. On macOS the user must expand the browser dialog that complains about the certificate and choose to always accept that certificate. If the user already dismissed that dialog, then Safari has to be restarted. A self signed certificate must be manually approved for all machines in a cluster.
If you must test a browser on iOS with a self-signed certificate you have to add the certificate as a trusted certificate authority on the iOS device. Download the certificate on the device and install it in . Then you also have to enable the full trust of that root certificate in the Certificate Trust Settings which can be found at the bottom of the page. See Apple’s instructions here. After using Safari to install the certificate, you can use Web Access in any browser on iOS.
Warning
The above steps for iOS are very insecure and are not recommended for production systems. iOS does not have a mechanism for ignoring bad certificates for a single site. This means that following the method above will result in that your device considers the certificate as a generally trusted authority. This can in turn allow whoever has access to that certificate’s private key to generate a certificate that falsely appears valid for any site. For example, an evil website could appear to have a valid certificate for your bank.
Usage
ThinLinc Web Access is accessed with your web browser by browsing to the master machine, for example https://thinlinc-master.example.com:300. If you have configured the service to run on port 443, “:300” can be omitted.
Note
On iOS and Android devices, you can add an icon to the home screen. When the ThinLinc Web Access is launched from the home screen, it will run in full-screen mode.
Logging in to a ThinLinc server
The first thing presented to the user when browsing to ThinLinc Web Access is a login form where the user’s username and password can be specified.

Fig. 22 ThinLinc Web Access Login
To login into a ThinLinc server Web Access needs to do a successful user authentication. For most systems the password will be sufficient. If more information is needed, e.g. when using One Time Passwords or when a password change is needed, then Web Access will present a series of prompts for the user until the user has been fully authenticated.
If the login attempt is successful a ThinLinc session will start or an old one will be reused, depending on if the user already has a session running or not.
Note
ThinLinc Web Access does not fully support multiple sessions for a the same user. If the user has multiple session then a random session will be chosen
The Toolbar
Once connected ThinLinc Web Access will display a toolbar on one side of the browser window for various functions. This toolbar can be hidden by clicking the small tab on the side of it. Clicking the tab again will make the toolbar reappear. The toolbar can also be moved to either side by grabbing the tab and dragging it to the desired side.

Fig. 23 ThinLinc Web Access Toolbar
The ThinLinc Web Access toolbar has the following functions:
- Move/Drag Viewport
Toggle between sending mouse events to the ThinLinc session or panning a session that is larger than the current browser window. This button will only be shown on devices that do not have visible scrollbars.
- Show Keyboard
Toggle the on screen keyboard for the device. This button will only be shown if a touch device has been detected.
- Show Extra Keys
Displays a secondary toolbar with virtual keys for devices with limited or no physical keyboard. See Extra Keys for details.
- Clipboard
Opens the clipboard dialog. See Clipboard for details.
- Disconnect
Disconnects ThinLinc Web Access from the current session.
Extra Keys
Some physical keyboards and most on screen keyboards lack a number of keys that are commonly used in applications and desktop environments. To simplify use of these an extra toolbar is available that can simulate these keys.

Fig. 24 ThinLinc Web Access Extra Keys
- Control
Simulates pressing or releasing the left Control key.
- Alt
Simulates pressing or releasing the left Alt key.
- Windows
Simulates pressing or releasing the left Windows key.
- Tab
Simulates pressing and releasing the Tab key in sequence.
- Escape
Simulates pressing and releasing the Escape key in sequence.
- Ctrl+Alt+Delete
Simulates pressing and releasing the Control, Alt and Delete keys in sequence.
Clipboard
For security reasons the browsers prevent ThinLinc Web Access from directly integrating with the local clipboard. Copying text to or from the ThinLinc session must therefore be handled manually via the clipboard dialog.

Fig. 25 ThinLinc Web Access Clipboard Dialog
The contents of the clipboard dialog will automatically be updated whenever the contents of the clipboard in the ThinLinc session changes. Correspondingly, if the contents of the clipboard dialog is changed by the user then the clipboard in the session will be updated to match.
Touch Gestures
ThinLinc Web Access has support for the same touch gestures as the ThinLinc client when used on a touch capable monitor. These gestures allow the user to simulate certain mouse operations that would otherwise not be possible. Please see Client Touch Gestures for details on what gestures are available.
Command and Alt Keys on macOS and iOS
The Alt key (also know as the Option key) behaves very differently on macOS and iOS compared to its behaviour on other platforms. It closely resembles the PC AltGr key, found on international keyboards. ThinLinc therefore treats these keys in a special manner on macOS and iOS in order to provide a good integration between the client and the remote ThinLinc system.
For more information on how ThinLinc treats these keys see Command and Alt Keys on macOS.
Authentication in ThinLinc
In this chapter we will describe how authentication of users is performed in ThinLinc
Pluggable Authentication Modules
Authentication of users in ThinLinc is performed using the Pluggable Authentication Modules (PAM). This means ThinLinc can authenticate users using any system for which there is a PAM module. Examples of PAM modules are pam_ldap for accessing LDAP directories (including Novell NDS/eDirectory) and pam_winbind for authenticating against a Windows Domain. Of course, authentication using the standard plaintext password files of Linux is also possible using the PAM module pam_unix.
Configuration files for PAM
PAM is configured by editing the files located in the directory
/etc/pam.d/.
Different Linux distributions have slightly different ways of
configuring PAM. The ThinLinc installation program will setup ThinLinc
to authenticate using the same PAM setup as the Secure Shell Daemon, by
creating a symbolic link from /etc/pam.d/thinlinc to either
/etc/pam.d/sshd or /etc/pam.d/ssh, depending on which of
the latter files that exists at installation. This seems to work on most
distributions. Be aware that the PAM settings for the Secure Shell
Daemon might really be somewhere else. For example, on Red Hat
distributions, the file /etc/pam.d/system-auth is included by
all other pam-files, so in most cases, that is the file that should be
modified instead of the file used by sshd.
Limitations
Some PAM modules and authentication mechanisms are case sensitive, while
others are not. Usernames in the ThinLinc client are case sensitive by
default, however this behaviour can be changed. See
LOWERCASE_LOGIN_NAME in Configuration Parameters Used by the ThinLinc Client for
details.
The SSH server should be configured to allow “keyboard-interactive” authentication for full functionality. The “password” authentication method does not allow multiple interactive prompts which is required for things such as password changes during login.
Using Public Key Authentication
Introduction
Public key authentication is a more secure alternative to passwords. It uses a challenge/response mechanism that prevents even the server from gaining access to the authentication information. This section will describe how to configure ThinLinc to use it.
Key Generation
In order to use public key authentication, a pair of encryption keys must be generated. Tools to accomplish this should be included with the SSH server. On Linux, that server is normally OpenSSH and the tool to generate keys is called ssh-keygen.
Example:
$ ssh-keygen
Generating public/private rsa key pair.
Enter file in which to save the key (/home/johndoe/.ssh/id_rsa):
Enter passphrase (empty for no passphrase):
Enter same passphrase again:
Your identification has been saved in /home/johndoe/.ssh/id_rsa.
Your public key has been saved in /home/johndoe/.ssh/id_rsa.pub.
The key fingerprint is:
e1:87:0d:82:71:df:e9:4a:b0:a8:e3:cd:e8:79:58:32 johndoe@example.com
Remember that the private key (id_rsa in the example) is a
password equivalent and should be handled with care. The public key
(id_rsa.pub in the example) does not need to be kept secret.
Note
The SSH key format is not standardised, so it may be required to convert the keys depending on which servers you will be using.
Server Configuration
All SSH servers must support public key authentication, so any SSH server will work. It is important, however, to verify that public key authentication is not disabled. Refer to the documentation for your SSH server for instructions on how to do this.
Next, the public keys need to be associated with the correct users. For
OpenSSH, you must store a copy of the public key in the users’ home
directory, specifically in the file ~/.ssh/authorized_keys. This
file can contain multiple keys, each on a separate line.
Client Configuration
The client must have a copy of the private key associated with the
public key stored on the server. The key can be stored anywhere,
although on Linux it is commonly stored as ~/.ssh/id_rsa. The
user will be able to specify where the key is located in the ThinLinc
Client interface.
Note
The client currently only supports the OpenSSH key format. If your keys are in another format, e.g. for PuTTY, then they must first be converted before they can be used with ThinLinc.
Using Smart Card Public Key Authentication
Introduction
Smart card public key authentication is an advanced version of the method described in Using Public Key Authentication. It uses the same basic principle but stores the private key on a smart card, where it can never be extracted. This section will describe how to configure ThinLinc to use it.
General Requirements
Smart cards with an appropriate PKCS#11 library. The library included with ThinLinc requires PKCS#15 compliant smart cards and PC/SC libraries on the client system.
Key Generation
The keys on the smart card are generated when the smart card is issued. How this is done is not covered by this guide.
Server Configuration
To use a smart card with ThinLinc, the public key must be extracted off the card and associated with a user on the ThinLinc server. The method for doing this depends on your smart card and your SSH server.
On Linux, with the OpenSSH server and an PKCS#15 compliant smart card, the tool pkcs15-tool (part of the OpenSC suite) is able to extract the public key.
The first step is identifying the certificate on the card:
$ pkcs15-tool --list-certificates
X.509 Certificate [identification]
        Flags    : 0
        Authority: no
        Path     : 3f0050154331
        ID       : 45
The second step is to extract the key, based on the ID number:
$ pkcs15-tool --read-ssh-key 45
1024 65537 918282501237151981353694684191630174855276113858858644490084487922635
27407657612671471887563630990149686313179737831148878256058532261207121307761545
37226554073750496652425001832055579758510787971892507619849564722087378266977930
9875752082163453335538210518946058646748977963861144645730357512544251473818679
ssh-rsa AAAAB3NzaC1yc2EAAAADAQABAAAAgQCCxIx/xtVoDR2qwY4Pym7F6yKmdJsB26MUbbTiGT7o
6M6G4A2l5Go1kdQRNjOWDJE9HZWToaApSkVprNeiQLeOkbELz2yND2Te/Oyl3u44YeIUImT1v4t7q9jC
MTpfZ+TpxLf0sd3DAk2So8EBAtUkhib/ugKqfTCqB7WNoHf0Nw==
The second line, starting with ssh-rsa, is the one needed for SSH
version 2 authentication. For instructions on how to associate this key
with a user, see Using Public Key Authentication.
Client Configuration
The ThinLinc client requires no special configuration to use the smart card.
Automatic Connection
The client is able to automatically connect to the server when a smart card is inserted (see Security tab). It does, however, require that the user is able to log in using the subject name on the card. As that is rarely a valid user name, ThinLinc ships with a special NSS module, called nss-passwdaliases, that enables alternate names for users.
The module is configured by editing the file /etc/passwdaliases.
The file is a colon-delimited table of alternate names and their
corresponding user ids. Example:
givenname=John,sn=Doe,c=us:572
To activate the nss-passwdaliases module, it must be added to the list
of NSS modules for the passwd database. This is specified in the
file /etc/nsswitch.conf. For example, replace the following
line:
passwd: files ldap
with this line:
passwd: files ldap passwdaliases
LDAP Automatic Update (tl-ldap-certalias)
ThinLinc includes the tool tl-ldap-certalias that can automatically update the local databases needed for smart card public key authentication, provided the system uses the OpenSSH server (or any SSH server that uses a compatible format and location for authorized public keys) and standards compliant LDAP servers where users and certificates are stored.
The tl-ldap-certalias command can also perform validation of certificates it finds in LDAP databases. Read more about this in Certificate validation.
On invocation, a list of all users and matching certificates is gathered. How is determined by the
certificate_user_matchconfiguration variable. Ifallow_invalid_certificatesis no, only matching valid certificates will be gathered.The user’s home directory, as well as the
~/.sshdirectory, are created if they are required and do not already exist. tl-ldap-certalias reuses the/vsmagent/make_homedir_modeconfiguration variable from vsmagent for determining the default permissions of newly created home directories.Any old public keys added by tl-ldap-certalias are removed from the
~/.ssh/authorized_keysfile and the keys from the current set of certificates are added.The file
/etc/passwdaliasesis updated with a list of subject names and user id:s, to allow for login without usernames. See Automatic Connection for more information.
Note
It should be noted that any custom entries in
~/.ssh/authorized_keys will be retained, but custom changes
to /etc/passwdaliases will be overwritten each time
tl-ldap-certalias is run.
After deployment, tl-ldap-certalias is meant to be run from cron at regular intervals, for example every 15 minutes. This makes sure that the ThinLinc system automatically keeps all user certificates updated. However, please note that if you’re using certificate validation, downloading and parsing certificate revocation lists may take a long time (up to 5 minutes each). This is mitigated by caching the data from the CRL:s, but the first run and whenever the CRL needs to be updated may take a long time. Thus, if you have certificates from a lot of different certificate authorities, don’t run tl-ldap-certalias too often.
Since the default use of this tool is to be run from cron, the default behaviour is to produces no output other than error messages. If you want more output from tl-ldap-certalias, see options in Command line options.
Note
The root user must able to write to the users’ home directories for
tl-ldap-certalias to be able to update the
~/.ssh/authorized_keys files.
Command line options
tl-ldap-certalias accepts a number of different command line options that affects how the program interacts with its environment.
- -v, --verbose
Turn on program status output to standard output. This is off by default.
- -d, --debug
Turn on extra debugging putput to standard output. This is off by default.
- -s, --simulate
Dry run mode. Specifying this option tells tl-ldap-certalias to avoid writing any changes to disk. This is off by default.
- -h, --help
Show usage information and exit.
Configuration
tl-ldap-certalias uses the
/utils/tl-ldap-certalias hiveconf folder for configuration
purposes. On a standard ThinLinc installation, it’s located in
/opt/thinlinc/etc/conf.d/tl-ldap-certalias.hconf. See
Parameters in /utils/tl-ldap-certalias/ for details about the available
parameters.
Certificate validation
tl-ldap-certalias can perform validation of certificates
found in LDAP databases by the following methods if
allow_invalid_certificates is set to yes:
- Certificate validity and expiry dates
tl-ldap-certalias now checks the certificate validity and expiry dates and rejects certificates that are not valid yet or have expired.
- Matching certificate to certificate issuers
Place the CA certificates you wish to trust certificates from in
/opt/thinlinc/etc/ca/. The CA certificates must be in DER form. If tl-ldap-certalias finds a certificate with an issuer that does not match any of the certificates in/opt/thinlinc/etc/ca/, the certificate will be considered invalid and ignored.- Certificate revocation lists
tl-ldap-certalias searches the certificates it encounter for certificate revocation lists (CRL), to make sure that the certificate has not been revoked by its issuer. Once downloaded, the CRL will be cached until the time for the next scheduled update found in the CRL list has passed.
Note
tl-ldap-certalias can only handle CRL lists distributed with HTTP.
- Validation of certificate signatures.
tl-ldap-certalias can verify that the certificate signature is valid and thus assures that the certificate has not been tampered with.
Using One Time Passwords
Introduction
In this section, we will describe how to configure ThinLinc for authentication against One Time Password (OTP) servers, such as the RSA SecurID. By using OTPs, you can increase the system security.
General Requirements
An OTP server which accepts the OTP twice. This is due to the ThinLinc architecture: The client first contacts the master machine, and then the agent host. When using RSA SecurID, we recommend using the Steel-Belted Radius server as a “Token Caching Server”.
An user database (directory server) that is supported both by the operating system on the ThinLinc servers, as well as the OTP server. We recommend using a LDAP directory server, such as Novell eDirectory.
The operating systems on the ThinLinc servers must support the OTP servers authentication protocol. We recommend using the RADIUS protocol, by using the pam_radius_auth PAM module from the FreeRADIUS project.
The SSH server on the ThinLinc servers must accept “keyboard-interactive” authentication. It’s recommended to disable “password” authentication.
Configuration for RSA SecurID
This section describes how to deploy a OTP solution based on RSA SecurID with ThinLinc. When using this solution, the SecurID PASSCODEs are used instead of normal passwords. The PASSCODE should be entered in the ThinLinc client password input field. Please observe the following limitations:
When SecurID requests additional information, in addition to the PASSCODE initially entered, a popup dialog will be used. This happens, for example, in Next Token or New PIN mode. After finishing the dialog, the ThinLinc client will display a “Login failed!” error message. This happens since the SBR server clears the token cache when additional information is requested. When this happens, wait until the token changes once more, and login again.
The ThinLinc Single Sign-On mechanism will store the string entered in the clients password input field. When using SecurID, this is the PASSCODE, which cannot be used for further logins. To use the Single Sign-On mechanism, the user must be prompted for their real password. This can be done with the program tl-sso-update-password. To configure ThinLinc so that this program is executed during login, execute this command:
$ sudo ln -s /opt/thinlinc/bin/tl-sso-update-password \
  /opt/thinlinc/etc/xstartup.d/05-tl-sso-update-password
The configuration example below assumes that you are using LDAP and RADIUS, and the Steel-Belted Radius (SBR) server. Step 8 through 11 should be repeated on all ThinLinc servers.
Install and configure RSA Authentication Manager (ACE server). For basic configuration tasks such as creating users and assigning tokens, we refer to the RSA documentation.
Create a new Agent Host for the SBR server, with type Net OS Agent. Select which users should be able to login through ThinLinc. To allow all users, check the Open to All Locally Known Users checkbox.
Generate a configuration file for the SBR server, by selecting . Copy this file to
c:\windows\system32on the machine running SBR.Open the SBR Administrator. Create clients for all ThinLinc servers, using default settings. Make sure you enter a shared secret.
Use SBR Administrator to create a SecurID user. The user should typically be of type <ANY>.
Modify the SBR Authentication Policy, so that the only active method is SecurID User. Exit SBR Administrator.
Enable ACE authentication caching by editing the configuration file
c:\radius\service\radius.iniand set:[SecurID] CachePasscodes = yes SecondsToCachePasscodes = 60
Restart SBR after changing the configuration file. For more information about ACE authentication caching, refer to the Steel-Belted Radius Tech Note RD310.
Install pam_radius_auth. Some distributions, such as SUSE, includes this module.
Configure pam_radius_auth, by creating
/etc/raddb/server. It should contain the SBR server name, port, and a shared secret. Example:myotpserver.example.com:1812 mysecret
Configure the ThinLinc servers for RADIUS authentication by modifying its PAM configuration. The exact procedure depends on the system, but typically, this can be done by modifying
/etc/pam.d/system-auth, by inserting the lineauth sufficient /lib/security/pam_radius_auth.so use_first_pass
after the line containing
pam_unix.so.Restart the VSM and SSH server.
Login to the system with a SSH client, and verify that an OTP is required and accepted.
Login to the system with a ThinLinc client, and verify that an OTP is required and accepted.
File Access
Restricting write access to users home directory
Introduction
When accessing directories from CIFS and NCP servers, these are mounted
in subdirectories of the users Linux home directory. It is not possible
to place the Linux home directory on a CIFS or NCP server, since these
typically does not support the necessary POSIX file system semantics
(such as hard links). In a typical setup, applications such as Mozilla
uses the Linux home directory for settings (~/.mozilla), while
the user saves documents in ~/MyDocuments. In this case, it
might be desirable to restrict access to the Linux home directory:
Forbid saving arbitrary files to it. This can be solved by using a
feature of ThinLinc called homecreatefilter.
Activation
To activate homecreatefilter , create a symbolic link in the
xstartup.d directory:
$ sudo ln -s /opt/thinlinc/libexec/tl-homecreatefilter.sh \
   /opt/thinlinc/etc/xstartup.d/06-tl-homecreatefilter.sh
Configuration
The configuration file /opt/thinlinc/etc/homecreatefilter.conf
controls which files and directories are allowed. By default, all files
starting with a dot are allowed, as well as the files necessary for KDE
to start.
The configuration file is line based. A line not starting with a colon specifies a file object pattern that should be allowed. A line starting with a colon specifies a command line pattern. Processes matching this pattern will also be allowed write access, even if no file object pattern allows access.
Security Considerations and Limitations
The homecreatefilter feature is based on the LD_PRELOAD mechanism, which means it does not support statically linked applications. Since environment variables can be modified by the user, the user can disable the filter at will. homecreatefilter should not be regarded as a security mechanism, but rather a mechanism that prevents the user from saving documents to the Linux home directory by mistake.
In addition to the home directory, homecreatefilter restricts write
access to the ~/Desktop directory.
Accessing Client Resources from the ThinLinc session
In this chapter we will describe how to access client resources, such as local drives and serial ports, from the ThinLinc session.
Accessing the Clients Local Drives
Introduction
Using ThinLinc, it is possible to access the clients’ drives and filesystems from the ThinLinc session. With thin terminals, one might want to access a local CD-ROM drive. When running the client on a workstation, applications on the remote desktop server can access all filesystems mounted at the workstation, just like local applications can.
Note
Many Digital Cameras can be accessed as a USB storage device, and can be exported as a local drive.
Mounting and Unmounting Local Drives
The exported local drives can be mounted with the command
tl-mount-localdrives . The drives will be mounted below
$TLSESSIONDATA/drives. A symbolic link called thindrives
will be created in the user’s home directory, pointing to this
directory. The syntax for tl-mount-localdrives is:
tl-mount-localdrives [-h] [-v]
The -v option causes the tool to be executed in verbose mode,
while -h shows the syntax.
The Hiveconf parameter
/utils/tl-mount-localdrives/mount_args specifies the mount
arguments. This Hiveconf parameter is normally found in
/opt/thinlinc/etc/conf.d/tl-mount-localdrives.hconf. The options
mountport, port, mountvers, nfsvers, nolock, and
tcp will always be used.
Mounted local drives can be unmounted with the command tl-umount-localdrives. If some applications are using a mount at this time, they can continue to access the mount, even though the mount has been removed from the filesystem hierarchy (so called “lazy” umount). The syntax for tl-umount-localdrives is:
tl-umount-localdrives [-a] [-s] [-l]
If -a is specified, then all mounted local drives, for all
users on this machine, will be unmounted. If -s is specified,
then all mounted local drives, for all sessions belonging to the current
user, will be unmounted. If -l is specified, the
thindrives link will not be updated.
Note
When using multiple sessions per user, the thindrives link
will point to the newest session that executed
tl-mount-localdrives. tl-umount-localdrives
will restore the link to the newest session which is not newer than
the current session and which has mounted local drives.
Mounting Drives at Login
Often, it’s convenient to automatically mount all local drives for a
user when the session starts. This is done by default via a symbolic
link in /opt/thinlinc/etc/xstartup.d, pointing at
/opt/thinlinc/bin/tl-mount-localdrives. This link is created
for you during installation, as well as its counterpart in
/opt/thinlinc/etc/xlogout.d which points to
/opt/thinlinc/bin/tl-umount-localdrives.
Limitations and additional information
Linux kernel 2.6.23 or later is required.
A mounted local drive, for example
/var/opt/thinlinc/sessions/johndoe/47/drives/cdrom, is only usable during the lifetime of the ThinLinc session. If the user ends the session without unmounting and then starts a new session, the mount will not be usable even if the session number happens to be same. In this case, any attempts to access the mount will give the error message “Stale NFS file handle”. To be able to use the local drive, the user needs to run tl-mount-localdrives.The mounted local drive does not fully support POSIX semantics. The usual limitations of NFSv3 applies. Additionally, if the file is moved to another directory while a process has the file open, the process will get a “Stale NFS file handle” error on any subsequent file operation for that file.
Local files are uniquely identified by their inode number. Some file system implementations, such as the Linux kernel FAT implementation, do not provide persistant inode numbers. Inode numbers will change on each remount, which usually results in “Stale NFS file handle” errors.
Using Serial Port redirection
Introduction
Using ThinLinc, it is possible to access the serial ports of the client from the ThinLinc session. This means that you can utilize peripheral devices which connect through a serial port, such as digital cameras, PDAs and modems. Up to two serial ports are supported at a time.
Requirements
The application which communicates with the serial port must be dynamically linked. Statically linked applications are not supported.
Enabling Serial Port Redirection
Serial port redirection is activated (for the current user session) by sourcing the file tl-serial-redir.sh. It can be done manually with this command:
$ source /opt/thinlinc/libexec/tl-serial-redir.sh
It is necessary to source this file, because it sets the environment variables CYCLADE_DEVICES and LD_PRELOAD. Thus, all applications needing serial port access should be started as a subprocess to this shell. The easiset way to accomplish this is to source tl-serial-redir.sh from the session startup scripts. To automatically activate serial port redirection at login for all users, execute this command:
$ sudo ln -s /opt/thinlinc/libexec/tl-serial-redir.sh \
   /opt/thinlinc/etc/xstartup.d/42-tl-serial-redir.sh
Accessing the redirected port from applications
When using redirected serial ports, applications should be configured to
use a special, personal device-file, instead of a port such as
/dev/ttyS0. The two device files are called
$TLSESSIONDATA/dev/ttyS0. and $TLSESSIONDATA/dev/ttyS1.
Tip
Since the session number varies, it’s often convenient to use the
symbolic link /var/opt/thinlinc/sessions/$USER/last, which
points to the last started session directory. For example, the first
serial port can be accessed as
/var/opt/thinlinc/sessions/$USER/last/dev/ttyS0.
Limitations and additional information
When reconnecting to an existing session, it might take up to 10 seconds before the serial ports are available.
A maximum of two serial ports per session can be redirected.
The redirection is handled by processes called cyclades-ser-cli. It writes debugging information to
$TLSESSIONDATA/ttyS0.log. and$TLSESSIONDATA/ttyS1.log. These processes will automatically terminate when the session terminates.Applications that uses the
ioctlTIOCMGETare not supported yet.
Using Sound Device Redirection
Introduction
With ThinLinc, it is possible to access the client’s sound device from the ThinLinc session. This means that you can run sound applications on the remote desktop servers and listen to the sound through the client’s sound device and speakers. Input devices such as microphones can also be used.
ThinLinc can support sound redirection for almost all applications, provided that the correct libraries and utilities are installed on the ThinLinc server.
Requirements
PulseAudio client libraries to support applications with native PulseAudio support and the ALSA plug-in. ThinLinc supports version 0.9 of PulseAudio.
padsp to support OSS applications via PulseAudio.
alsa-plugins, version 1.0.12 or later, to support ALSA applications via PulseAudio.
PulseAudio applications
All applications that can communicate using the PulseAudio protocol will also work automatically in ThinLinc. Most current distributions are configured to use PulseAudio by default, but older ones might require some configuration to work properly.
OSS applications
Most applications that use the Open Sound System (OSS) can be made to work with ThinLinc through the padsp application.
padsp redirects OSS applications to the PulseAudio protocol. The following command line should be used:
padsp <application>
See the padsp manual page for more information.
The application which communicates with the sound device must be dynamically linked to glibc. It is not possible to intercept the accesses to OSS in a statically linked application. Most applications that you find on a Linux system will satisfy this requirement, but a test with ldd can also be done:
$ ldd /usr/bin/someapp
        not a dynamic executable
When using padsp on 64-bit platforms, make sure that you have
both 32- and 64-bit versions of the necessary libraries
(libpulsedsp.so and libpulse.so.0 ). Usually, these are
found in /usr/lib and /usr/lib64. Also, the
padsp script must not contain absolute references to these
libraries. Instead, the system should automatically select the correct
library, depending on if you are executing a 32- or 64-bit application.
In this case it’s necessary to have both library directories included in
/etc/ld.so.conf.
Although it is rare, some applications manage to misuse the OSS API in a way that works with local sound cards but not padsp . If you encounter problems, try updating the application to the latest version as it might contain fixes for such bugs.
ALSA applications
All applications that use the Advanced Linux Sound Architecture (ALSA) will also work well with ThinLinc provided the correct plug-ins are installed and configured. The plug-ins can be found in the alsa-plugins package (called libasound2-plugins on Debian-based distributions). The PulseAudio client libraries are also needed to build and use the plug-ins.
To redirect ALSA applications to use the plug-ins, the ALSA
configuration must be modified. This can be done on a global level in
/etc/asound.conf or per user in ~/.asoundrc. Add the
following to the file (creating it if necessary):
pcm.!default {
    type pulse
}
ctl.!default {
    type pulse
}
Unfortunately, there are some applications that use the ALSA API in an incorrect way. When using local hardware this usually doesn’t matter, but when advanced ALSA features, like dmix or this plug-in, are used, then problems start to appear. If an application misbehaves, the first step should be to upgrade it to the latest version. With some luck, the API is used more correctly in a later version.
Choosing sound system
Many applications support several sound systems and it can be difficult to know which one to use. Applications should be configured in the following manner, listed from the best solution to the worst:
Native PulseAudio application.
ALSA appliction using the PulseAudio plug-in.
OSS appliction using padsp .
Limitations and additional information
Transferring sound over the network requires a lot of bandwidth, so it is only suitable for high-speed networks, such as LANs.
Using Smart Card Redirection
Introduction
Using ThinLinc, it is possible to access the locally connected smart cards and smart card readers from the ThinLinc session. This means that you can use smart cards for encrypting your email, signing documents and authenticing against remote systems.
Requirements
The application which communicates with the smart card must be using the PC/SC API and be dynamically linked to pcsc-lite.
Enabling Smart Card Redirection
Smart card redirection is always activated on the server so there is no administration required to enable it.
Limitations and additional information
When a client disconnects, all smart cards and smart card readers will disappear for the applications. Some applications do not handle hot-plug and must therefore be restarted when this happens.
Commands on the ThinLinc Server
In this chapter, we will describe the commands shipped as part of the ThinLinc server that are meant for the common user.
Commands in /opt/thinlinc/bin
- tl-session-param [options] <parameter>
The tl-session-param command is used to access the session information managed by the VSM server. This includes information sent by the client, such as if the client has exported any local drives, or what language is set on the client side. This command is used by for example tl-set-clientlang.sh, documented later in this chapter.
- tl-config [options] <parameter>
The tl-config command is used to access configuration parameters used by the ThinLinc system. It is also used to set parameters from scripts, and can be used instead of an editor when some parameter needs to be changed. tl-config uses hivetool, part of the Hiveconf system. See Hiveconf for more information about Hiveconf.
- tl-desktop-restore
When a user’s Gnome or KDE desktop needs to be reset to default, the command tl-desktop-restore can be run. This will move the settings directories for KDE and Gnome to a backup directory named
~/.old-thinlinc-desktopin the user’s home directory, which will make both Gnome and KDE revert to the default settings.- tl-limit-printers
This command is run by VSM Server at session startup and reconnect if the Printer Access Control feature of ThinLinc is activated. See Printer Access Control for details.
- tl-memberof-group <groupname> [groupname…]
This command can be used to determine if the current user is a member of the specified groups. It returns true (0) if the user is a member of any of the groups, false (1) if the user is not a member and false (2) if any of the specified groups do not exists.
- tl-run-xstartup.d
This command is run by the default session startup file (
/opt/thinlinc/etc/xstartup.default) to execute all start scripts in the directory/opt/thinlinc/etc/xstartup.d/. Files with the suffix.shwill be sourced. All other files will be executed.- tl-select-profile
This command is run by the session setup file (
/opt/thinlinc/etc/xstartup.defaultor~/.thinlinc/xstartup) and provides a menu where the user can choose what kind of session to run. See Customizing the User’s Session for more information.- tl-set-clientlang.sh
By creating a symlink from
/opt/thinlinc/etc/xstartup.dto this command, the user’s LANG environment will be set to the language environment reported by the client.- tl-shadow-notify
This command starts the tl-shadow-notify command for the lifetime of the session. This will enable notifications when the session is shadowed.
- tl-single-app <command> [arguments]
The tl-single-app command can be used to execute a single application in a ThinLinc session. A window manager with a suitable configuration is automatically started. All top level windows are automatically maximized. Window titles are displayed in the title bar of the ThinLinc Client, not in the ThinLinc session. The client close button will disconnect the session as usual. Inner close buttons closes application windows. The tl-single-app command can be specified as a client supplied start program (see Session Startup with a Client Supplied Start Program), or used with the ThinLinc profile selector (see Configuring available profiles).
Tip
If the application opens multiple top level windows, you can switch between them by clicking on the application icon in the top left corner.
- tl-sso-update-password
This command requests a password from the user, to be used with the Single Sign-On mechanism of ThinLinc. It is useful when the password is not already available, for example, when using One Time Passwords. See Configuration for RSA SecurID for more information.
- tl-support [-p <listen-port>] [-u <user>] [host]
The tl-support command can be used to enable a support technician to login to your ThinLinc server, even though the server is behind a firewall that doesn’t allow connections to the ssh port. This is accomplished by opening a ssh connection from the server to an external server on the internet, at the same time setting up a tunnel from the remote host to the local host’s ssh port. The default server to connect to is “support.thinlinc.com” with the default username “support”. This command should only be used after contacting your ThinLinc support technician.
- tl-disconnect
This command is used to disconnect from the current session. This can be used to provide an alternative to the F8 key, such as a disconnect button on the Gnome panel.
- tl-sso-password [--check] [--remove]
This command can be used to hook up the Single Sign-on mechanism of ThinLinc with new applications. It can be used to test for the presence of a valid password and to feed that password out on standard output to another application.
To check for the existance of a valid password, invoke the command as
tl-sso-password --check. A return code of zero indicates a valid password.If the
--removeoption is specified, the password will be removed, after the retrieval or check.There are two basic models to connect tl-sso-password to an application. The first is to use shell pipes:
$ tl-sso-password | /usr/bin/application --read-password-on-stdin
The second is to have the application invoke tl-sso-password as needed:
$ /usr/bin/application --password-prog tl-sso-password- tl-sso-token-passphrase [--check] [--remove]
This command is identical to tl-sso-password, except that it uses the smart card token passphrase (PIN) instead of the user’s password. For usage, see the tl-sso-password section above.
- tl-env [-d] [-n <nr>] <command> [arg…], tl-env -s [-n <nr>]
This command can be used to save and restore the ThinLinc session environment variables. It operates on the file
xstartup.envin the session directory. During session startup, tl-env is called with the-soption after everything inxstartup.dhave been executed. Later, tl-env can be used to execute a command in this environment, even outside the ThinLinc session. During restore, the DISPLAY environment variable can be excluded by specifying-d. By default, this command operates on the “last” session number for the invoking user. An alternative session number can be specified with the-noption.
Commands in /opt/thinlinc/sbin
- tl-notify [-u <username>] <message>
This command sends a user-visible message to ThinLinc sessions on the server. The default is to send the message to all sessions, but the
-uoption can be used to send the message to a single recipient instead.To send messages to all users in a ThinLinc cluster, you can use this command in combination with the tl-ssh-all command described in this section.
- tl-rsync-all
This command is used to synchronize files and directories in a ThinLinc cluster. It runs the rsync command over SSH against all agent servers in the cluster.
- tl-ssh-all
This command is used to perform shell commands on all agents in a ThinLinc cluster. It works by running the ssh command against all agent servers in the cluster.
Commands in /opt/thinlinc/libexec
- tl-kinit.sh
The tl-kinit.sh command is used to obtain a Kerberos ticket automatically during start of the session, using the single sign-on mechanism.
- tl-kdestroy.sh
The tl-kdestroy.sh command is used to destroy the Kerberos ticket cache. It calls kdestroy during logout.
Server Configuration
This chapter describes how to configure the various features of the ThinLinc Server once it has been installed as described in Installation.
Configuring ThinLinc Servers in a Cluster
In this section, we will describe how to configure a ThinLinc cluster with multiple agent servers to allow load-balancing and redundancy.
Note
This section does not address configuration of high availability (HA). For information on configuring your ThinLinc cluster for high availability, see High Availability (HA).
A ThinLinc cluster consists of one master server (or multiple master servers in a HA configuration) with multiple agent servers grouped into subclusters. While ThinLinc in its simplest configuration may be run with both the master and agent installed on the same machine, running ThinLinc in a cluster configuration conveys numerous advantages:
A cluster configuration allows automatic load-balancing of sessions across multiple agents
Having multiple agents offers redundancy; for example, if one agent goes down or is taken out of service for maintenance, other agents are still available to handle user sessions
A cluster configuration is scalable. Since most of the workload is taken up by the agents and not the master, adding more capacity to your ThinLinc installation is generally as easy as installing one or more new agent servers
Cluster Configuration
When configuring ThinLinc servers as a cluster, one needs to configure both the master server and the agents. The master server needs configuration for subclusters (even if there is only one agent) and the agents need to know which server is the master for access control.
The configuration parameter /vsmagent/master_hostname for
each agent that is included in a ThinLinc cluster should be configured
with the address of the master server for the cluster. This gives the
master access to communicate with and control the agent server.
Once the master and agents within a cluster are configured, and the vsmagent and vsmserver services have been restarted, these ThinLinc servers will then function as a cluster.
Subclusters
A subcluster is a group of agents. At least one subcluster is always active, even in a single server setup. Each subcluster can serve a specific purpose within the ThinLinc cluster. The dimension for grouping can be chosen at will and could for example be; location, project, application etc.
ThinLinc ships with one default subcluster configuration which is used for creating new sessions by any user. It is allowed to define as many subclusters as needed. Each subcluster can be associated with users and with user groups.
To associate a user with a subcluster, either use the users or
groups configuration parameter for the specific subcluster. See
Parameters in /vsmserver/subclusters/ for details on these subcluster
configuration parameters.
If a subcluster does have neither user nor group associations configured, it is used as a default subcluster. Users that does not belong to any subcluster, will have their sessions created on the default subcluster. If a user is not associated with a subcluster and there is no default subcluster configured, the user will not be able to logon to the ThinLinc cluster.
Loadbalancing of new sessions is performed using the list of agents
defined in the agents parameter within each subcluster. See
Stopping new session creation on select agents in a cluster for details on preventing new sessions
on some agents.
Note
The subcluster association rules limit the creation of new sessions and does not apply to already existing sessions. So given a case where subcluster association was changed after session startup, the user is able to reconnect to a session outside their configured subcluster. However, next time this user creates a session it will be created on the configured subcluster.
A subcluster is defined as a folder under the
/vsmserver/subclusters configuration folder in
vsmserver.hconf. The foldername defines a unique subcluster
name.
Here follows an example subcluster configuration for a geographic location based grouping of agents:
[/vsmserver/subclusters/default]
agents=tla01.eu.cendio.com tla02.eu.cendio.com

[/vsmserver/subclusters/usa]
agents=tla01.usa.cendio.com tla02.usa.cendio.com
groups=ThinLinc_USA

[/vsmserver/subclusters/india]
agents=tal01.india.cendio.com tla02.india.cendio.com
groups=ThinLinc_India
During the selection process for which subcluster a new session is created on, the following rules apply:
usershas precidence overgroups. This means that if a user belongs to a group that is associated with subcluster A and the user also is specified inusersfor subcluster B, the user session will be created on subcluster B.groupshas precidence over the default subcluster. This means that if a user belongs to a group that is associated with subcluster B, the user session will be created subcluster B and not on the default subcluster A.If user does not belong to an associated group nor is explictly specified by
usersfor a subcluster, the new session will be created on the default subcluster.
Note
Try to avoid the following configurations that will result in undefined behaviors for subclusters:
Avoid two subclusters without associated
usersandgroups, eg. default subclusters. It is undefined which of them that will be the default subcluster used for users that are not associated to a specific subcluster.If a user is a member of two user groups which are used for two different subclusters, it is undefined which subcluster the new session will be created on.
If a user is specifed in
usersof two different subclusters, it is undefined which subcluster the new session will be created on.
Keeping agent configuration synchronized in a cluster
When multiple agents have been configured as part of a cluster, it is usually desirable to keep their configurations synchronised. Instead of making the same change seperately on each agent, ThinLinc ships with the tool tl-rsync-all to ensure that configuration changes can be synchronised easily across all agents in a cluster. See Commands on the ThinLinc Server for more information on how to use this tool.
The tl-rsync-all command should be run on the master server, since it is the master which has the knowledge of which agents there are in the cluster. For this reason, it is often useful to configure the master server as an agent as well, even if it will not be used to host user sessions in general. This allows the master to be used as a “template” agent, where configuration changes can be made and tested by an administrator before pushing them out to the rest of the agents in the cluster. In this way, configuration changes are never made on the agents themselves; rather, the changes are always made on the master server, and then distributed to the agents using tl-rsync-all.
An example of how one might implement such a system is to configure the master server as an agent which only accepts sessions for a single administrative user. The steps to do this are as follows:
Configure the master as an agent too. On a ThinLinc master, the vsmagent service should already have been installed during the ThinLinc installation process; make sure that this service is running.
Create an administrative user, for example tladmin . Give this user administrative privileges if required, i.e. sudo access.
Create a subcluster for the master server and associate administrator user tladmin to it. See following example:
[/vsmserver/subclusters/Template]
agents=127.0.0.1
users=tladmin
See Subclusters for details on subcluster configuration.
Restart the vsmserver service.
In this way, configuration changes are never made on the agents themselves; rather, the changes are always made on the master server, and then tested by logging in as the tladmin user. If successful, these changes are then distributed to the agents using tl-rsync-all.
Stopping new session creation on select agents in a cluster
When, for example, a maintenance window is scheduled for some agents servers it is sometimes desirable that no new sessions are started on that part of the cluster. It is possible to prevent new sessions from being started without affecting running sessions.
To stop new session creation on specific agents, those agents need to be
removed from the agents configuration variable in the associated
subcluster. Once the vsmserver service is restarted on the master
server, new user sessions will not be created on the removed agents.
Users with existing sessions can continue working normally and users
with disconnected sessions will still be able to reconnect.
Server Configuration Parameters
The ThinLinc server is configured using a number of configuration parameters stored in Hiveconf. For information about how to access and set the parameters, please refer to Hiveconf. In this chapter, we will describe the different parameters and their meaning.
The parameters used in ThinLinc are divided into a number of folders, each having zero or more subfolders. The following folders exist:
/vsmcontains parameters common to both the VSM agent and the VSM server. This folder normally resides in/opt/thinlinc/etc/conf.d/vsm.hconf./vsmagentcontains parameters specific to the VSM agent. This folder normally resides in/opt/thinlinc/etc/conf.d/vsmagent.hconf./vsmservercontains parameters specific to the VSM server. This folder normally resides in/opt/thinlinc/etc/conf.d/vsmserver.hconf./vsmserver/subclusterscontains definitions of subclusters within the ThinLinc cluster. This folder normally resides in/opt/thinlinc/etc/conf.d/vsmserver.hconf./profilescontains parameters for configuring the different session profiles. This folder normally resides in/opt/thinlinc/etc/conf.d/profiles.hconf./utilscontains parameters used by miscellaneous ThinLinc utilities. Each utility has its own configuration file, but all parameters are then merged in under/utilswhen read by the HiveConf framework./sessionstartcontains some parameters used during session startup. This folder normally resides in/opt/thinlinc/etc/conf.d/sessionstart.hconf./shadowingcontains parameters used to control access to the shadowing feature. This folder normally resides in/opt/thinlinc/etc/conf.d/shadowing.hconf./tlwebadmcontains parameters for the tlwebadm web configuration interface. This folder normally resides in/opt/thinlinc/etc/conf.d/tlwebadm.hconf./webaccesscontains parameters for the server part of ThinLinc Web Access. This folder normally resides in/opt/thinlinc/etc/conf.d/webaccess.hconf.
Parameters in /vsmagent/
In this section, we will describe all the parameters currently used by the VSM agent.
- /vsmagent/agent_hostname
Public hostname; the hostname that clients are redirected to. If not defined, the agent will use the computer’s IP address. This is the default configuration, and means that ThinLinc does not require DNS to work properly. However, if you are using Network Address Translation (NAT), you must set this parameter to a IP address or DNS name that all clients can connect to. Example:
agent_hostname = thinlinc.example.com
- /vsmagent/allowed_clients
This is the space-separated list of VSM servers that should be allowed to connect to this VSM agent and create new sessions. The localhost is always allowed as well as the IP of the hostname the VSM agent runs on, and the host specified in the
/vsmagent/master_hostnameparameter.
- /vsmagent/default_environment
This subfolder of
/vsmagentcontains environment variables that should be set in each user’s session. Example:[/vsmagent/default_environment] TOWN=Springfield LC_CTYPE=sv_SE.UTF-8 FOOBAR=foobar
This will set the TOWN environment variable to
Springfield, the LC_CTYPE variable tosv_SE.UTF-8and the FOOBAR variable tofoobarin each user’s session.Note
xsession is executed via a login shell, which may modify the environment and override values in
/vsmagent/default_environment.
- /vsmagent/default_geometry
The default session size, to be used when clients are not requesting any specific session size.
- /vsmagent/display_max
The maximum display number to be used for ThinLinc sessions on each specific VSM agent host. Default value is
2000.The maximum ThinLinc sessions allowed on a specific VSM Agent host is
/vsmagent/display_max-/vsmagent/display_min.
- /vsmagent/display_min
The lowest display numbers to use for clients. The default is
10, and unless there are other processes needing display numbers, the recommendation is not to change this number. See TCP Ports Used by ThinLinc for an in-depth explanation of port allocation.
- /vsmagent/listen_port
The TCP port VSM Agent listen to for incoming requests. This should normally be set to the same value as
/vsm/vsm_agent_port.
- /vsmagent/lowest_user_port
The lowest port to be used by normal user processes. This may never be lower than
/vsmagent/max_session_port. See TCP Ports Used by ThinLinc for an in-depth explanation of port allocation.
- /vsmagent/make_homedir
If this parameter is true, the users home directory will be automatically created if it doesn’t exist.
- /vsmagent/make_homedir_mode
When a home directory is created (see parameter
/vsmagent/make_homedirabove), the mode for the newly created directory will be determined by this parameter.
- /vsmagent/master_hostname
This parameter specifies the hostname of the master machine, i.e. the machine that runs the VSM server. In a HA setup, this should be the hostname of the IP address that is on the machine that is currently the active node, to ensure that services on the agents that need to access the VSM Server always connects to the machine that is up and running.
- /vsmagent/max_session_port
The highest port to use for VNC and tunnel ports on the VSM Agent. See TCP Ports Used by ThinLinc for an in-depth explanation of port allocation.
- /vsmagent/single_signon
This parameter decides whether the passwords of the users should be saved in order to support Single Sign-On when connecting to servers from the ThinLinc session, for example when running a Windows session.
- /vsmagent/xserver_args
Extra arguments to pass on to the Xserver Xvnc. One common case is to use
-localhost, which makes Xvnc require connections to originate from localhost, thus forcing applications to either be local or use a tunnel (which often also means that the traffic is encrypted). Other examples include-IdleTimeoutand-MaxIdleTime. For more information, see Limiting Lifetime of ThinLinc Sessions.
- /vsmagent/xauthority_location
This parameter controls the location of the
Xauthorityfile. Currently, two values are supported: Withhomedir, the file will be placed in the users home directory. Withsessiondir, the file will be placed in the session directory below/var/opt/thinlinc/sessions. The XAUTHORITY environment variable is set accordingly by the VSM agent.
Parameters in /vsmserver/
In this section, we will describe all the parameters currently used by the VSM server.
- /vsmserver/admin_email
The administrator’s email address. This is where warnings about overuse of Licenses are sent, among with other administrative messages. Make sure this is a valid address.
- /vsmserver/allowed_clients
A space-separated list of hosts from which privileged operations are allowed. The default (empty) allows localhost to do this. Privileged operations are for example to deactivate a session, something that should be allowed by the host running the ThinLinc Web Administration service.
- /vsmserver/allowed_groups
ThinLinc access can be limited to certain groups. If the
allowed_groupsspace-separated list is empty, all users are accepted. Otherwise, the user must be a member of the groups listed below, to be able to use ThinLinc. Example:allowed_groups = students teachers
- /vsmserver/bogomips_per_user
Estimated bogomips required for each user.
- /vsmserver/existing_users_weight
This parameter decides the importance of the amount of logged in users on a VSM agent host when calculating load balance parameters. A host with low load, but a lot of users, is generally more likely to get a higher load within short time when the users get active. For this reason, the load balance calculating code takes the number of users at a certain host into its calculation. The
/vsmserver/existing_users_weightcontrols how important this factor is. A higher value of this parameter means the load balancing code will care less about a high number of users on a certain machine.Note
This parameter should normally not be changed, unless when fine-tuning the load balancing.
- /vsmserver/HA/enabled
If this parameter is true, the VSM server will try to replicate information about sessions to the other VSM server node. See High Availability (HA) for more information about ThinLinc in a High Availability configuration.
- /vsmserver/HA/nodes
This parameter lists the hostnames of both nodes in a ThinLinc HA setup. The space-separated list should include the hostname of the current node. This means that
vsmserver.hconfcan be identical on both nodes.
- /vsmserver/listen_port
The TCP port VSM Server listen to for incoming requests. This should normally be set to the same value as
/vsm/vsm_server_port.
- /vsmserver/load_update_cycle
The number of seconds allowed for updating the load status in the entire cluster.
- /vsmserver/max_sessions_per_user
The maximum number of sessions allowed per user.
0means no limit. The master will attempt to keep all sessions for a user on the same agent server in order to avoid problems. The problems usually come from applications that incorrectly assumes unrivaled access to the user’s home directory. When on the same machine the conditions allow the applications to handle things better.
- /vsmserver/ram_per_user
Integer, number of estimated MiB memory required for each session.
- /vsmserver/unbind_ports_at_login
If this parameter is true, processes occupying the users’ interval of forwarded ports will be killed at login. This means that if a user logs in twice to the same session, the second login will get working tunnel ports, if this parameter is true. The first session’s tunnel ports will stop working. If the parameter is false, the first session will keep the ports.
Parameters in /vsmserver/subclusters/
In this section, we will describe all the parameters used for defining subclusters. For more information about subclusters see Subclusters.
- /vsmserver/subclusters/<name>/agents
All ThinLinc agents part of this ThinLinc subcluster. New user sessions for this subcluster are created on the agents in this list. Agents later removed from the list will continue to function normally for existing sessions until those sessions end. This should be a space-separated list of DNS host names. These will be used for communication between the master and the agent. The name reported to the client is fetched from the agent itself; names in
/vsmserver/subclusters/<name>/agentsare not reported directly to the clients.
- /vsmserver/subclusters/<name>/users
All users that should be associated with this specific ThinLinc subcluster. This should be a space-separated list of usernames. If both
/vsmserver/subclusters/<name>/usersand/vsmserver/subclusters/<name>/groupsare empty it means the subcluster is a default subcluster.
- /vsmserver/subclusters/<name>/groups
All user groups that should be associated with this specific ThinLinc subcluster. This should be a space-separated list of groupnames. If both
/vsmserver/subclusters/<name>/groupsand/vsmserver/subclusters/<name>/usersare empty it means the subcluster is a default subcluster.
Parameters in /vsm/
Parameters in the /vsm folder are used by both the VSM agent
and the VSM server. Neither of them need to be changed on a normal
ThinLinc installation.
- /vsm/tunnel_bind_base
The tunnels setup by the client to access various resources (audio, serial port, network resources, local printer) need one port number each on the server running the VSM agent the client is connected to. This parameter decides the lowest such port that is allocated by the VSM agent. Each user has a port range defined by the formula:
/vsm/tunnel_bind_base+ display × 10 + service_slotwhere the service_slot depends on which service will use the tunnel. This port range is however used only for sessions with display numbers less than 100. See TCP Ports Used by ThinLinc for an in-depth explanation of port allocation.
Note
This parameter should normally not be changed.
- /vsm/tunnelservices
There are several parameters under the
/vsm/tunnelservicesfolder. Each one decides which ports are used at serverside termination points for the tunnels used to access client resources. See TCP Ports Used by ThinLinc for an in-depth explanation of port allocation.Note
None of these parameters should normally be changed.
- /vsm/tunnelslots_per_session
The number of ports to reserve for tunnel port endpoints on the server. The number of ports actually used depends on the number of services defined under
/vsm/tunnelservices. We recommend letting this parameter have its default value (10), since that provides a margin for future services. See TCP Ports Used by ThinLinc for an in-depth explanation of port allocation.Note
This parameter should normally not be changed and must not be changed whilst there are any running sessions.
- /vsm/vnc_port_base
The port base for VNC communication. The VNC protocol runs on one port per active user on the VSM agent host, and this is the base of the numbers used. That is, for the first user, the port will be
/vsm/vnc_port_base+ 1, for the second user/vsm/vnc_port_base+ 2 and so on. This algorithm is used only for display numbers below 100. See TCP Ports Used by ThinLinc for an in-depth explanation of port allocation.Note
This parameter should normally not be changed.
- /vsm/vsm_agent_port
VSM agent communication. This is the port that the VSM server connects to on VSM Agents. This traffic is not encrypted.
Note
This parameter should normally not be changed
- /vsm/vsm_server_port
The port that the VSM server listens to.
Note
This parameter should normally not be changed
Parameters in /sessionstart/
In this section, we will describe all the parameters currently used by the session startup scripts.
- /sessionstart/background_color
The initial color of the background that is set early during session startup. By default this is a dark blue color.
- /sessionstart/background_image
A PNG image used as the initial background. The image will always be scaled to cover the entire screen.
If the image contains transparency then the color set by
/sessionstart/background_colorwill shine through.
- /sessionstart/keyboard_layout
The default virtual keyboard layout used by Xvnc. The protocol is not dependent on this being configured, but some applications can misbehave if a different virtual layout is configured compared to the real keyboard layout on the client device.
A list of possible keyboard layouts is given from this command:
$ man /opt/thinlinc/share/man/man7/xkeyboard-config.7
Parameters in /shadowing/
In this section, we will describe all the parameters currently used by the shadowing feature.
- /shadowing/allowed_shadowers
A space-separated list of users and/or groups that are allowed to shadow other users. Group names are prefixed with
+sign. Please note that these users will gain full access to other users’ sessions. See Shadowing for more information.
- /shadowing/shadowing_mode
A constant string value of:
reject,silent,notifyorask. This value configures in which way a shadowing request is handled.rejectAll shadowing requests are rejected. You should set this if you want to disable the shadowing feature.
silentAll shadowing requests are accepted and the user will not be notified about beeing shadowed.
notifyAll shadowing requests are accepted and a message box will be shown to notify the user when the shadowing starts and when the shadowing ends.
askShows a dialog to the user and gives him the full control of deciding to accept or reject the shadowing request. If the request timeout is reached without the user making a decision then the shadowing request will be rejected. Like for notify the user is also informed when the shadowing ends.
See Shadowing for more information.
Parameters in /profiles/
In this section, we will describe all the parameters currently used by the profiles feature.
- /profiles/default
The profile that should be preselected when the profile chooser starts, and the profile to be chosen when there is a problem displaying the profile chooser to the user.
- /profiles/order
A space separated list of profiles that should be available for the user to choose from. The profiles will be displayed in the same order as specified here.
Note that other criteria must also be satisfied for a profile to be available to a user. See
xdg_sessionandtestcmdfor more details.
- /profiles/show_intro
If this parameter is true then the introduction text specified in
introductionwill be displayed by the profile chooser. Enabled by default.
- /profiles/greeting
This parameter specifies the title for the introduction text specified in
introduction. Pango Markup can be used here to provide styling to the text (e.g. bold or italicized words).
- /profiles/introduction
This parameter specifies the the introduction text shown by the profile chooser. Pango Markup can be used here to provide styling to the text (e.g. bold or italicized words). If
show_introis set to false then this text is not shown.
Each profile is defined under a section named
/profiles/<profile key>. It has the following fields:
- /profiles/<profile key>/xdg_session
Connects this ThinLinc profile with a system desktop session configuration. The directories
/etc/X11/sessionsand/usr/share/xsessionswill be searched for a file matching<xdg_session>.desktop. It is recommended that this field is used for all modern desktop environments as it sets up important environment variables.The fields
name,description,icon,cmdlineandtestcmdwill all be implicitly filled in by the system configuration. You can override those values individually by specifying a different value in the ThinLinc configuration.Multiple values can be specified in this field, separated by spaces. The first matching configuration will be used. If no matching configuration can be found then the profile will not be shown.
Note
If the configuration is listed in
/etc/upstart-xsessionsthen the specified command is ignored and an Upstart user session will be started instead. A manually specifiedcmdlinecan still be used to override the command.
- /profiles/<profile key>/name
A short description of the profile, shown in the profile list. Pango Markup can be used here to provide styling to the text (e.g. bold or italicized words).
- /profiles/<profile key>/description
A longer description, shown under the screen shot when the profile is selected. Pango Markup can be used here to provide styling to the text (e.g. bold or italicized words).
- /profiles/<profile key>/icon
A 22×22 image shown next to the name in the profile list. Paths can be absolute or relative
/opt/thinlinc/share/tl-select-profile. It is also possible to specify an icon name in accordance with the icon naming specification.
- /profiles/<profile key>/screenshot
A 200×150 image shown when the profile is selected. Paths can be absolute or relative
/opt/thinlinc/share/tl-select-profile.
- /profiles/<profile key>/cmdline
The command to execute if this profile has been chosen.
If
xdg_sessionis set then the environment variable XDG_EXEC will be set to the original command line from the system desktop session configuration.
- /profiles/<profile key>/testcmd
A shell expression or command that is executed to determine if this profile should be visible or not. A non-zero return code causes the entry to be hidden. If this field is empty or missing then the entry will always be shown.
If
xdg_sessionis set then the environment variable XDG_TRY_EXEC will be set to the expected binary from the system desktop session configuration. Note that this value differs in behaviour fromtestcmd. XDG_TRY_EXEC should only name a executable binary in PATH , whilsttestcmdwill be executed and its return code inspected.
Parameters in /tlwebadm/
In this section, we will describe all the parameters currently used by the ThinLinc Web Administration.
- /tlwebadm/username
The username to authenticate with when accessing the web interface.
- /tlwebadm/password
The password for the above user. The tool /opt/thinlinc/sbin/tl-gen-auth may be used to create hashes of the format required for use with this parameter.
- /tlwebadm/cert
The path to the certificate file to be used for TLS encryption.
- /tlwebadm/certkey
The path to the certificate private key file.
- /tlwebadm/listen_port
The local port for the web server to listen on.
- /tlwebadm/gnutls_priority
The GnuTLS priority string is used to select the order and availability of TLS versions, ciphers, key exchange, MAC, compression, signature and elliptic curve algorithms for TLS sessions. See GnuTLS priority strings for possible values.
- /tlwebadm/logging/logfile
The file to use for logging tlwebadm messages. By default, this is
/var/log/tlwebadm.log.
Parameters in /webaccess/
In this section, we will describe all the parameters currently used by the ThinLinc Web Access client.
- /webaccess/cert
The path to the certificate file to be used for TLS encryption.
Note
This certificate may be downloaded by connecting clients to be installed in their browsers. Make absolutely sure that this file does not contain a private key.
- /webaccess/certkey
The path to the certificate private key file used for TLS encryption.
- /webaccess/login_page
The URL which is used to redirect back to the Web Access login page on the master server. The default value is
/, which redirects to the current server. This parameter needs to be changed when ThinLinc Web Access is used in a cluster setup.
- /webaccess/listen_port
The local port for this service to listen on. The default port used is
300.
- /webaccess/gnutls_priority
The GnuTLS priority string is used to select the order and availability of TLS versions, ciphers, key exchange, MAC, compression, signature and elliptic curve algorithms for TLS sessions. See GnuTLS priority strings for possible values.
- /webaccess/logging/logfile
The file to use for logging tlwebaccess messages. By default, this is
/var/log/tlwebaccess.log.
Parameters in /utils/
In this section, we will describe all the parameters currently used by various utilities.
Parameters in /utils/tl-desktop-customizer/
In this section we will describe all the parameters currently used by the ThinLinc Desktop Customizer.
- /utils/tl-desktop-customizer/xdg_data_dirs
A space separated list of directories that ThinLinc Desktop Customizer should look for applications in.
Parameters in /utils/tl-ldap-certalias/
In this section we will describe all the parameters currently used by tl-ldap-certalias.
- /utils/tl-ldap-certalias/ldap_schema
Specify the schema type that is used on the target LDAP server. Valid options are
rfc2307andAD.rfc2307is default and should be used with standard LDAP servers that complies to RFC 2307.ADshould be used if target LDAP server is an Active Directory.
- /utils/tl-ldap-certalias/allow_invalid_certificates
This parameter controls whether to perform validation on certificates found in the LDAP database. Possible values are
yesandno.Please note that by setting this to yes, you will allow users with expired, invalid, revoked or untrusted certificates to log in as if their certificates are valid.
Note
If you want tl-ldap-certalias to match the behaviour of tl-ldap-certalias versions earlier than 3.2.0, set this to
yes.
- /utils/tl-ldap-certalias/certificate_user_match
The method to use for finding certificates assigned to the user. Valid options are
sameobjectandnovell_certificate_subjectname.sameobjectmakes tl-ldap-certalias search for certificates in theuserCertificateattribute on user objects it finds.novell_certificate_subjectnameallows for certificates to be stored in another LDAP tree. User objects are associated to certificates by storing subject names of certificates in a multivalued attribute calledsasAllowableSubjectName(OID 2.16.840.1.113719.1.39.42.1.0.69) on the user object. tl-ldap-certalias can handle both DN:s as written by Novell iManager (DC=com.DC=example.OU=test.CN=foo) and as returned bytl-certtool --subject(cn=foo,ou=test,dc=example,dc=com).
- /utils/tl-ldap-certalias/users/uri
A LDAP server URI for finding users on the form
ldap[s]://name[:port]
- /utils/tl-ldap-certalias/users/base
The LDAP search base for finding users.
- /utils/tl-ldap-certalias/users/binddn
The username to bind as for searching for users. If left blank, no bind is performed.
- /utils/tl-ldap-certalias/users/bindpw
The password to use in combination with
binddnfor bind operations Ifbinddnis left empty, this can also be left empty.
- /utils/tl-ldap-certalias/certs/uri
- /utils/tl-ldap-certalias/certs/base
- /utils/tl-ldap-certalias/certs/binddn
- /utils/tl-ldap-certalias/certs/bindpw
If
certificate_user_matchis notsameobject, these settings will be used to determine where to look for certificates. They follow the same rules as the settings for users.
Parameters in /utils/tl-mount-localdrives/
In this section we will describe all the parameters currently used by tl-mount-localdrives.
- /utils/tl-mount-localdrives/mount_args
Specifies any extra mount parameters to be used when mounting local drives from a client.
Configuring Logging on ThinLinc servers
In this section we will describe how ThinLinc logs activities on the server, and how the logging can be configured.
Logs are written by each individual session and by the following ThinLinc server components.
VSM server
VSM agent
Web Integration
Web Administration Interface
Web Access (HTML5 client)
ThinLinc server components
Logging is configured by editing parameters in Hiveconf. Each component
that uses the logging system has a Hiveconf folder named logging.
In this folder and its subfolder, the logging system is configured.
Log destinations
Logs can be written either to file on the local disk, to syslog or both.
The file name for the log file written to local disk is configured by
editing the parameter logfile under the logging folder. To turn
off logging to file, set the parameter log_to_file to 0. Note
that the log file will still be created. If abnormal situations occur
because of programming errors, data may appear in the file.
For large installations, using a central loghost might be very convenient. ThinLinc supports writing logs to syslog, which makes it possible to collect all logs in one place.
By setting the parameter log_to_syslog under the logging folder
to 1, logs will be written to syslog. Specify the syslog facility in
the parameter syslog_facility . The default behaviour is not to log
to syslog.
If the parameter syslog_host is set, logs will be sent via UDP to
the syslog daemon on the host specified. If not, logs will be sent to
syslog by writing to the socket specified in syslog_socket . The
latter is the default.
Subloggers
Each program doing logging uses a number of sub loggers. Sub loggers are
a way to distinguish different types of information written by the
program. For example, the VSM server uses the subloggers license,
session and shadow for logging license-related messages,
information about sessions and information about shadowing repectively.
Every sublogger can be configured to use a different log level. This
allows the system administrator to, for example, increase the
information about new sessions without increasing the overall loglevel,
easing debugging of specific problems.
Log levels
The amount of logging can be configured using log levels. The log levels available are:
Log Level |
Explanation |
|---|---|
|
Unrecoverable Errors |
|
Warnings - something went wrong, but ThinLinc can recover. |
|
Messages that are useful in daily maintenance. |
|
Messages that can be of use for system administrators when debugging problems. |
|
Messages useful to trained ThinLinc personel when doing advanced debugging. |
The log level configured can be seen as a barrier. If the log level is
set to for example INFO, log messages with a level of INFO or
higher are let through. If the log level instead is set to DEBUG2,
all log messages are let through, since all log levels are higher than
DEBUG2.
There is one default loglevel, and one loglevel per sublogger defined. If the log level for a sub level is set to a lower value than the default loglevel, more information will be written by that specific sublogger.
The default loglevel is configured in the logging/defaultlevel
parameter. Each sublogger’s level can then be configured by setting the
parameters under the logging/levels folder.
Summary
The default logging configuration is summarized in Default Log Behaviour.
Component |
Default Behaviour |
Log Configuration Hive Folder |
|---|---|---|
VSM server |
Log to /var/log/vsmserver.log |
|
VSM agent |
Log to /var/log/vsmagent.log |
|
Web Administration Interface |
Log to /var/log/tlwebadm.log |
|
Web Access (HTML5 client) |
Log to /var/log/tlwebaccess.log |
|
Per-Session Logging
Each Session writes what is written to standard output and standard
error output to a file named xinit.log which is located in the
session directory for a specific session. For example, the log for the
last session of the user johndoe is located in
/var/opt/thinlinc/sessions/johndoe/last/. This log contains
for example output written by software run in the session, but it also
has some output from ThinLinc software that is run by the user.
Customizing the User’s Session
In this section, we will describe how the session startup in ThinLinc can be customized.
Session startup - the big picture
The session setup is constructed to be easy to use and configure yet still easy to customize for advanced use cases.

Fig. 26 Session Startup Procedure - on VSM Server
In Fig. 26, shows a (simplified) description of what happens on the VSM Server when a client connects to login:
The VSM Server checks if the user has an existing session.
If a session exists, VSM Server contacts the VSM Agent running on the host where the session is running, and asks it to verify that the session is still alive.
If the session was alive, VSM Server runs any scripts placed in
/opt/thinlinc/etc/sessionreconnect.d. When all such scripts are completed, session information is returned to the client. The client proceeds by contacting the agent on which the session is running.If the existing session was not alive, or if there were no existing session at all, VSM Server finds out which VSM Agent has the least load, and contacts this agent to request a new session.
When the agent responds that a new session has been created, VSM Server runs any scripts placed in
/opt/thinlinc/etc/sessionstartup.d. When all such scripts are completed, session information is sent back to the client. The client proceeds by contacting the agent on which the session was started.
Scripts run at session startup/reconnect
Scripts in /opt/thinlinc/etc/sessionstartup.d and
/opt/thinlinc/etc/sessionreconnect.d are run by the root user,
on the VSM Server. Session information will not be sent back to the
client until these scripts have completed. This makes it possible to
ensure that commands have been run before the client connects to the VSM
Agent.
If background execution is desired, place the command to be run in the background and make sure all file descriptors are closed. Here’s an example on how to execute a script in the background.
${TLPREFIX}/sbin/tl-limit-printers < /dev/null > /dev/null 2>&1 &
Session startup on VSM Agent

Fig. 27 Session Startup Procedure - on VSM Agent
Fig. 27 outlines what happens when an VSM Agent is contacted by VSM Server to request a new session. In detail, the following happens:
The VSM agent on the machine where the session will reside executes the script
/opt/thinlinc/etc/xsession.The file
/opt/thinlinc/etc/xsessionis a shell script that can be customized by advanced users. In its standard version, as delivered with ThinLinc, it will check if there is a file named~/.thinlinc/xstartupin the user’s home directory. If there is such a file, it will be executed. If no such file exists, the file/opt/thinlinc/etc/xstartup.defaultis executed instead. See Profiles and the standard xstartup.default file for a description of the standard behaviour of this file.
This system allows for experienced users to customize how their session
startup should work by editing the file ~/.thinlinc/xstartup. On
the other hand, at sites where users should not be able to customize
their system startup, /opt/thinlinc/etc/xsession can be modified
so that it doesn’t try to execute user-specific xstartup-files. The
standard setup should however suit the needs of the majority of
installations.
Profiles and the standard xstartup.default file
ThinLinc allows for different “profiles” when starting up a user session. The users will be presented with a menu after logging in, where they can choose for example between a desktop suited for engineering users, a desktop suited for the marketing department or a Windows desktop. The example configuration files that are delivered with ThinLinc have several different alternatives, however only those sessions that are actually available on the system are displayed. This is just an example configuration, meant to be customized for each individual ThinLinc installation.

Fig. 28 The ThinLinc profiles and xstartup.default
As described in Session startup - the big picture,
/opt/thinlinc/etc/xstartup.default is executed if there is no
~/.thinlinc/xstartup for the user. This file, in its unmodified
version as delivered with ThinLinc, executes three steps, as outlined in
Fig. 28.
The command tl-run-xstartup.d is executed, which causes all files in
/opt/thinlinc/etc/xstartup.d/to be executed. Files that have filenames ending with.shwill be sourced as shell scripts. Other files are executed normally. This way, environment variables that persist down to the session command can be set in*.shfiles.If a specific execution order is needed for the scripts in the
xstartup.d/directory, let the names of the scripts begin with numbers, where a script with a lower number will be executed before one with a higher number. For example10setuphomedirwill be executed before20copyfiles.By default, the script
/opt/thinlinc/etc/xstartup.d/20-tl-select-profile.shwill invoke tl-select-profile, to let the user choose among the possible profiles. See Configuring available profiles for documentation on how to setup profiles. If only one profile is available, tl-select-profile will select it without asking the user. The environment variable TLPROFILE is set to the name of the selected profile.Worth noting is that the environment variable TLPROFILE is available when running the scripts in
xstartup.d, for decisions based on what profile will be run.The command tl-run-profile is run. This runs the commands associated with the selected profile, for example startkde to start a KDE session.
When the commands run by tl-run-profile exits,
xstartup.defaultruns the command tl-run-xlogout.d which runs scripts and commands located in the directory/opt/thinlinc/etc/xlogout.d. The same information that applies to files inxstartup.d(as documented in step 1. above) applies to files in this directory.
Note
Scripts in /opt/thinlinc/etc/xstartup.d and
/opt/thinlinc/etc/xlogout.d are run on the agent, with
the same rights as the user owning the session.
Session Startup with a Client Supplied Start Program
If the client has requested that the session should be started with a
command supplied by the client, VSM agent will set the environment
variable TLCOMMAND to this command. In this case, the profile
selection dialog will be disabled and tl-run-profile will
execute the command specified by the client, instead of a profile
command. To disable client supplied start programs, create the file
/opt/thinlinc/etc/xstartup.d/00-no-startprog.sh, containing:
unset TLCOMMAND
Configuring available profiles
The profiles choosable via the tl-select-profile command are
configured via Hiveconf, under the /profiles path. The
default configuration includes a number of examples.
If the default parameter is present, it specifies the default profile.
The profile chooser will have this entry selected when it starts, and it
may also be used automatically for some error conditions.
The order parameter selects which profiles should be available for
selection, and the order in which they are displayed. This is a
space-separated list.
If the show_intro parameter is true, a configurable introduction text
will be displayed and requires user input to proceed with the logon
process. The introduction parameter is a text that will be displayed
if introduction is shown. This text block also supports Pango Markup
format styling for a fancier text layout.
Each profile is defined under a section named
/profiles/<profile key>. For most desktop environments
only the xdg_session parameter needs to be configured. For custom
profiles more values need to be specified, mainly cmdline. Please see
Parameters in /profiles/ for more details on the available options.
Configuring different Linux Desktops based on the selected profile
Please read Building custom Linux desktops with the ThinLinc Desktop Customizer for documentation on how to configure different desktops with for example different menu and desktop icons depending on what profile were selected.
Speeding up Session Startup
If a user has a complicated session startup with many time-consuming operations, it can take quite a while before the user’s desktop environment (for example KDE or Gnome) begins to start. Prime examples of when this happens is when mounting local drives, or when mounting some shared directories from a Netware server.
One way of speeding up this process is to execute some of the operations in the background. Most often, there is no need to mount the local drives before starting KDE, because it takes longer time to start KDE than it takes to mount the local drives. The two operations can easily run in parallel. The same goes for the example of mounting shared directories.
The easiest way to accomplish this is to add an & sign after commands
run by scripts in /opt/thinlinc/etc/xstartup.d.
Make sure that commands that must be run before starting the window environment are run sequentially. For example, configuring desktops via TLDC must be done before starting KDE.
Configuring the language environment on the server based on the client language
The ThinLinc client reports the language settings on the client side when requesting a session. This can be used to configure the language on the server side. The idea is that in an environment where several languages are in use, a user could automatically get their preferred language based on what their client computer is configured for.
To activate this, a symlink needs to be created:
$ sudo ln -s /opt/thinlinc/libexec/tl-set-clientlang.sh \
   /opt/thinlinc/etc/xstartup.d/00-tl-set-clientlang.sh
Also, make sure no other parts of the startup environment are trying to
set the LANG variable. For example, on Fedora, the files
/etc/profile.d/lang.sh and /etc/profile/lang.csh will
override the LANG variable set by
tl-set-clientlang.sh.
Limiting Lifetime of ThinLinc Sessions
The Xserver has three options which controls the maximum lifetime of
ThinLinc sessions. These are described below, and can be added to the
parameter /vsmagent/xserver_args.
- -MaxDisconnectionTime <s>
Terminate when no client has been connected for s seconds. Note: Never use a value smaller than 60.
- -MaxConnectionTime <s>
Terminate when a client has been connected for s seconds
- -MaxIdleTime <s>
Terminate after s seconds of user inactivity. Note: Never use a value smaller than 60.
In addition to the options above which control the lifetime of the
ThinLinc session, the option -IdleTimeout can be used to
configure how long an idle session should remain connected. The
-IdleTimeout option takes a number of seconds as an argument,
and can be added to the parameter /vsmagent/xserver_args as
per the options described above.
Note
Setting -IdleTimeout s will simply disconnect the client
from the session after s seconds; it will not terminate the ThinLinc
session itself.
Shadowing
Introduction
Shadowing is a feature that lets a user connect to, view, and interact with ThinLinc sessions of other users. This can be useful in remote assistance and support scenarios, where trusted support personnel can connect to a user session and aid with for example application problems.
Because shadowing gives the shadowing user full control over the shadowed session, this feature should be used with caution.
The shadowing feature is enabled by default and is configured to ask the user to accept or reject a shadowing request.
Disable shadowing feature
The shadowing feature is enabled by default when installing ThinLinc. You can disable this feature if required, using the following command.
$ sudo tl-config /shadowing/shadowing_mode=reject
When the shadowing feature is disabled, all requests to shadow a user
session is activly rejected. Details about
the /shadowing/shadowing_mode configuration parameter
is described in Parameters in /shadowing/.
Note
The above command should be run on all of the ThinLinc servers in your cluster.
Granting shadowing access to users
Because of the security implications of this feature, the system administrator needs to grant this permission to named users and/or groups before it can be used.
The vsmserver service controls whether a user requesting to shadow
another user is authorized to do so. The configuration parameter
/shadowing/allowed_shadowers from the
/opt/thinlinc/etc/conf.d/shadowing.hconf file is read by the
vsmserver service on startup. This parameter is described in detail
in Parameters in /shadowing/.
Note
After the configuration variable has been set, the vsmserver
service needs to be restarted before the change is made active.
Shadowing notification
Notification behaviour of the shadowing feature is configured by the system administrator. The notification mechanism can be configured in four different modes as described here.
Shadow requests are silently rejected
Shadow requests are silently accepted
Shadow requests are accepted and the user is notified
Shadow requests are interactivly accepted or rejected by the user
To configure the shadowing mode use the following command and select a
value of: reject, silent, notify or ask. Details about
the /shadowing/shadowing_mode configuration parameter
is described in Parameters in /shadowing/.
$ sudo tl-config /shadowing/shadowing_mode=ask
Note
The above command should be run on all ThinLinc servers in your cluster.
Note
Only newly started session are affected by the above change.
Shadowing a user session
The ThinLinc client must be configured for shadowing. See Advanced tab for more information.
Once the client has been configured for shadowing, enter the username of the user you wish to shadow in the User to shadow field and connect.
Hiveconf
Overview
Hiveconf is the name of the configuration system used in ThinLinc. It is however not a ThinLinc-specific configuration system, but instead a generic configuration framework for storing key/value pairs in a human readable way, although still in a format that’s easy to read and modify from a computer program.
Hiveconf stores data using a “backend”, meaning configuration data can
be stored in different ways. The default backend which is also used in
ThinLinc is using a text file format similar to Windows
.INI-files, or the format used in smb.conf from Samba.
In ThinLinc, Hiveconf can only guarantee that files with encoding UTF-8 are correctly read. The Hiveconf-files of ThinLinc ships in UTF-8, but the encoding of the files could change if the files are opened or manually modified on a non UTF-8 system.
In this section, we will describe Hiveconf from a general point of view and also describe ThinLinc-specific details.
Basic Syntax
Basically, a Hiveconf file consists of key/value pairs with a
equalsign(=) between them, as in the following example:
vsm_server_port = 9000
vnc_port_base = 5900
The values after the equal sign can be of the following types:
String
Boolean
Integer
Float
Binary data as hexadecimal ASCII
Data can also be lists of the above types, these lists are space-separated.
Tree Structure
Parameters in Hiveconf all reside in folders. Folders are just like a directory or folder in a normal file system. By adding folder directives to Hiveconf files, the parameters will be split up in a tree structure, meaning each parameter will be addressed using a path. This way, two folders can have two parameters with the same name without collision.
The benefits of this is that a software suite (for instance ThinLinc)
can have one common configuration namespace, without having to name all
configuration parameters uniquely, since every component in the suite
can have its own namespace. In ThinLinc, the VSM server has its
parameters in the /vsmserver folder, the VSM agent has its
parameters in the /vsmagent folder and so on.
Looking from a system global point of view, every software package has its own folder, meaning all configuration parameters of the system can be accessed using a common tool.
Folders are put into the configuration files by adding a path inside square brackets to the file as in the following example:
#
# Hiveconf configuration file - VSM server
#
[/vsmserver]
unbind_ports_at_login=true

# Administrators email
admin_email = root@localhost
In this example, both parameters ( unbind_ports_at_login and
admin_email ) reside in the /vsmserver folder. This means that
they should be addressed as /vsmserver/unbind_ports_at_login ,
/vsmserver/admin_email respectively if used from inside a program
using the Hivetool libraries. This is of course not that important from
the system administrator’s point of view, but it’s important to
understand the principle.
Mounting Datasources
One Hiveconf file can use another Hiveconf file by mounting the other file using a mount command as in the following example:
%mount HA.hconf
The mount should be compared to a mount on a Linux. That is, the mount adds the tree structure of the file mounted at exactly the place in the current tree structure where the mount command was found.
Mounts can also use wildcards, as in the following example:
%mount conf.d/*.hconf
The above is exactly what you’ll find if you look into the file
/opt/thinlinc/etc/thinlinc.hconf. Hiveconf will mount all files
in /opt/thinlinc/etc/conf.d and add them to the current folder.
This is a very convenient way to add all configuration files for a
specific software suite to the Hiveconf namespace.
Hostwide Configuration
As we hinted in Tree Structure, Hiveconf lays the foundation for a hostwide configuration system where all applications on a host can be configured using a single system with a common API. This can be accomplished because each application will get its own subfolder in the hostwide configuration folder, so that two applications parameters won’t collide even if they have the same name. Using the mount command, every application can have its own configuration file, while still exporting its parameters to the hostwide folder system.
There is a hostwide Hiveconf “root”, implemented by the file
/etc/root.hconf. This file mounts all files in
/etc/hiveconf.d/ where an application can drop its own hiveconf
file at install-time, just like it can drop a file in for example
/etc/logrotate.d or /etc/profile.d.
Hiveconf Tools
In addition to the system libraries used by applications to read and write configuration parameters that reside in Hiveconf files, there is a command line utility named hivetool for inspecting and setting parameters from the command line. This can be very convenient, for example when scripting setup scripts that need to set some parameter.
hivetool without parameters will do nothing. To see all parameters on the system, run:
$ hivetool -Ra /
which instructs hivetool to print all parameters, beginning
from the root (/) and recursing downwards. With a standard Hiveconf
installation this will list Samba and KDE configuration parameters. If
ThinLinc is installed, it will list ThinLinc parameters as well.
To print a specific parameter, run hivetool with the name of the parameter as parameter. For example:
$ hivetool /thinlinc/vsmserver/admin_email
root@localhost
Setting a parameter is equally easy. To set the admin_email
parameter above, execute the following:
$ hivetool /thinlinc/vsmserver/admin_email=johndoe@example.com
Hiveconf and ThinLinc
ThinLinc uses Hiveconf as its primary configuration system on the serverside. In this section, we will describe the convenience utility shipped with ThinLinc. For descriptions of the folders and parameters used by ThinLinc, please refer to Server Configuration
The ThinLinc Configuration Tool
In order to access the ThinLinc part of the Hiveconf configuration
namespace without having to address it using the hostwide path (i.e. to
avoid having to add /thinlinc/ to all parameters, a tool named
tl-config is shipped with ThinLinc.
tl-config takes the same parameters as hivetool and works the same way. Refer to Hiveconf Tools for information about hivetool. Try for example
$ tl-config -Ra /
a command that will print all ThinLinc-related parameters.
Administration of ThinLinc using the Web Administration Interface
Introduction
This chapter describes the web-based ThinLinc administration interface called tlwebadm . This administration interface is installed automatically by the ThinLinc installation program, and may be accessed by pointing your web browser to https://<hostname>:1010.
For information on configuring tlwebadm , for example setting a password or changing the default port, see Parameters in /tlwebadm/.
Note
The password must be set and the tlwebadm service restarted before use.
Modules
The tlwebadm interface consists of several modules which address different aspects of ThinLinc configuration:
System Health, for viewing information about ThinLinc master and agent services, and testing user or group lookup performance. See The System Health Module below.
Status, for viewing information such as license usage, server load and sessions. See The Status Module below.
VSM, for viewing information and managing ThinLinc subclusters, the master service and the agent service. See The VSM Module below.
Profiles, for viewing and configuring profiles. See The Profiles Module below.
Locations, for viewing and configuring printers and terminal locations. See The Locations Module below.
Desktop Customizer, for configuring desktops. See The Desktop Customizer Module below.
Documentation Center, a module containing documentation and other useful information.
These modules are described in more detail in the following sections.
The System Health Module
The System Health module allows you to check the running state of the ThinLinc services VSM Master, VSM Agent and Web Access. There is also a tool to perform a user or group lookup which reports the time for the lookup.
VSM Master reports current running state of VSM Master service.
VSM Agent reports current running state of VSM Agent service.
Web Access reports current running state of Web Access service.
Users and Group Lookup allows you to test performance of user and group lookup on the system.
Fill in values for username and/or group and click the Test user and group lookup button to perform a lookup.
The Status Module
The Status module allows you to view or manipulate the following aspects of ThinLinc, by selecting the relevant submenu:
Licenses allows you to view current and historic license usage, as well as the current number of licenses.
Load allows you to check the current server load on the ThinLinc agents.
Sessions allows you to terminate, shadow or view details of sessions. This feature is described in more detail in the next section, The Sessions Menu
The VSM Module
VSM contains information about subclusters and VSM Master and Agent services. This module also allows managing of subclusters and configuration of Master and Agent.
Subclusters allows viewing, adding, modifying or deleting subclusters.
VSM Master allows starting or stopping the service, and modifying a subset of the configuration options.
VSM Agent allows starting or stopping the service, and modifying a subset of the configuration options.
Subclusters
On this page, the configured subclusters of the ThinLinc Master can be found. Subclusters are groups of agents that can be associated with users or groups. Adding, modifying or deleting existing subclusters is possible. A restart of the vsmserver service is required after changes to subcluster configuration in order for the changes to take effect. The vsmserver service can be restarted from the VSM Master page described in VSM Master.
The page will present a list of currently configured subclusters. This should be something like the example in Fig. 29. To edit a subcluster, click on its name in the list.
Fig. 29 Subclusters
Fig. 29 shows a system with a total of two subclusters. The subcluster called default is configured with two agent servers and US_cluster is configured with one agent.
To add a new subcluster to the list, press the Add new subcluster button. This will bring up an empty subcluster edit form. See figure Fig. 30 for an example.
Fig. 30 New subcluster form
There are four editable fields in this view: Subcluster, Agents, Users and Groups. These are described in Parameters in /vsmserver/subclusters/. To save changes, press the Save button. Remember to restart the vsmserver service afterwards.
VSM Master
On this page you can start or stop VSM Master service. There are also a subset of configuration options available for configuration of the service.
Service Status gives you the ability to start or stop the VSM Master service.
Sessions per user allows you to configure how many session are allowed per user.
A value of zero means no limit and will give unlimited sessions per user.
Allowed Groups allows you to configure which groups should be given access to connect to ThinLinc.
If no groups are specified, all users will have access to connect to ThinLinc
Allowed Shadowers allows you to configure which users should be able to shadow other ThinLinc sessions.
Click the Save button when you want to save your changes to the configuration files.
Note
You need to restart the service to apply your changes.
VSM Agent
On this page you can start or stop the VSM Master service. There are also a subset of configuration options available for configuration of the service.
Service Status gives you the ability to start or stop the VSM Agent service.
Agent Hostname allows you to configure the hostname that clients are redirected to.
Note
This configuration is needed if running ThinLinc in a NAT environment. See ThinLinc in a NAT/Split-DNS Environment for more information.
Extra Arguments to X Server allows you to configure additional arguments to the X server (Xvnc) for new sessions that are started.
Click the Save button when you want to save your changes to the configuration files.
Note
You need to restart the service to apply your changes.
The Profiles Module
On this page you can modify text shown in the profile chooser, and manage profiles. You can create or delete a profile and configure the profile order.
Introduction Texts allows you to modify and manage translation of texts used in the profile chooser.
Profile List allows you to configure the available profiles and their order.
Introduction Texts
Introduction texts contains translation tables for greetings and introduction texts. There is also a configuration option to enable or disable the use of introduction texts.
Greeting Text the text to show at the top of the profile chooser.
Show Introduction disable or enable the introduction text which is shown to the user before the profile selection dialog.
Introduction Text the text to show before presenting the list of profiles.
To add a new translation, fill in language code and the translated string. Click the Save button to save the new translation and add it to the translation table.
To delete a translation select the row using the checkbox in Delete column of the translation table. Click the Save button to carry out the actual deletion of selected rows.
Profile List
The Profile List module contains functionality to manage your profiles. You can change the default profile, or create new and edit existing profiles. You can also change the order of profiles.
Default Profile allows you to specify the default profile to be selected in the profile chooser.
Profile List allows you to modify profiles and their order, or create new profiles.
Create a new profile by clicking the Add new profile button. If you want to edit an existing profile, click the profile name in the table of available profiles.
When creating a new or editing an existing profile a form is displayed. This form is shared between both modes and each field details are described below.
Identification
An unique string identifier for the profile which is used when referencing this profile.
XDG Session Desktop
The system desktop session configuration that this profile should be connected to.
Default Name
A name for the profile which is displayed in the profile chooser.
Availability
This will make the profile available to be selected and used. If you uncheck it will not be shown to the user in the profile chooser.
Take Description From
The description is shown in the profile chooser when a profile is selected. This field can be a static text which is defined in the input field Default Description.
Test command: This will take and use the output of defined Test Command as description for the profile.
Manually defined text below: This will use the text defined in the Default Description field below.
Default Description
A text used as description for the profile. This is text is used if Take Description From above is selected to use the manually defined text.
Icon Path
A filename of the icon to use in the profile chooser.
Screenshot Path
A filename of the screenshot to use in the profile chooser.
Command Line
This command is used to start up a session. In most cases this is something simple like
xfce4-session, but in some cases there might also be arguments likegnome-session --session gnome-classic.Test Command
This command is evaluated and if it returns true, the profile is shown to the user. If the command evaluates as false, the profile will not be shown in the list of available profiles for the user.
ThinLinc includes the tool tl-memberof-group which may be used to test memebership of groups. You can use this tool as test command, such as
${TLPREFIX}/bin/tl-memberof-group
my_profile_access_group
. This example will give members of groupmy_profile_access_groupaccess to the profile.If you only want to give a specific user access to the profile you may specify
test ${USER} = user.
When you have filled out the form, or changed any fields, click Save button at the bottom of the form to save your changes into the configuration file.
To delete a profile click the profile name in table of available profiles. Then click the checkbox at the bottom of the form to verify your intention about deletion of the profile. Complete the deletion by clicking the Delete button.
The Locations Module
Locations contains information about locations where terminals and printers reside. A location can be a room, a floor, a house or some other type of geographical delimitation.
Every terminal should be assigned as a member of a location. In addition to terminals, printers may also be assigned to locations.
Terminals
Terminals contains necessary information about all terminals. The most important information here is every terminal’s interface hardware (MAC) address.
Each terminal should be entered as described in this section. Enter the terminals module by clicking on the menu item. You will be presented with a list of currently entered terminals. This could be something like the example in Fig. 31.
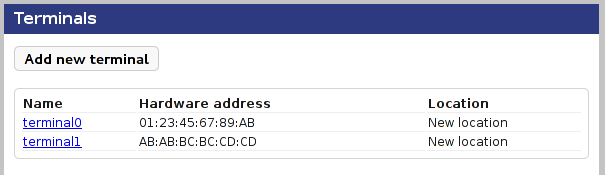
Fig. 31 Terminals
Fig. 31 shows a system with a total of two terminals.
To edit a terminal, click on its name in the list.
To add a new terminal to the list you press the Add new terminal button. This will bring up an empty terminal edit form. See Fig. 32 for an example.
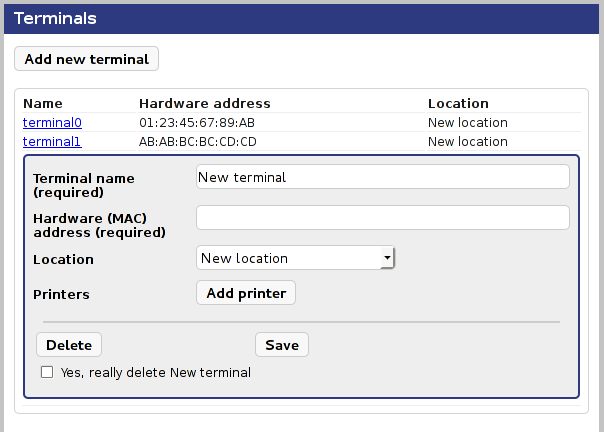
Fig. 32 New terminal form
There are three editable fields in this view, Hardware (MAC) address, Terminal name and Location. They are described in Terminal properties below.
To save changes, press the Save button. When you have pressed the Save button you will see that the Hardware (MAC) address field will change from being an editable field to become a static text label. To assure data integrity between the modules you aren’t allowed to change this field after it’s added.
When a new terminal is saved or when clicking an existing in the terminals list, there will be three buttons inside the form. The Save button is used to save changes made to the terminal. The Delete button deletes the currently viewed terminal. The Add Printer button will add a new printer field to the form.
Name |
Description |
|---|---|
Hardware (MAC) address |
hardware (MAC) address of the main interface of the terminal. This field is important! Without a correct value the nearest printer won’t work! |
Terminal name |
Name of the terminal. Could for example be the terminal’s DNS name or a name following a naming scheme that identifies the terminal. |
Location |
Which of the locations, entered in the Locations module, this terminal belongs to. |
It is also possible to add a printer to a terminal in the terminal module. This can be used if a terminal has its own printer or is closer to another printer than the ones assigned to this terminals location. You should use this feature moderately since it may cause more administration.
To add a printer you do exactly as in the Locations menu. Click the Add printer button, select the printer in the pop-up menu and then press Save to make sure that the settings are stored. To delete it, check the relevant Delete checkbox(es) for the printer(s) you wish to remove, and click Save.
Locations
To edit a location, click on its name in the list.
To add a new location to the list you press the Add location button. This will bring up an empty location edit form. See Fig. 33 for an example.
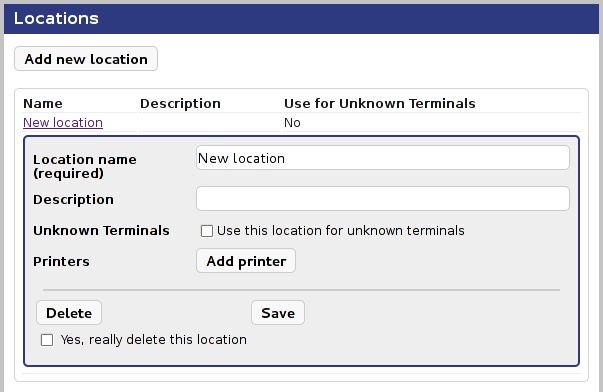
Fig. 33 New location form
Fill the Name and Description fields with relevant information. Check the checkbox if this location is to be used for unknown terminals when using the printer access control feature (see Printer Access Control for details).
To save changes, press the Save button. When you have pressed the Save button you will see that the Name field will change from being an editable field to become a static text label. To assure data integrity between the modules you aren’t allowed to change the name of an item after it’s added.
The Delete button deletes the currently viewed location, but only if the confirmation checkbox is also checked. The Add Printer button will add a new field to the form, a drop-down menu with all possible printers. An example of this can be seen in Fig. 34.
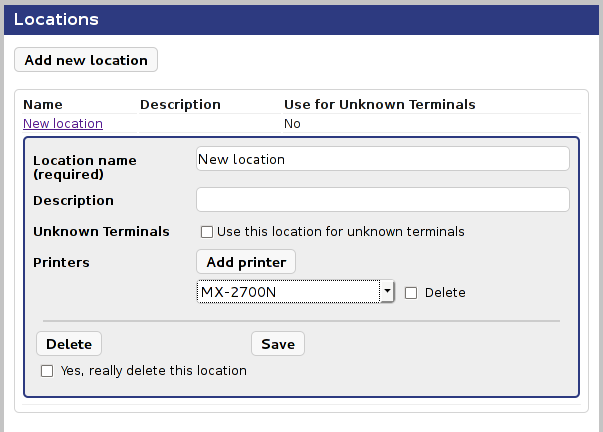
Fig. 34 Location Details With Printer
The Printer field above has the printer europa selected. Remember to save the changes if you change printer! You can assign more printers to this location by clicking Add printer again to bring up another printer line. To remove a printer you select the Delete checkbox corresponding to the printer(s) you want to delete, and click Save to apply the changes. The printer(s) will disappear.
Note
Printers contains entries for all available printers. These entries are just shadows of the real CUPS (Common Unix Printing System) printer system entries. This means that you first need the printers to be installed in the CUPS printer system and then added to this list.
The Desktop Customizer Module
The ThinLinc Desktop Customizer is described more fully in its own chapter, Building custom Linux desktops with the ThinLinc Desktop Customizer. Links to sections of this chapter pertaining to the respective menus of the Desktop Customizer module are provided below for convenience.
Application Groups
For information on configuring application groups using TLDC, see Defining Application Groups
Applications (Manual)
For information on configuring manual applications using TLDC, see Handling Applications
Applications (System)
For information on configuring system applications using TLDC, see Applications
Building custom Linux desktops with the ThinLinc Desktop Customizer
In this chapter, we will document how to create custom desktops for ThinLinc users using the ThinLinc Desktop Customizer (TLDC). TLDC relies on freedesktop.org’s standard and desktop environments like MATE and Xfce are examples of desktops that can be used in combination with TLDC.
Note that TLDC does not work with some desktop environments such as GNOME Shell (GNOME 3) since it does not have a traditional application menu.
The TLDC’s core functionality is to build the application menus based on factors such as group membership, username and ThinLinc Profile. It can also add icons to the desktop of each user, based on the same premises.
Introduction
The ThinLinc Desktop Customizer is a combination of a web-based administration tool and a command that is run at session startup for all users. It enables the administrator to decide what menu entries should be presented for specific users, and what icons should be made available on the desktop. Which menu entries and/or desktop entries are given to a specific user is decided based on the Linux group memberships of the user, the username and what ThinLinc Profile was choosen (if any).
Note
Since KDE4 uses a different desktop configuration mechanism compared to older versions of KDE, icons added to the desktop using the ThinLinc Desktop Customizer will not be shown in KDE4. This can be solved by changing the Desktop layout setting of your KDE4 desktop to Folder view.
Using the ThinLinc Desktop Customizer
Using the ThinLinc Desktop Customizer, the system administrator can decide what applications should be available in the menu and/or on the desktop for specific users or for users that are members of some Linux group. The ThinLinc Desktop Customizer is configured via a web interface, part of the ThinLinc Web Administration. Administration of ThinLinc using the Web Administration Interface describes the interface in general, this section will describe the Desktop Customizer part of it.
Concepts

Fig. 35 ThinLinc Desktop Customizer Concepts
The main concept in the ThinLinc Desktop Customizer is the application group. The application group combines data about applications, a menu structure, Linux groups and users, and some other settings.
Applications
The applications referred to in the application groups are found by
scanning the space-separated list of directories defined in the Hiveconf
parameter /utils/tl-desktop-customizer/xdg_data_dirs for
files named *.desktop. The files are read according to the
Freedesktop.org Desktop Menu Specification. The TLDC scans the
directories in the same way that KDE will do when building the menu.
Some applications are marked by the operating system to be shown only
for root, or in some cases only for specific desktop environments. On
SuSE, there is also a X-SuSE-Unimportant parameter in some
*.desktop files, which will make the KDE packaged with SUSE hide
the application. TLDC handles this by adding a comment to the
application in the applications listing, and in the boxes used to select
applications when creating application groups.
In addition to the desktop files automatically found, it is also
possible to manually define applications. This is needed for example
when an application without a *.desktop-file has been installed or
when an application has been installed in a non-standard location.
Linux groups and users
An application group is used by zero or more Linux groups and by zero or more specific users. An example would be an educational environment. Let’s say that all pupils attending the class “biology 4” are members of the Linux group “bio4”. By creating an application group named “Biology 4” with all applications that are specific to the biology class, and then adding the “bio4” Linux group as one of the groups that should be assigned the “Biology 4” Application Group, all students attending the class will automatically get the applications specific to the biology class in their menu. By adding the teacher of the class as a specific user, he/she as well will also get access to the applications.
Using the ThinLinc Desktop Customizer
The daily use of the TLDC consists of one or several of the following steps:
Create an application
Create a folder in the menu structure
Bind one or several applications to a folder in the menu structure, using an application group
In the following sections, we will more thoroughly describe the different actions that may be needed.
Handling Applications
The handling of applications is normally the first step in using the TLDC. Click on the Applications (Manual) link in the TLDC, and you will enter a view where the applications you’ve defined manually are listed. Several example applications are included with ThinLinc at installation. By clicking on the text Applications defined by system, you can also see what applications are found automatically by scanning, as described in Applications.
If the application you want to add to a menu or to the desktop is not
found among Applications defined by system, you need to
define it manually. This is the case for applications installed without
adding a .desktop file in the correct location.
Definining applications manually is done by clicking on the button Add new application (located at the top of the list of applications). This leads to a page where you can define the following properties for the new application:
- Default Application Name
This is the name of the application. It’s the name that is written next to the icon (if any), in the menu, and under the icon if the application is to be added to the desktop.
The default application name is used if there is no name defined for the language in use when the application is shown, or if the language is English.
- Application Name (<language-code>)
This is the name of the application in the language with the RFC 1766 language code <language-code>. This name is shown if the locale is set to that language when the menu or desktop is shown.
The languages that should be configurable are set by editing the space-separated list in the parameter
/utils/tl-desktop-customizer/desktop_languages. The default value of this parameter issv, which means that the TLDC will allow you to set the default name and the name in Swedish.- Command
This specifies the command to run to start the application. Enter the path to the command followed by any arguments in the Command box. The input box follows bourne shell syntax rules.
Example:
"/usr/bin/my program" --fullscreen --title "My title"
- Path to Icon file
The filename of the icon for the application. If the icon is available in one of the directories where your desktop environment looks for icons, just the filename without the extension can be given. Otherwise, the complete path must be specified.
- Command Startup Feedback
Check the box to instruct the window manager to show a special icon while the command is starting. Note that not all applications support this functionality.
Press :Save when done filling the fields. The application will now show up among the other manually defined applications.
If you want to, you can add the application directly to an existing application group by checking the checkbox in front of the application name, then selecting the application group and if the application should be added to the menu or desktop of this application group, in the form at the top of the page. This can be done for both manually defined, and automatically found applications.
Defining Application Groups
Enter the Applications Groups part of the Desktop Customizer. This will present you with a list of existing application groups and their settings.
Note
An application group called Hidden is shipped with the default ThinLinc configuration. See Home Icon not working in KDE for an explanation of its functionality. Please don’t remove it if you are planning to use KDE.
Press the button Add new group (located at the top in the table of existing application groups) to create a new application group. This will open a rather large form, where you can define the following properties:
- Name of the Application Group
This is the name of the application group. This is not displayed to the users, but only to the system administrator using the ThinLinc Desktop Customizer. Set to something that reflects the contents of the application group.
- Applications Added to Menu
First, define in the dropdown box, the menu structure folder of the application group. This dropdown box is labeled Applications added to menu. Applications choosen in the boxes below will be added to the chosen menu folder.
Add to the left box, labeled Selected, the applications that should appear in the menu folder selected above. This will only apply for users that are assigned this application group. The right box, labeled Available, lists applications, both manually defined and ones found installed on the system. If no applications are available, applications can be defined, as documented in Defining Application Groups.
- Applications Added to Desktop
Add to the left box, labeled Selected, the applications that should appear as icons on the desktop. This will only apply for users that are assigned this application group. Just as for applications added to the menu, only applications earlier defined, or automatically found, will show up as selectable, in the box labeled Available.
- Linux Groups with this Application Group
This is where you map Linux groups to application groups. If for example a specific school should be assigned an application group, and all the pupils of that school are members of the Linux group “school-1”, using the right text box, add the Linux group “school-1” to the left box, labeled Selected. When logging in, the group memberships of each user is inspected to determine which application groups to assign to the user.
Note
If the mapping between the numerical group id and the group name doesn’t work, the group is shown as
#<gid>. This might be because the group has been removed from the system, or because the operating system has problems in the connection to the directory service used.- Specific Users with this Application Group
This parameter allows you to decide if specific users should be assigned this application group as well, even if they are not a member of one of the groups that were added above. This way, for very specialized applications, no Linux group needs to be created. Another way of using this field would be that the teachers of a specific class could be added to the application group for that class, if the teachers are not part of the Linux group that is associated with the class.
Note
If the mapping between the numerical user id and the user name doesn’t work, the user is shown as
#<uid>. This might be because the user has been removed from the system, or because the operating system has problems in the connection to the directory service used.- ThinLinc Profiles with this Application Group
This setting allows you to connect the application group to ThinLinc profiles as documented in Profiles and the standard xstartup.default file. This allows for different application groups to be selected based on user input after login.
- Shell Command Activating this Application Group
This setting allows you to activate application groups based on the return value of an arbitrary command. If the command returns 0 (which is the standard return code for success for shell commands), the application group will be activated.
This can be used for example to activate Application Groups based on group membership by using the tl-memberof-group command. It can also be used to activate an application group for all users by running /bin/true as activation command.
The command is run via the shell in the current user’s environment when running tl-desktop-activate.sh. The environment variable TLDCGROUP is set to the application group currently under consideration for activation.
- Save!
Don’t forget to press the Save button, or none of the changes will be written to the database.
Distribute configuration to all agent hosts
After doing changes to the desktop configuration, the new configuration
must be copied to all VSM agent hosts. The files/directories to be
copied are /opt/thinlinc/etc/conf.d/tl-desktop-customizer.hconf
and all subdirectories of /opt/thinlinc/desktops.
Tip
Use the tl-rsync-all command as described in Commands on the ThinLinc Server to copy the files.
Enabling the custom desktops for users
Enabling the Custom Desktops for users is easy. Simply create a symbolic
link in /opt/thinlinc/etc/xstartup.d:
$ sudo ln -s /opt/thinlinc/bin/tl-desktop-activate.sh
   /opt/thinlinc/etc/xstartup.d/35-tl-desktop-activate.sh
The ThinLinc session startup will read this file and write a
~/.config/menu/applications.menu (and possibly create symbolic
links under ~/.kde/share/apps/kdesktop/Desktop if you’re using
KDE).
Note
The TLDC activation script only runs TLDC for non-root users. Test your TLDC configuration using a normal user.
Tips & Tricks with TLDC
Unwanted icons on the desktop with KDE
At first login for each user, KDE copies files from
/usr/share/apps/kdesktop/DesktopLinks to the Desktop
directory of the user. This means that if there is a Home Icon
in DesktopLinks and you add a Home Icon via TLDC, there
will be two Home Icon.
Remove the contents of /usr/share/apps/kdesktop/DesktopLinks to
solve the problem, and let TLDC be the sole provider of icons on the
desktop.
Note
If your KDE is based somewhere else than under /usr, the
DesktopLinks directory will be situated elesewhere. For
example, on SuSE, KDE is based at /opt/kde3.
Home Icon not working in KDE
This is a case of the problem above where file associations are not working. Create an application group that includes the Konqueror (“kde-kfmclient_dir”) application in a hidden menu, and make sure this application group is added for all relevant users, and the home icon will work again.
Note
A menu named Hidden Menu is created by the application group Hidden which is by default activated for the Profile kde. This menu contains kde-kcmclient_dir to make sure the home icon is working. Make sure this application group is activated for all users with a desktop based on KDE.
TCP Ports Used by ThinLinc
This appendix describes all the TCP ports that must be available for ThinLinc to function correctly. Note that only some ports must be available externally and most need only be available locally on the machine or to other machines that are part of the same ThinLinc cluster.
On Machine Running VSM Server
- 22: SSH Daemon
Port 22 is not used by ThinLinc per se, but since no ThinLinc installation can work without a running SSH daemon, we list port 22 here. Port 22 is the normal SSH port, but basically any port can be used - the client has support for connecting to any port. Note however that if the SSH daemon on the VSM server is listening on port x, all VSM agents must also have their SSH daemons configured to listen on port x.
- 300: ThinLinc Web Access
By default, ThinLinc’s Web Access service tlwebaccess is available on TCP port 300. Traffic to this port is encrypted (TLS).
Note
The port on which tlwebaccess runs is configurable via the parameter
/webaccess/listen_port. See Parameters in /webaccess/ for details.- 1010: ThinLinc Administration Interface (tlwebadm)
By default, ThinLinc’s web-based administration interface is available on TCP port 1010. In order to access this interface remotely, port 1010 will need to be reachable. Traffic to this port is encrypted (TLS).
Note
The port on which tlwebadm runs is configurable via the parameter
/tlwebadm/listen_port. See Parameters in /tlwebadm/ for details.- 9000: VSM server
The VSM server listens on port 9000. The traffic is not encrypted, but sensitive information will only be shared with root or connections originating from a port lower than 1024, from a list of known IP addresses. The protocol used is XML-RPC through HTTP (using a minimal internal HTTP server in the VSM server).
On Machine Running VSM Agent
- 22: SSH Daemon
Just as for the VSM server, there must be a SSH Daemon running on all VSM agent machines. This daemon is normally listening to port 22, although it can listen to other ports as well. See the entry about port 22 on On Machine Running VSM Server.
- 300: ThinLinc Web Access
By default, ThinLinc’s Web Access service tlwebaccess is available on TCP port 300. Traffic to this port is encrypted (TLS).
Note
The port on which tlwebaccess runs is configurable via the parameter
/webaccess/listen_port. See Parameters in /webaccess/ for details.- 904: VSM Agent
The VSM agent listens on port 904 for incoming requests from the VSM server host. The traffic is not encrypted, but the VSM agent only allows connections originating from a port lower than 1024, from a list of known IP addresses. The protocol in use is XMLRPC through HTTP.
- 1010: ThinLinc Administration Interface (tlwebadm)
By default, ThinLinc’s web-based administration interface is available on TCP port 1010. See the entry about port 1010 at On Machine Running VSM Server.
- 5901-5999: VNC servers for first 99 sessions
Ports 5901-5999 are used by Xvnc processes serving display numbers strictly below 100.
- 4900-5899: Tunnels to clients
The ports in this interval is used as serverside endpoints for the SSH tunnels used to access local resources of the client, for example local drives, serial ports and sound.
This interval is used for sessions with display number strictly below 100.
The algorithm used for calulating which ports to use for a specific display number in this interval is:
4900 + display-id × 10 + SERVICE_SLOT
where SERVICE_SLOT is a number defined under
/vsm/tunnelservices.- 6001-8000: X Display ports
If Xvnc is configured to listen for incoming TCP requests from X Window System clients on other hosts, ports 6001-8000 are used by display numbers 1-2000. The default is not to listen for incoming TCP requests, so in the default configuration, the ports in this interval are not open.
- Port 32767 downwards to 11857
The algorithm described below is used to allocate ports for the Xvnc process and for the serverside endpoints for SSH tunnels to access local resources of the client. This algorithm is used for sessions with display numbers strictly higher than 99.
Each session is allocated
/vsm/tunnelslots_per_session(default value 10) + 1 ports, leading to an allocation of 11 ports per session with the default configuration. The ports are allocated starting with the port given as/vsmagent/max_session_port(default 32767), and then downwards. This means that the ports are aligned upwards as closely as possible to the upper limit defined. This is a good practice to avoid collisions with other services running on the machine.Some examples follow
- Display number 50
The VNC port will be 5950 which is:
5900 + display.
The tunnel ports allocated for this display are 5400-5409, which is:
4900 + (10 × display) + SERVICE_SLOT
where SERVICE_SLOT is 0-9.
- Display number 100,
/vsmagent/display_min= 10 (the default),/vsmagent/max_session_port= 32767. The VNC port will be 32757, which is:
32767 - ((display - 100) × (
/vsm/tunnelslots_per_session+ 1) +/vsm/tunnelslots_per_session))Ports 32758-32767 (inclusive) will be used for tunnel ports.
- Display number 300,
/vsmagent/display_min= 100,/vsmagent/max_session_port= 32767 (the default). The VNC port will be 30557 which is:
32767 - ((display - 100) × (
/vsm/tunnelslots_per_session+ 1) +/vsm/tunnelslots_per_session))Ports 30558-30567 (inclusive) will be used for tunnel ports.
- Display number 600,
/vsmagent/display_min= 300,/vsmagent/max_session_port= 32767 (the default). The VNC port will be 29457, which is:
32767 - ((display - 300) × (
/vsm/tunnelslots_per_session+ 1) +/vsm/tunnelslots_per_session))Ports 29458-29467 (inclusive) will be used for tunnel ports.
Troubleshooting ThinLinc
In this appendix, we will describe how to troubleshoot common problems in a ThinLinc installation.
We will begin by giving a general view of the recommended troubleshooting method, and then continue with more detailed instructions for troubleshooting specific problems.
General troubleshooting method
In most cases, troubleshooting a ThinLinc session problem should follow the method outlined in Fig. 36.

Fig. 36 The General Troubleshooting Method
The method is to first check that the user was let in by SSH on the VSM
server. This information is found on different places on different
distributions. Common log filenames for SSH information are
/var/log/secure, /var/log/auth.log or
/var/log/daemon.log. If the user was let in by SSH, the VSM
server log (/var/log/vsmserver.log) is inspected. In some cases,
the reason for session failure can be found there, but most of the
times, it’s neccesary to find out which VSM agent was selected for the
session, and inspect the VSM agent log (/var/log/vsmagent.log)
on the server in question.
If inspecting /var/log/vsmagent.log on the server that was
selected for the session does not reveal the reason for the failure,
there is a per-session log in
/var/opt/thinlinc/sessions/<username>/last/xinit.log where the
output of commands run during session startup is stored.
In very rare cases, it might also be neccesary to inspect the SSH log on the VSM agent.
Troubleshooting Specific Problems
The first step should be to check if your specific problem is mentioned in the Platform Specific Notes available at https://www.cendio.com/thinlinc/docs/platforms. If your problem isn’t mentioned in the Platform Specific Notes you should read the sections below.
Problems Where the Client Reports an Error
In the following sections, we will describe how to cope with problems where the ThinLinc client is reporting an error.
Couldn’t set up secure tunnel to ThinLinc server. (Couldn’t establish SSH tunnel, SSH terminated.)
This error is caused by failure to connect to the SSH daemon on the ThinLinc server (the server running the VSM server). This could be caused by the fact that the SSH daemon is simply not running, or that it is not letting the user in for some reason.
Another possible reason is that there is a firewall between the user and the ThinLinc server, that forbids communication.
“Login Failed! Wrong username or password.”
This error is very often caused simply by the user entering an incorrect password. Begin by verifying that the user is actually entering the correct username and password.
If the username and password are correct and this is the first time the
user tries to login, check the SSH logs of the server. If SSH says that
the user is invalid, that means that something is incorrect in the
user’s user information database entry. For example, this may happen if
a user stored in eDirectory has two cn attributes, one of them
different than the other.
The getent command can be a valuable tool to dissect problems of this type. If the output of getent passwd <username> doesn’t produce any output, that is a sign that the user is in fact invalid.
The SSH connection succeeded, but the ThinLinc server connection failed.Perhaps this server doesn’t run a ThinLinc server?
This error is most often caused by the fact that the VSM server is not running on the server. Start the VSM server and try again.
A user entering the wrong hostname, for example the hostname of one of the VSM agents, would also get this error message. Check that the user has entered the correct hostname. In very rare cases, this could also be caused by incorrect DNS data.
ThinLinc login failed. (No agent server was available)
This error is reported if there were no working VSM agents available according to the load balance information in the VSM server.
In a system with few VSM agent servers, restoring a VSM agent that has been down for some reason doesn’t take effect immediately - the load balance information is only updated once every 40 seconds by default. Either wait for the load balance cycle to complete, or restart the VSM server.
The load balance information can be inspected in the ThinLinc Web Administration, see The Status Module.
ThinLinc login failed. (Couldn’t create your session)
When this error occurs, the user was valid on the VSM server, but for some reason, the session couldn’t be created on the VSM agent.
One very common reason for this problem is that the VSM agent has lost its connection to the user database backend (LDAP, Windows domain or other database), so the user exists on the VSM server, but not on the VSM agent. If this is the case, the VSM agent log on the selected server will clearly state that the user doesn’t exist on the system.
Another very common reason is home directory trouble on the VSM agent. Verify that the home directory exists on the selected server, and that it is owned by the correct uidNumber/gidNumber. Of course, the user must have write permissions on his/her home directory.
To verify that the home directory works, the following command can be used:
$ ssh <username>@<agenthost> touch .
If the home directory is correctly mounted and writable by the user, the above command will not produce any output except the password question.
Couldn’t set up secure tunnel to VNC! (Couldn’t establish SSH tunnel, SSH terminated.)
This error is caused by failure to connect to the SSH daemon on the selected VSM agent. This could be caused by the fact that the SSH daemon is simply not running, or that it is not letting the user in for some reason.
Another possible reason is that there is a firewall between the user and the selected VSM agent that disallows communication.
Problems that Occur After Session Start
In this section we will discuss some problems that can occur after the successful login, that is, after the ThinLinc login window has closed. In this phase, a number of session startup problems can occur
Session starts, but closes down immediately
If the ThinLinc login window closes, and the session starts up but then
immediately shuts down, inspect xinit.log found in
/var/opt/thinlinc/sessions/<username>/last/ on the selected VSM
agent. Some of the commands run during session startup will probably
have written an error message that will be stored in that file.
It may also be of value to inspect the VSM agent log on the selected server.
At login, user is reconnected to previous, faulty, session
If a previous session still exists and is faulty, for example because of desktop environment failures, the user is reconnected to the same session when logging in. Disconnect from the session, enable the End existing session checkbox and log in again. That will terminate the current session and start a new one.
Login Succeeds, but the ThinLinc Desktop Configuration fails
When using the ThinLinc Desktop Customizer, as documented in Building custom Linux desktops with the ThinLinc Desktop Customizer, the KDE or Gnome menu and the entries on the desktop are customized at each login. If this fails, quota problems are very often the problem. Check the quota of the user in question.
Login Succeeds, but KDE Fails to Start
If KDE fails to start, complaining about being unable to create symlinks and similiar, quota problems are very often the real problem. Check the quota of the user in question.
Restricting access to ThinLinc servers
In some cases it might be desirable or required to restrict the users’ access to the ThinLinc servers and their ability to move data in and out of the system. This chapter describes some ways this can be achieved, as well as the consequences of such restrictions.
Disabling SSH access
The system’s SSH server often includes a lot of functionality for accessing the system. Completely disabling this service is a quick way to restrict most of the external access to the system. However the native ThinLinc client requires SSH to function so users will be limited to only using the HTML based Web Access client.
Many SSH servers also support limiting access to just certain users.
OpenSSH has settings such as AllowGroups and Match that can
limit functionality without completely disabling the SSH server.
Disabling shell access
User sessions are normally started via the user’s configured shell, so restricting the shell is a good method to restrict what kind of sessions the user can start. Primarily this is usefull to prevent users from running custom commands via SSH.
Changing the configured shell
Commonly the user’s shell is configured to /bin/false in order to disable shell access. Unfortunately this also prevents access to ThinLinc as it needs to run the commands thinlinc-login and /opt/thinlinc/etc/xsession via the user’s shell. As an alternative it is possible to configure /usr/bin/thinlinc-login as the shell. This will allow ThinLinc to function whilst preventing any other type of session.
Note that this method prevents any terminals inside the session from functioning as well. In most cases it also does not prevent users from running custom scripts and shell commands as they can use a text editor to construct such scripts.
Using ForceCommand
OpenSSH has the ability to ignore the user’s configured shell and run a
different command instead. This makes it possible to keep a normal shell
for the user and only restrict access when connecting via SSH. However
this prevents the native ThinLinc client from connecting as it needs to
be able to run the command thinlinc-login with specific
arguments. The following script can be specified as ForceCommand to
allow only ThinLinc access via SSH:
It is also possible to apply this restriction only to a subset of users
by using the Match setting. Please see OpenSSH’s documentation for
how to configure this mechanism.
Disabling port forwarding
ThinLinc relies on SSH port forwarding in order to function. However it
is possible to limit that port forwarding in order to avoid unwanted
network access. ThinLinc only requires forwarding via the loopback
interface, so the SSH server can always be configured to only allow this
without limiting ThinLinc in any way. For OpenSSH this is configured by
specifying the following in sshd_config:
GatewayPorts no
PermitOpen 127.0.0.1:*
Note that it is also necessary to disable shell access in order to completely prevent users from forwarding ports as otherwise they could run their own forwarding software over the shell channel.
Disabling remote port forwarding
It is possible to use ThinLinc with remote port forwarding completely
disabled. However this will prevent local devices such as sound, drives
and printers from functioning. In OpenSSH this is configured by adding
the following to /etc/ssh/sshd_config:
AllowTcpForwarding local
It is also possible to apply this restriction only to a subset of users
by using the Match setting. Please see OpenSSH’s documentation for
how to configure this mechanism.
Note
Local port forwarding cannot be disabled as it is required for even the basic ThinLinc functionality.
Disabling clipboard
It is possible to disable clipboard transfers in either direction in
order to avoid easily moving data to and from the server. The first step
is adding -noclipboard to the ThinLinc setting
/vsmagent/xserver_args. This prevents the user from later
changing the clipboard settings. Next add -AcceptCutText=0 to
disable clipboard transfers going to the server, and
-SendCutText=0 to prevent transfers going from the server.
Disabling local drives
ThinLinc local drives redirection relies on being able to ask the kernel to mount a NFS share. This is a privileged operation that only root is permitted to perform, and as such this feature requires a setuid helper binary. This helper is called /opt/thinlinc/libexec/tl-mount-personal and the setuid permission can be removed by running the follow:
$ sudo chmod u-s /opt/thinlinc/libexec/tl-mount-personal
Note that this only disables the ability to use the kernel NFS client. If a user can start some other NFS client then they can still access the local drive redirection. The setuid permission is also restored each time ThinLinc is upgraded.
GnuTLS priority strings
ThinLinc uses priority strings to allow the administrator to select their own preferred availability and order of algorithms used by GnuTLS for services that uses tlstunnel. The priority string is a colon-delimited list of strings being either keywords (groups of algorithms) or algorithms which can be individually enabled or disabled.
For more information, see the GnuTLS documentation about priority strings.
Standard configuration
ThinLinc comes configured with the priority string NORMAL, which
means the standard, secure GnuTLS algorithms. This is the order and
availability of algorithms for that priority string.
Cipher suites
TLS_AES_256_GCM_SHA384
TLS_CHACHA20_POLY1305_SHA256
TLS_AES_128_GCM_SHA256
TLS_AES_128_CCM_SHA256
TLS_ECDHE_ECDSA_AES_256_GCM_SHA384
TLS_ECDHE_ECDSA_CHACHA20_POLY1305
TLS_ECDHE_ECDSA_AES_256_CCM
TLS_ECDHE_ECDSA_AES_256_CBC_SHA1
TLS_ECDHE_ECDSA_AES_128_GCM_SHA256
TLS_ECDHE_ECDSA_AES_128_CCM
TLS_ECDHE_ECDSA_AES_128_CBC_SHA1
TLS_ECDHE_RSA_AES_256_GCM_SHA384
TLS_ECDHE_RSA_CHACHA20_POLY1305
TLS_ECDHE_RSA_AES_256_CBC_SHA1
TLS_ECDHE_RSA_AES_128_GCM_SHA256
TLS_ECDHE_RSA_AES_128_CBC_SHA1
TLS_RSA_AES_256_GCM_SHA384
TLS_RSA_AES_256_CCM
TLS_RSA_AES_256_CBC_SHA1
TLS_RSA_AES_128_GCM_SHA256
TLS_RSA_AES_128_CCM
TLS_RSA_AES_128_CBC_SHA1
TLS_DHE_RSA_AES_256_GCM_SHA384
TLS_DHE_RSA_CHACHA20_POLY1305
TLS_DHE_RSA_AES_256_CCM
TLS_DHE_RSA_AES_256_CBC_SHA1
TLS_DHE_RSA_AES_128_GCM_SHA256
TLS_DHE_RSA_AES_128_CCM
TLS_DHE_RSA_AES_128_CBC_SHA1
Protocols
VERS-TLS1.3
VERS-TLS1.2
VERS-TLS1.1
VERS-TLS1.0
VERS-DTLS1.2
VERS-DTLS1.0
Ciphers
AES-256-GCM
CHACHA20-POLY1305
AES-256-CCM
AES-256-CBC
AES-128-GCM
AES-128-CCM
AES-128-CBC
MACs
SHA1
AEAD
Key Exchange Algorithms
ECDHE-ECDSA
ECDHE-RSA
RSA
DHE-RSA
Groups
GROUP-SECP256R1
GROUP-SECP384R1
GROUP-SECP521R1
GROUP-X25519
GROUP-X448
GROUP-FFDHE2048
GROUP-FFDHE3072
GROUP-FFDHE4096
GROUP-FFDHE6144
GROUP-FFDHE8192
PK-signatures
SIGN-RSA-SHA256
SIGN-RSA-PSS-SHA256
SIGN-RSA-PSS-RSAE-SHA256
SIGN-ECDSA-SHA256
SIGN-ECDSA-SECP256R1-SHA256
SIGN-EdDSA-Ed25519
SIGN-RSA-SHA384
SIGN-RSA-PSS-SHA384
SIGN-RSA-PSS-RSAE-SHA384
SIGN-ECDSA-SHA384
SIGN-ECDSA-SECP384R1-SHA384
SIGN-EdDSA-Ed448
SIGN-RSA-SHA512
SIGN-RSA-PSS-SHA512
SIGN-RSA-PSS-RSAE-SHA512
SIGN-ECDSA-SHA512
SIGN-ECDSA-SECP521R1-SHA512
SIGN-RSA-SHA1
SIGN-ECDSA-SHA1
Available algorithms
Here are all the available algorithms for use in a priority string in ThinLinc.
Cipher suites
TLS_AES_128_GCM_SHA256
TLS_AES_256_GCM_SHA384
TLS_CHACHA20_POLY1305_SHA256
TLS_AES_128_CCM_SHA256
TLS_AES_128_CCM_8_SHA256
TLS_RSA_NULL_MD5
TLS_RSA_NULL_SHA1
TLS_RSA_NULL_SHA256
TLS_RSA_ARCFOUR_128_SHA1
TLS_RSA_ARCFOUR_128_MD5
TLS_RSA_3DES_EDE_CBC_SHA1
TLS_RSA_AES_128_CBC_SHA1
TLS_RSA_AES_256_CBC_SHA1
TLS_RSA_CAMELLIA_128_CBC_SHA256
TLS_RSA_CAMELLIA_256_CBC_SHA256
TLS_RSA_CAMELLIA_128_CBC_SHA1
TLS_RSA_CAMELLIA_256_CBC_SHA1
TLS_RSA_AES_128_CBC_SHA256
TLS_RSA_AES_256_CBC_SHA256
TLS_RSA_AES_128_GCM_SHA256
TLS_RSA_AES_256_GCM_SHA384
TLS_RSA_CAMELLIA_128_GCM_SHA256
TLS_RSA_CAMELLIA_256_GCM_SHA384
TLS_RSA_AES_128_CCM
TLS_RSA_AES_256_CCM
TLS_RSA_AES_128_CCM_8
TLS_RSA_AES_256_CCM_8
TLS_DHE_DSS_ARCFOUR_128_SHA1
TLS_DHE_DSS_3DES_EDE_CBC_SHA1
TLS_DHE_DSS_AES_128_CBC_SHA1
TLS_DHE_DSS_AES_256_CBC_SHA1
TLS_DHE_DSS_CAMELLIA_128_CBC_SHA256
TLS_DHE_DSS_CAMELLIA_256_CBC_SHA256
TLS_DHE_DSS_CAMELLIA_128_CBC_SHA1
TLS_DHE_DSS_CAMELLIA_256_CBC_SHA1
TLS_DHE_DSS_AES_128_CBC_SHA256
TLS_DHE_DSS_AES_256_CBC_SHA256
TLS_DHE_DSS_AES_128_GCM_SHA256
TLS_DHE_DSS_AES_256_GCM_SHA384
TLS_DHE_DSS_CAMELLIA_128_GCM_SHA256
TLS_DHE_DSS_CAMELLIA_256_GCM_SHA384
TLS_DHE_RSA_3DES_EDE_CBC_SHA1
TLS_DHE_RSA_AES_128_CBC_SHA1
TLS_DHE_RSA_AES_256_CBC_SHA1
TLS_DHE_RSA_CAMELLIA_128_CBC_SHA256
TLS_DHE_RSA_CAMELLIA_256_CBC_SHA256
TLS_DHE_RSA_CAMELLIA_128_CBC_SHA1
TLS_DHE_RSA_CAMELLIA_256_CBC_SHA1
TLS_DHE_RSA_AES_128_CBC_SHA256
TLS_DHE_RSA_AES_256_CBC_SHA256
TLS_DHE_RSA_AES_128_GCM_SHA256
TLS_DHE_RSA_AES_256_GCM_SHA384
TLS_DHE_RSA_CAMELLIA_128_GCM_SHA256
TLS_DHE_RSA_CAMELLIA_256_GCM_SHA384
TLS_DHE_RSA_CHACHA20_POLY1305
TLS_DHE_RSA_AES_128_CCM
TLS_DHE_RSA_AES_256_CCM
TLS_DHE_RSA_AES_128_CCM_8
TLS_DHE_RSA_AES_256_CCM_8
TLS_ECDHE_RSA_NULL_SHA1
TLS_ECDHE_RSA_3DES_EDE_CBC_SHA1
TLS_ECDHE_RSA_AES_128_CBC_SHA1
TLS_ECDHE_RSA_AES_256_CBC_SHA1
TLS_ECDHE_RSA_AES_256_CBC_SHA384
TLS_ECDHE_RSA_ARCFOUR_128_SHA1
TLS_ECDHE_RSA_CAMELLIA_128_CBC_SHA256
TLS_ECDHE_RSA_CAMELLIA_256_CBC_SHA384
TLS_ECDHE_ECDSA_NULL_SHA1
TLS_ECDHE_ECDSA_3DES_EDE_CBC_SHA1
TLS_ECDHE_ECDSA_AES_128_CBC_SHA1
TLS_ECDHE_ECDSA_AES_256_CBC_SHA1
TLS_ECDHE_ECDSA_ARCFOUR_128_SHA1
TLS_ECDHE_ECDSA_CAMELLIA_128_CBC_SHA256
TLS_ECDHE_ECDSA_CAMELLIA_256_CBC_SHA384
TLS_ECDHE_ECDSA_AES_128_CBC_SHA256
TLS_ECDHE_RSA_AES_128_CBC_SHA256
TLS_ECDHE_ECDSA_CAMELLIA_128_GCM_SHA256
TLS_ECDHE_ECDSA_CAMELLIA_256_GCM_SHA384
TLS_ECDHE_ECDSA_AES_128_GCM_SHA256
TLS_ECDHE_ECDSA_AES_256_GCM_SHA384
TLS_ECDHE_RSA_AES_128_GCM_SHA256
TLS_ECDHE_RSA_AES_256_GCM_SHA384
TLS_ECDHE_ECDSA_AES_256_CBC_SHA384
TLS_ECDHE_RSA_CAMELLIA_128_GCM_SHA256
TLS_ECDHE_RSA_CAMELLIA_256_GCM_SHA384
TLS_ECDHE_RSA_CHACHA20_POLY1305
TLS_ECDHE_ECDSA_CHACHA20_POLY1305
TLS_ECDHE_ECDSA_AES_128_CCM
TLS_ECDHE_ECDSA_AES_256_CCM
TLS_ECDHE_ECDSA_AES_128_CCM_8
TLS_ECDHE_ECDSA_AES_256_CCM_8
TLS_ECDHE_PSK_3DES_EDE_CBC_SHA1
TLS_ECDHE_PSK_AES_128_CBC_SHA1
TLS_ECDHE_PSK_AES_256_CBC_SHA1
TLS_ECDHE_PSK_AES_128_CBC_SHA256
TLS_ECDHE_PSK_AES_256_CBC_SHA384
TLS_ECDHE_PSK_ARCFOUR_128_SHA1
TLS_ECDHE_PSK_NULL_SHA1
TLS_ECDHE_PSK_NULL_SHA256
TLS_ECDHE_PSK_NULL_SHA384
TLS_ECDHE_PSK_CAMELLIA_128_CBC_SHA256
TLS_ECDHE_PSK_CAMELLIA_256_CBC_SHA384
TLS_PSK_ARCFOUR_128_SHA1
TLS_PSK_3DES_EDE_CBC_SHA1
TLS_PSK_AES_128_CBC_SHA1
TLS_PSK_AES_256_CBC_SHA1
TLS_PSK_AES_128_CBC_SHA256
TLS_PSK_AES_256_GCM_SHA384
TLS_PSK_CAMELLIA_128_GCM_SHA256
TLS_PSK_CAMELLIA_256_GCM_SHA384
TLS_PSK_AES_128_GCM_SHA256
TLS_PSK_NULL_SHA1
TLS_PSK_NULL_SHA256
TLS_PSK_CAMELLIA_128_CBC_SHA256
TLS_PSK_CAMELLIA_256_CBC_SHA384
TLS_PSK_AES_256_CBC_SHA384
TLS_PSK_NULL_SHA384
TLS_RSA_PSK_ARCFOUR_128_SHA1
TLS_RSA_PSK_3DES_EDE_CBC_SHA1
TLS_RSA_PSK_AES_128_CBC_SHA1
TLS_RSA_PSK_AES_256_CBC_SHA1
TLS_RSA_PSK_CAMELLIA_128_GCM_SHA256
TLS_RSA_PSK_CAMELLIA_256_GCM_SHA384
TLS_RSA_PSK_AES_128_GCM_SHA256
TLS_RSA_PSK_AES_128_CBC_SHA256
TLS_RSA_PSK_NULL_SHA1
TLS_RSA_PSK_NULL_SHA256
TLS_RSA_PSK_AES_256_GCM_SHA384
TLS_RSA_PSK_AES_256_CBC_SHA384
TLS_RSA_PSK_NULL_SHA384
TLS_RSA_PSK_CAMELLIA_128_CBC_SHA256
TLS_RSA_PSK_CAMELLIA_256_CBC_SHA384
TLS_DHE_PSK_ARCFOUR_128_SHA1
TLS_DHE_PSK_3DES_EDE_CBC_SHA1
TLS_DHE_PSK_AES_128_CBC_SHA1
TLS_DHE_PSK_AES_256_CBC_SHA1
TLS_DHE_PSK_AES_128_CBC_SHA256
TLS_DHE_PSK_AES_128_GCM_SHA256
TLS_DHE_PSK_NULL_SHA1
TLS_DHE_PSK_NULL_SHA256
TLS_DHE_PSK_NULL_SHA384
TLS_DHE_PSK_AES_256_CBC_SHA384
TLS_DHE_PSK_AES_256_GCM_SHA384
TLS_DHE_PSK_CAMELLIA_128_CBC_SHA256
TLS_DHE_PSK_CAMELLIA_256_CBC_SHA384
TLS_DHE_PSK_CAMELLIA_128_GCM_SHA256
TLS_DHE_PSK_CAMELLIA_256_GCM_SHA384
TLS_PSK_AES_128_CCM
TLS_PSK_AES_256_CCM
TLS_DHE_PSK_AES_128_CCM
TLS_DHE_PSK_AES_256_CCM
TLS_PSK_AES_128_CCM_8
TLS_PSK_AES_256_CCM_8
TLS_DHE_PSK_AES_128_CCM_8
TLS_DHE_PSK_AES_256_CCM_8
TLS_DHE_PSK_CHACHA20_POLY1305
TLS_ECDHE_PSK_CHACHA20_POLY1305
TLS_RSA_PSK_CHACHA20_POLY1305
TLS_PSK_CHACHA20_POLY1305
TLS_DH_ANON_ARCFOUR_128_MD5
TLS_DH_ANON_3DES_EDE_CBC_SHA1
TLS_DH_ANON_AES_128_CBC_SHA1
TLS_DH_ANON_AES_256_CBC_SHA1
TLS_DH_ANON_CAMELLIA_128_CBC_SHA256
TLS_DH_ANON_CAMELLIA_256_CBC_SHA256
TLS_DH_ANON_CAMELLIA_128_CBC_SHA1
TLS_DH_ANON_CAMELLIA_256_CBC_SHA1
TLS_DH_ANON_AES_128_CBC_SHA256
TLS_DH_ANON_AES_256_CBC_SHA256
TLS_DH_ANON_AES_128_GCM_SHA256
TLS_DH_ANON_AES_256_GCM_SHA384
TLS_DH_ANON_CAMELLIA_128_GCM_SHA256
TLS_DH_ANON_CAMELLIA_256_GCM_SHA384
TLS_ECDH_ANON_NULL_SHA1
TLS_ECDH_ANON_3DES_EDE_CBC_SHA1
TLS_ECDH_ANON_AES_128_CBC_SHA1
TLS_ECDH_ANON_AES_256_CBC_SHA1
TLS_ECDH_ANON_ARCFOUR_128_SHA1
TLS_SRP_SHA_3DES_EDE_CBC_SHA1
TLS_SRP_SHA_AES_128_CBC_SHA1
TLS_SRP_SHA_AES_256_CBC_SHA1
TLS_SRP_SHA_DSS_3DES_EDE_CBC_SHA1
TLS_SRP_SHA_RSA_3DES_EDE_CBC_SHA1
TLS_SRP_SHA_DSS_AES_128_CBC_SHA1
TLS_SRP_SHA_RSA_AES_128_CBC_SHA1
TLS_SRP_SHA_DSS_AES_256_CBC_SHA1
TLS_SRP_SHA_RSA_AES_256_CBC_SHA1
TLS_GOSTR341112_256_28147_CNT_IMIT
Certificate types
CTYPE-X.509
CTYPE-Raw Public Key
Protocols
VERS-TLS1.0
VERS-TLS1.1
VERS-TLS1.2
VERS-TLS1.3
VERS-DTLS0.9
VERS-DTLS1.0
VERS-DTLS1.2
Ciphers
AES-256-CBC
AES-192-CBC
AES-128-CBC
AES-128-GCM
AES-192-GCM
AES-256-GCM
AES-128-CCM
AES-256-CCM
AES-128-CCM-8
AES-256-CCM-8
ARCFOUR-128
ESTREAM-SALSA20-256
SALSA20-256
CHACHA20-32
CHACHA20-64
CAMELLIA-256-CBC
CAMELLIA-192-CBC
CAMELLIA-128-CBC
CHACHA20-POLY1305
CAMELLIA-128-GCM
CAMELLIA-256-GCM
GOST28147-TC26Z-CFB
GOST28147-CPA-CFB
GOST28147-CPB-CFB
GOST28147-CPC-CFB
GOST28147-CPD-CFB
AES-128-CFB8
AES-192-CFB8
AES-256-CFB8
AES-128-XTS
AES-256-XTS
AES-128-SIV
AES-256-SIV
GOST28147-TC26Z-CNT
3DES-CBC
DES-CBC
RC2-40
NULL
MACs
SHA1
SHA256
SHA384
SHA512
SHA224
UMAC-96
UMAC-128
AEAD
MD5
GOSTR341194
STREEBOG-256
STREEBOG-512
AES-CMAC-128
AES-CMAC-256
AES-GMAC-128
AES-GMAC-192
AES-GMAC-256
GOST28147-TC26Z-IMIT
Digests
SHA1
SHA256
SHA384
SHA512
SHA224
MD5
GOSTR341194
STREEBOG-256
STREEBOG-512
Key exchange algorithms
ECDHE-RSA
ECDHE-ECDSA
RSA
DHE-RSA
DHE-DSS
PSK
RSA-PSK
DHE-PSK
ECDHE-PSK
SRP-DSS
SRP-RSA
SRP
ANON-DH
ANON-ECDH
VKO-GOST-12
RSA-EXPORT
Compression
COMP-NULL
Groups
GROUP-SECP192R1
GROUP-SECP224R1
GROUP-SECP256R1
GROUP-SECP384R1
GROUP-SECP521R1
GROUP-X25519
GROUP-GC256B
GROUP-GC512A
GROUP-X448
GROUP-FFDHE2048
GROUP-FFDHE3072
GROUP-FFDHE4096
GROUP-FFDHE6144
GROUP-FFDHE8192
Public Key Systems
RSA
RSA-PSS
RSA
DSA
GOST R 34.10-2012-512
GOST R 34.10-2012-256
GOST R 34.10-2001
EC/ECDSA
EdDSA (Ed25519)
EdDSA (Ed448)
DH
ECDH (X25519)
ECDH (X448)
PK-signatures
SIGN-RSA-SHA256
SIGN-RSA-SHA384
SIGN-RSA-SHA512
SIGN-RSA-PSS-SHA256
SIGN-RSA-PSS-RSAE-SHA256
SIGN-RSA-PSS-SHA384
SIGN-RSA-PSS-RSAE-SHA384
SIGN-RSA-PSS-SHA512
SIGN-RSA-PSS-RSAE-SHA512
SIGN-EdDSA-Ed25519
SIGN-EdDSA-Ed448
SIGN-ECDSA-SHA256
SIGN-ECDSA-SHA384
SIGN-ECDSA-SHA512
SIGN-ECDSA-SECP256R1-SHA256
SIGN-ECDSA-SECP384R1-SHA384
SIGN-ECDSA-SECP521R1-SHA512
SIGN-ECDSA-SHA3-224
SIGN-ECDSA-SHA3-256
SIGN-ECDSA-SHA3-384
SIGN-ECDSA-SHA3-512
SIGN-RSA-SHA3-224
SIGN-RSA-SHA3-256
SIGN-RSA-SHA3-384
SIGN-RSA-SHA3-512
SIGN-DSA-SHA3-224
SIGN-DSA-SHA3-256
SIGN-DSA-SHA3-384
SIGN-DSA-SHA3-512
SIGN-RSA-RAW
SIGN-RSA-SHA1
SIGN-RSA-SHA1
SIGN-RSA-SHA224
SIGN-RSA-RMD160
SIGN-DSA-SHA1
SIGN-DSA-SHA1
SIGN-DSA-SHA224
SIGN-DSA-SHA256
SIGN-RSA-MD5
SIGN-RSA-MD5
SIGN-RSA-MD2
SIGN-ECDSA-SHA1
SIGN-ECDSA-SHA224
SIGN-GOSTR341012-512
SIGN-GOSTR341012-256
SIGN-GOSTR341001
SIGN-DSA-SHA384
SIGN-DSA-SHA512
